
There is just something utterly heartwarming about the smell of a baked fruit pastry filling your kitchen, isn’t there? It instantly makes everything feel cozy and right. If you’ve ever scrolled past those gorgeous, flaky pastries and thought, “I wish I had time for that,” well, I have wonderful news for you! Today, we’re making an Easy Puff Pastry Apple Strudel, and I promise it’s ridiculously simple. Forget wrestling with hand-stretched dough; we’re using store-bought pastry to get that buttery crunch without any fuss. This dessert proves that the best flavor comes from great ingredients, not complicated methods. Trust me, this is going straight into your rotation!
- Why This Easy Apple Strudel Recipe Works for Your Kitchen
- Gathering Ingredients for Your Puff Pastry Apple Strudel
- Step-by-Step Instructions for the Best Apple Strudel Filling
- Assembling Your Easy Apple Strudel
- Baking Your Golden Apple Strudel to Perfection
- Tips for the Ultimate Apple Strudel Experience
- Serving Suggestions for Your Sweet Apple Bake
- Storing and Reheating Leftover Apple Strudel
- Frequently Asked Questions About Apple Strudel
Why This Easy Apple Strudel Recipe Works for Your Kitchen
I developed this recipe because I needed incredible flavor without spending half a Saturday fussing over dough. It hits all the right notes for a busy home cook like me. Plus, it looks stunning on a platter!
- It’s an amazing Quick Apple Dessert—ready in under an hour total!
- The store-bought puff pastry guarantees those beautiful, golden, flaky layers every single time.
- It delivers the deep spice mix you expect in a classic Flaky Apple Tart but with zero stress.
- Granny Smith apples keep the filling wonderfully tart so it isn’t overly sweet.
Gathering Ingredients for Your Puff Pastry Apple Strudel
Okay, let’s get organized! Since we are leaning into an easy version, the convenience of store-bought puff pastry is our secret weapon. Seriously, it saves so much time, and you still get that spectacular, buttery crunch. Make sure you pull that package out of the freezer the night before so it can thaw gently in the fridge. It needs to be cold but pliable, not sticky!
For the filling, we are piling on the flavor. You’ll need 4 big Granny Smith apples—remember, we want tartness to balance the sweet. Make sure they are peeled, cored, and thinly sliced; don’t worry about perfect uniformity, this is rustic baking! Grab your sugars—we use both granulated and light brown sugar for depth. Don’t forget the cinnamon, nutmeg, raisins, and those chopped pecans because every great homemade apple dessert needs a little crunch. Everything else is pantry staples, including a little melted butter to keep things luscious.
Step-by-Step Instructions for the Best Apple Strudel Filling
Now that we have the star ingredients ready to go, let’s focus on assembling what I think is the absolute heart of this pastry: the filling. If you get this right, you’ve already won half the battle for making the best apple strudel imaginable. We’re creating what I lovingly call the Best Apple Strudel Filling right here!
Preparing the Spiced Apple Mixture
First things first: I always use Granny Smith apples for this recipe. They hold their shape beautifully while baking and provide that perfect sharp counterpoint to the sugar. If you use a sweeter apple, you risk a mushy filling, and we absolutely do not want that.
In your large mixing bowl—the one that held your sliced apples—toss in both the granulated and light brown sugar. Add in your flour; this little bit of flour is crucial because it thickens up the juices the apples release, preventing a soggy bottom. Now, sprinkle in that cinnamon and nutmeg. Don’t be shy with the cinnamon; it brings that amazing aroma! Gently toss everything until those apple slices are thoroughly coated. Then, fold in the raisins and chopped pecans. Toss one last time with care. See? That mixture is already giving off the best smell—it’s what makes this whole German Apple Pastry dream come true!
Assembling Your Easy Apple Strudel
This is where the magic happens, and honestly, this is the easiest part because we aren’t fighting with dough that wants to shrink back on us! We have two sheets of puff pastry, and we treat them like two separate little wrapping presents. Remember, we want that unbelievably flaky texture, which is why we only use the store-bought option here. We’re aiming for that perfect Warm Apple Pastry finish!
Laying Out and Filling the Puff Pastry Apple Strudel
Preheat those ovens to 400°F right now so they’re ready when we are! Take one thawed sheet of your puff pastry and gently unfold it onto your parchment-lined baking sheet. If it’s rectangular, just make sure the longest side is facing you—this helps with rolling a nice tight log. Now, take half of that gorgeous apple filling we just made and spoon it right down the center. You need to leave about a 2-inch border clear on all sides; this is essential for sealing later! Once the apples are nestled in, dot that filling with half of your melted butter. It just melts right in and keeps everything wonderfully moist.
Sealing and Finishing the Warm Apple Pastry
Time to seal it up! Fold the long sides of the pastry over the filling, letting the edges overlap just a tiny bit—maybe a quarter inch—and firmly press those seams closed with your fingers. Then, fold those short ends underneath, tucking them tightly to trap all those delicious juices inside. Repeat this entire process with your second sheet of pastry and the remaining filling. You should now have two beautiful, plump logs ready for their golden coat.
In a tiny bowl, whisk that one egg with 2 tablespoons of milk or water—that’s your egg wash. Brush this all over the tops of both strudels evenly. This wash is what gives you that beautiful, shiny, golden look on your finished Easy Apple Strudel! Finally, take a sharp knife and cut 3 or 4 small slits across the top of each one. These little vents are crucial; they let the steam escape so the pastry stays flaky and doesn’t burst open somewhere strange!
Baking Your Golden Apple Strudel to Perfection
Alright, we’ve mixed, we’ve folded, and now these beauties are ready for some heat! Since we are dealing with such beautiful, flaky pastry, we need a nice hot oven to ensure the pastry puffs up quickly and sets before the filling releases too much liquid. Preheat your oven to 400 degrees F (200 degrees C) right now. Don’t rush this step; having that blast of hot air helps create those incredible, airy layers we love so much in a Baking with Apples project.
Set those two gorgeous logs onto the baking sheet. They don’t need much room, but make sure they aren’t touching. Pop them into that hot oven for about 25 to 30 minutes. You are watching for two things here: first, the pastry needs to look deeply golden brown and completely puffed up. Second, you should see that filling bubbling slightly up through the steam vents you cut—that’s how you know the apples inside are perfectly tender.
Once they hit that perfect color, pull them out. This part is tough, but you absolutely have to listen to me on this: let them cool on the baking sheet for at least 15 minutes before you even think about slicing. If you saw them while they are too hot, all those lovely apple juices just flood out, and you end up with a soupy mess instead of a tight, delicious cross-section. Waiting patiently ensures you get that flaky texture right down to the very last bite of your apple strudel!
Tips for the Ultimate Apple Strudel Experience
Achieving that truly spectacular, bakery-worthy result comes down to a couple of little tricks I’ve learned over the years. These aren’t steps in the main recipe, but little nudges that elevate our simple Cinnamon Apple Dessert from good to gasp-worthy!
First, if you find your pastry is slightly sticking to the parchment paper after baking, brush it again with a little melted butter right when it comes out of the oven. That extra fat really helps keep the bottom layers from getting soggy while the pastry cools.
If you want that truly impressive sheen, don’t skip the heavy dusting of powdered sugar. It settles into the flaky cracks beautifully. And here’s my favorite tip for presentation: serve it warm, but not piping hot. Warm means the filling is gooey, but cooled enough that the pastry shell stays crisp. It’s the perfect texture contrast! For more inspiration on getting bakery textures at home, you should check out my guide on the best scones recipe; the principles of flaky layers transfer over!
Serving Suggestions for Your Sweet Apple Bake
Okay, the hard part is over! Your beautiful, golden apple strudel is out of the oven, it’s cooled just enough, and now it’s time for the presentation—which is almost as fun as the baking!
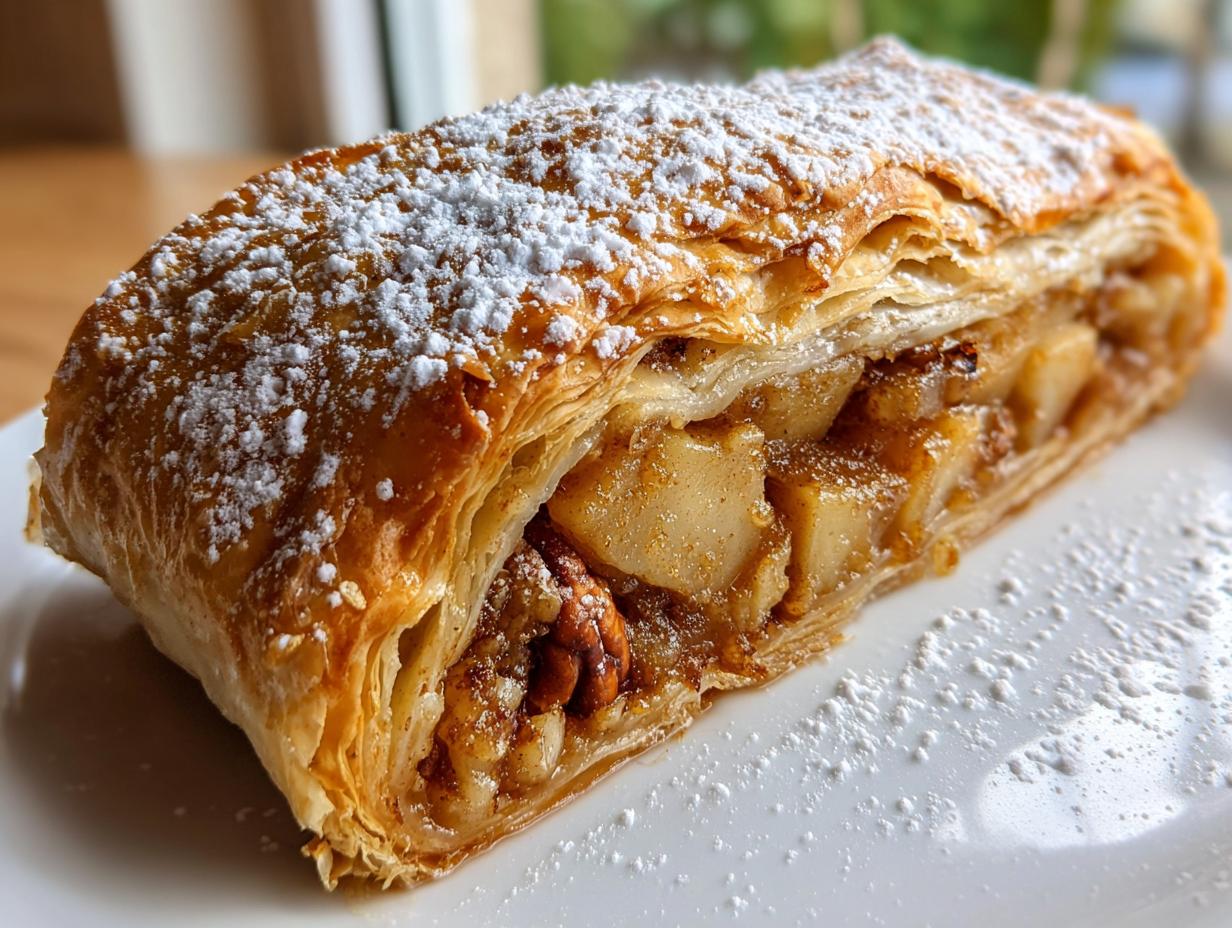
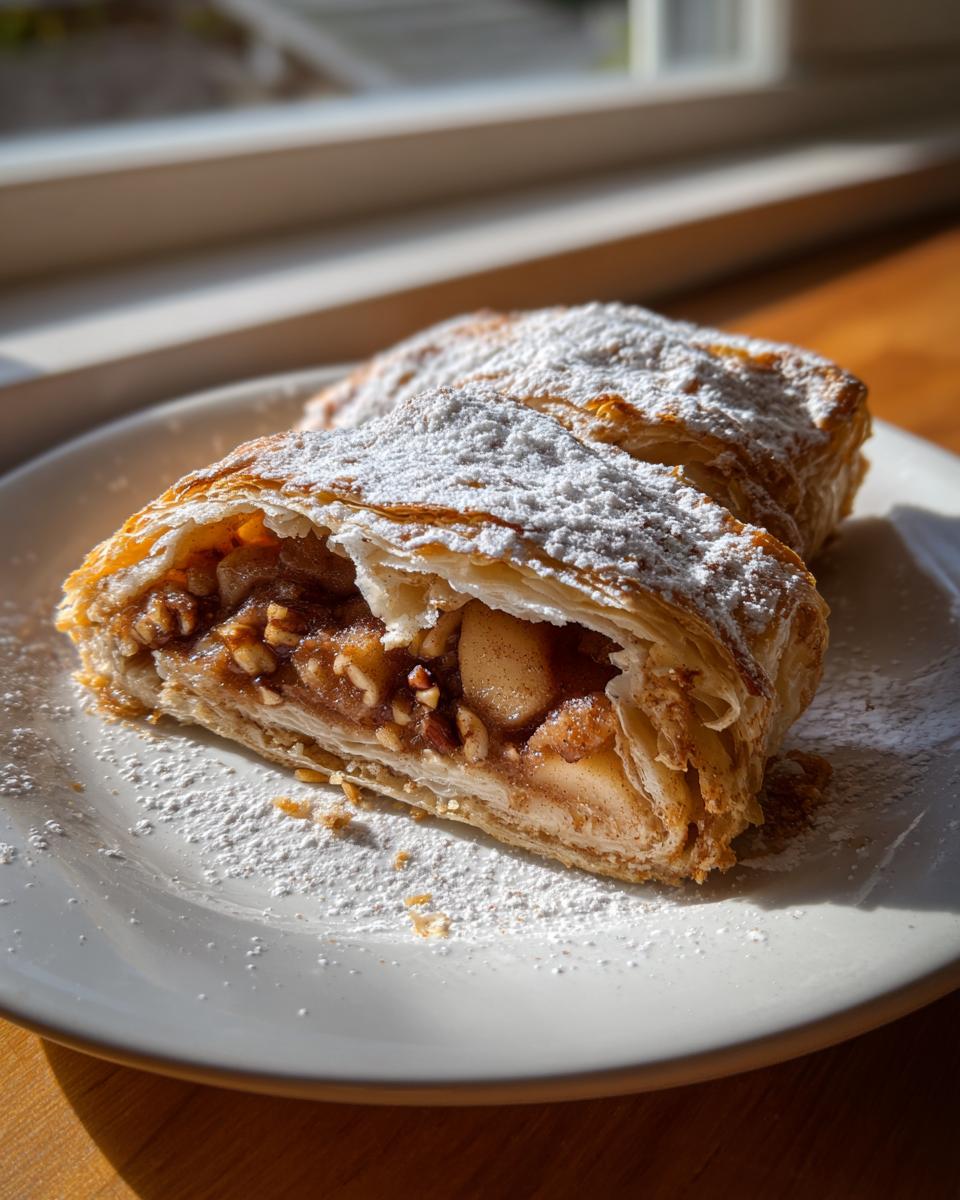
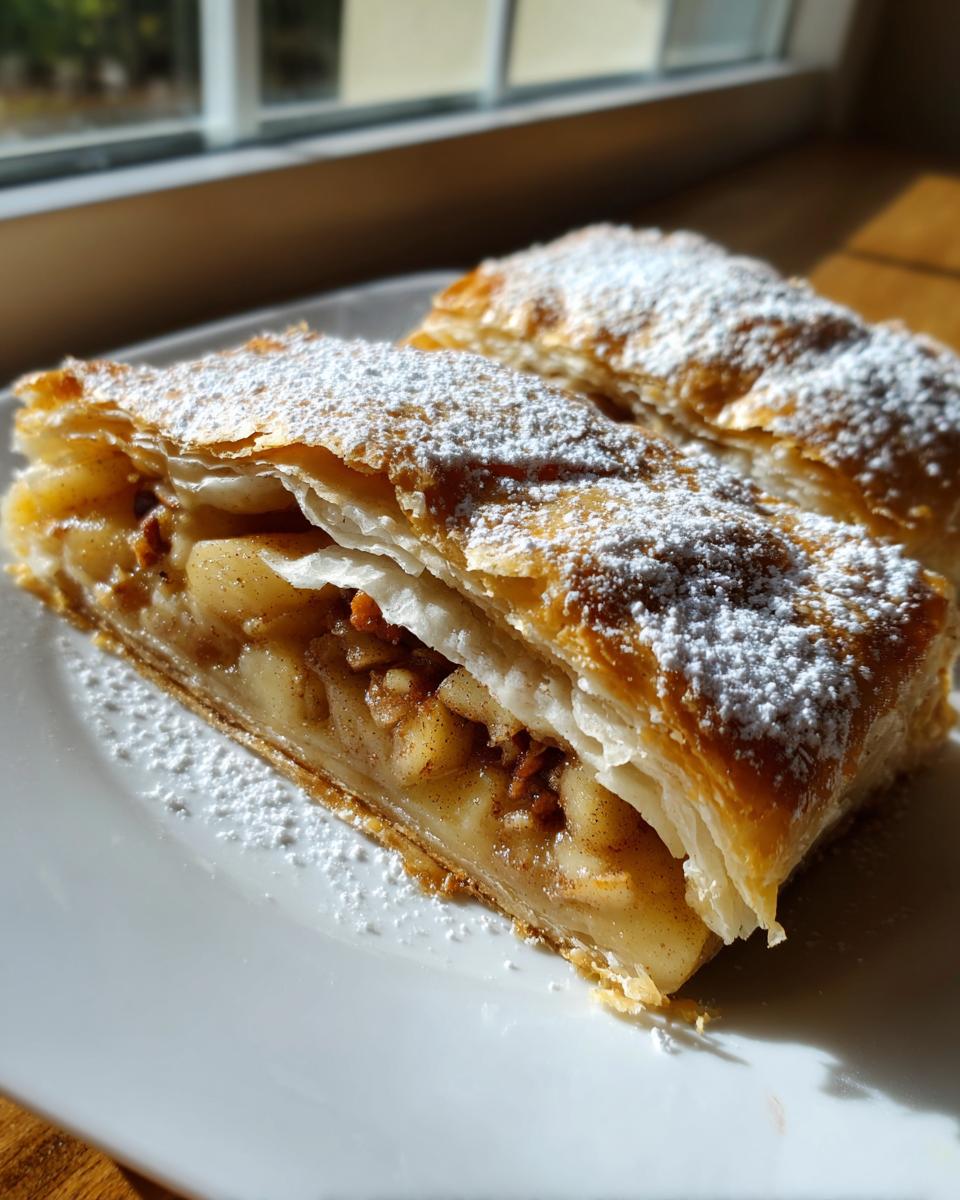
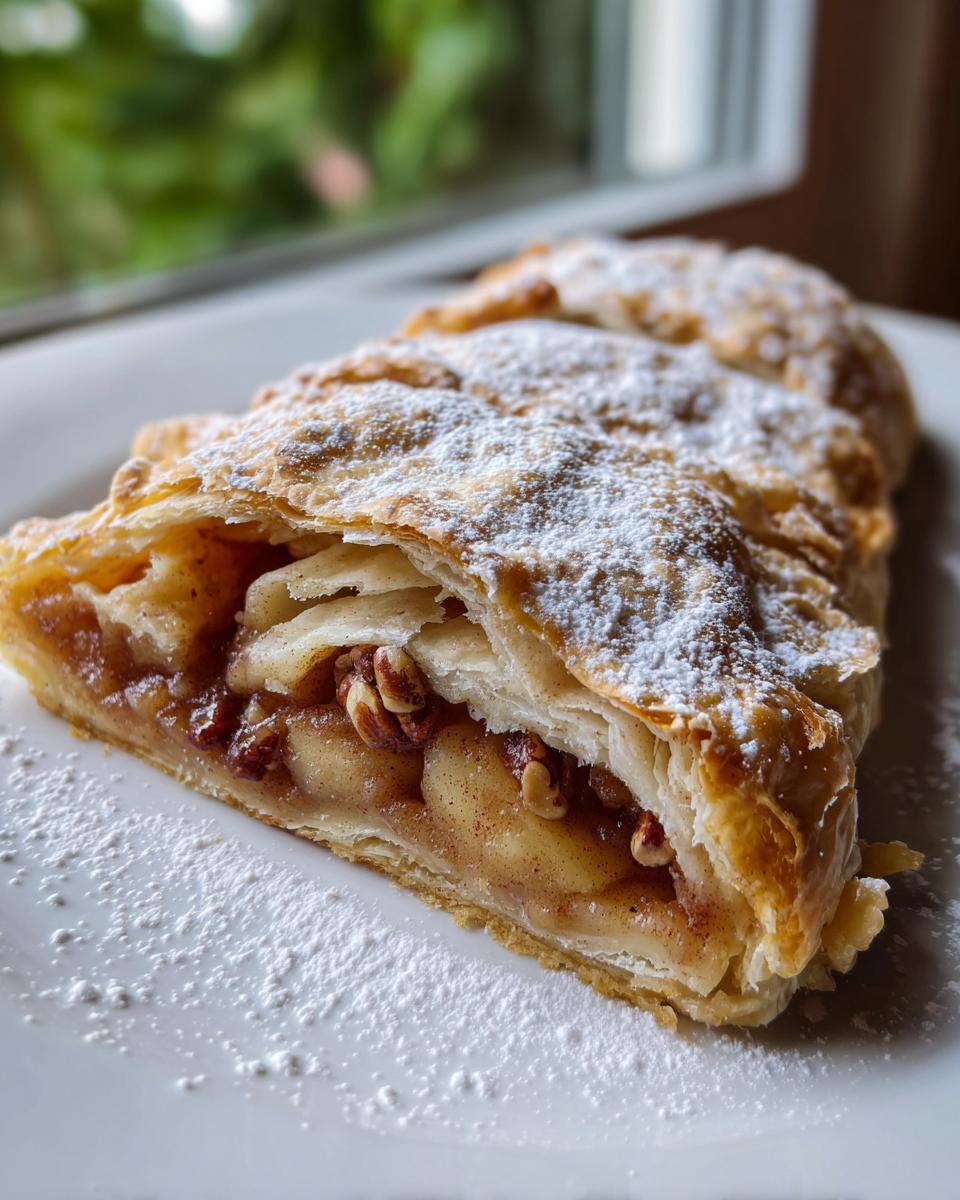
When I serve this Sweet Apple Bake, I like to keep things simple but elegant. The classic, undeniable finish is a generous dusting of powdered sugar right across the top. It melts slightly into those warm flakes, giving you that beautiful contrast between pure white and golden brown. It just screams holiday gathering or cozy evening!
But if you want to turn this simple Fall Baking Recipe into a true showstopper, you have to go for the ice cream pairing. Seriously, a scoop of high-quality vanilla bean ice cream melting slowly over a warm slice of apple strudel is unbeatable. The cold creaminess against the warm, spiced fruit and flaky crust? That’s pure magic, folks. It’s the perfect way to enjoy this as a rich Winter Comfort Food.

For those who like a little more tang, sometimes I’ll mix a tiny bit of fresh lemon zest into the powdered sugar before dusting. It brightens up all those deep cinnamon and nutmeg flavors. Just remember, whatever you choose, slice it with a serrated knife to preserve those flaky layers!
Storing and Reheating Leftover Apple Strudel
Now, this apple strudel is so good, you might actually have leftovers, though I doubt it! But just in case you do, or maybe you baked it a day ahead for a party, you need to treat this delicate pastry right so it tastes just as good the next day.
The biggest enemy of pastry fluffiness is air. So, once the strudel has cooled completely—and I mean completely, otherwise condensation will make it soggy—you need to tuck it away. I always use a large, airtight container. If you don’t have one big enough, plastic wrap works, but make sure that pastry is snugly wrapped on all sides. Stored on the counter, it holds up beautifully for about two days. If it’s been longer, pop it into the fridge, though I’d recommend no more than four days.
When you’re ready to bring it back to life, forget the microwave! Microwaves are the enemy of crisp pastry; they just make things soft and chewy. We need heat applied gently to re-crisp those layers. The best way to reheat a slice of this Puff Pastry Apple Strudel is in a toaster oven or a regular oven set to about 325°F for about 8 to 10 minutes.
If you’re reheating the whole log, give it about 15 minutes at that lower temperature. You want it warm through the middle, but you also want that gorgeous golden crust to snap when you cut into it. It’s the perfect way to enjoy this comfort food again tomorrow! Maybe you can even try freezing any leftovers; I actually have some great tips on freezing things that I talk about in my post on freezer jam that apply to baked goods too, just make sure to wrap it super tight!
Frequently Asked Questions About Apple Strudel
I know sometimes questions pop up once you get into the actual baking process, and that’s totally normal! I’ve pulled together some of the things folks ask me most often about this little pastry adventure. If you’ve got a burning question about how to get this German Apple Pastry just right, odds are it’s answered below!
Can I make this Apple Strudel Recipe ahead of time?
Yes, you absolutely can assemble this ahead of time, which makes it perfect for holiday mornings! Assemble the strudel completely—folding in the filling and sealing the pastry—and brush it with the egg wash. But here’s the key: cover it tightly with plastic wrap and stick it in the fridge. You can have it ready to go for up to 12 hours. When you’re ready to bake, take it out of the fridge while the oven preheats, but don’t let it sit out too long. It needs that chill for the puff pastry to bake properly.
What is the difference between Apfelstrudel and a regular apple pie?
This is a fun one! The main difference really comes down to the dough and the shape. A traditional Apfelstrudel uses dough that is stretched paper-thin until you can almost read a newspaper through it, and it’s rolled up like a jelly roll. Our **Puff Pastry Apple Strudel** uses pre-made, flaky pastry folded over like a log, which creates those wonderful, thicker layers. Pie dough is generally thicker and enclosed in a dish, while strudel is always a free-form log baked directly on a sheet pan.
What apples are best for this Puff Pastry Apple Strudel?
For me, there is no substitute for Granny Smith apples here. They are firm, tart, and they resist breaking down into mush when baked. When you combine that tartness with the sweetness of the brown sugar and the warmth of the cinnamon, you get that perfect, balanced bite we are looking for in a truly excellent apple strudel. If you must substitute, look for Honeycrisp or Braeburn, but I always recommend prepping extra Granny Smiths just in case!
PrintEasy Puff Pastry Apple Strudel

Make this simple Apple Strudel using store-bought puff pastry for a flaky, golden dessert filled with warm, cinnamon-spiced apples. It is a quick and comforting homemade apple dessert perfect for any occasion.
- Prep Time: 20 min
- Cook Time: 30 min
- Total Time: 50 min
- Yield: 8 servings 1x
- Category: Dessert
- Method: Baking
- Cuisine: German
- Diet: Vegetarian
Ingredients
- 1 package (14.1 ounces) frozen puff pastry, thawed
- 4 large Granny Smith apples, peeled, cored, and thinly sliced
- 1/2 cup granulated sugar
- 1/4 cup packed light brown sugar
- 2 tablespoons all-purpose flour
- 1 teaspoon ground cinnamon
- 1/4 teaspoon ground nutmeg
- 1/4 cup raisins
- 1/4 cup chopped pecans or walnuts
- 2 tablespoons unsalted butter, melted
- 1 large egg, beaten (for egg wash)
- 2 tablespoons milk or water (for egg wash)
- Powdered sugar, for dusting
Instructions
- Preheat your oven to 400 degrees F (200 degrees C). Line a baking sheet with parchment paper.
- In a large bowl, combine the sliced apples, granulated sugar, brown sugar, flour, cinnamon, and nutmeg. Toss gently until the apples are evenly coated.
- Stir in the raisins and chopped nuts. This creates your best apple strudel filling.
- Unfold one sheet of thawed puff pastry onto the prepared baking sheet. If the pastry is rectangular, place it so the longer side faces you.
- Spoon half of the apple mixture in a line down the center of the pastry, leaving about a 2-inch border on all sides. Dot the filling with half of the melted butter.
- Fold the long sides of the pastry over the filling, overlapping them slightly. Press the seams together to seal. Fold the short ends under and press to seal.
- Repeat the filling and folding process with the second sheet of puff pastry.
- In a small bowl, whisk together the beaten egg and milk or water to create the egg wash. Brush the entire surface of both strudels evenly with the egg wash.
- Cut several small slits across the top of each strudel to allow steam to escape.
- Bake for 25 to 30 minutes, or until the pastry is golden brown and puffed and the filling is bubbling.
- Remove from the oven and let the strudel cool on the baking sheet for at least 15 minutes before slicing.
- Dust generously with powdered sugar before serving warm. This makes a great fall baking recipe.
Notes
- Serve this flaky apple tart warm with a scoop of vanilla ice cream for a classic pairing.
- For extra richness, brush the pastry with melted butter before applying the egg wash.
- If you prefer a sweeter glaze over powdered sugar, mix 1/2 cup powdered sugar with 1 tablespoon milk and drizzle over the cooled strudel.
Nutrition
- Serving Size: 1 slice
- Calories: 350
- Sugar: 28g
- Sodium: 150mg
- Fat: 18g
- Saturated Fat: 7g
- Unsaturated Fat: 11g
- Trans Fat: 0g
- Carbohydrates: 45g
- Fiber: 3g
- Protein: 4g
- Cholesterol: 40mg