
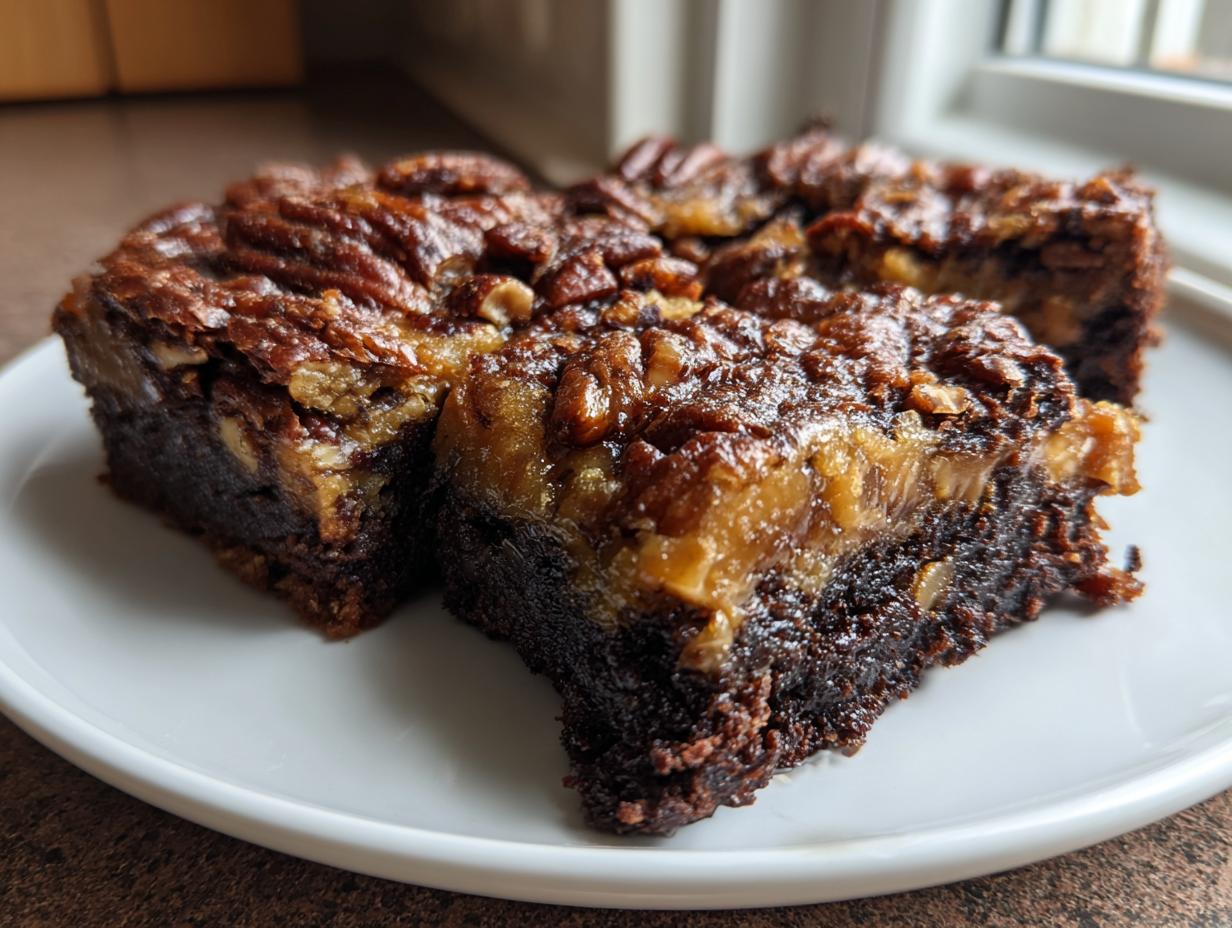
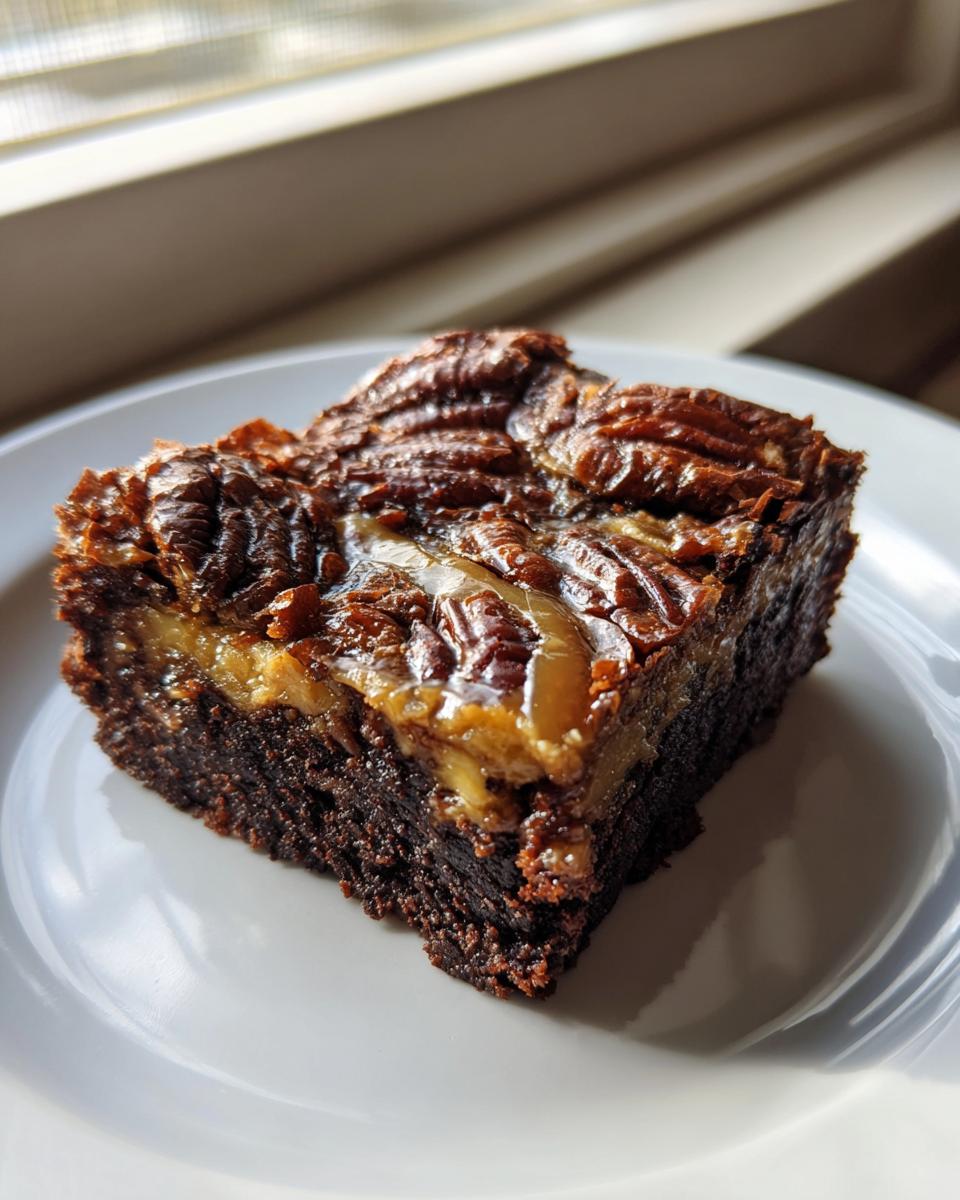
Listen, sometimes a dessert just needs to be *more*. You know what I mean? Why choose between that intensely rich, fudge-on-fudge brownie experience and that sweet, buttery, crunchy pecan pie topping when you can have both in one perfect square? That’s the philosophy here at HearthBite. I’m Sarah, and I developed this recipe because I believe life is too short for boring desserts, especially around the holidays. These pecan pie brownies are the ultimate dessert fusion! We nail that deep, dark, fudgy brownie base, and then we crown it with a gooey, buttery layer that absolutely sings. Trust me, these layered dessert bars are reliable, tested, and destined to become your new favorite comfort food. Check out our other comforting meals if you need dinner inspiration first!
- Why You Will Love These Ultimate Pecan Pie Brownies
- Gathering Ingredients for Perfect Pecan Pie Brownies
- Step-by-Step Guide to Making Pecan Pie Brownies
- Tips for Perfect Fudgy Pecan Pie Brownies
- Ingredient Notes and Substitutions for Pecan Pie Brownies
- Serving Suggestions for Your Pecan Pie Dessert
- Storage and Make-Ahead Options for Layered Dessert Bars
- Frequently Asked Questions About Pecan Pie Brownies
- Nutritional Estimates for These Decadent Chocolate Treats
- Share Your Ultimate Dessert Fusion Experience
Why You Will Love These Ultimate Pecan Pie Brownies
Honestly, once you try this combination, you might never go back to having your treats separate! We’ve taken the best qualities of two classic American desserts and smashed them together. Here’s exactly why these Ultimate Pecan Pie Brownies are about to become your go-to centerpiece for any gathering:
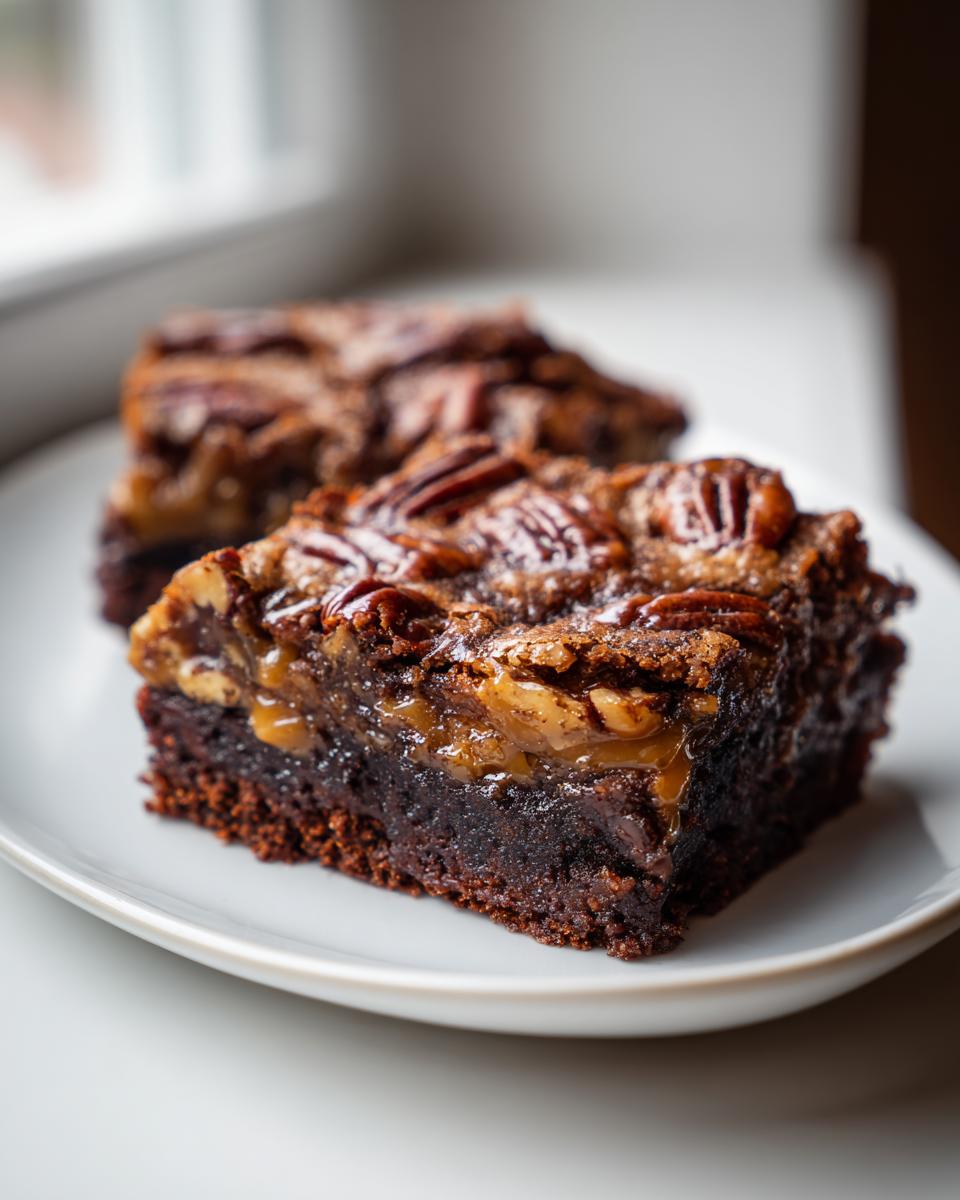
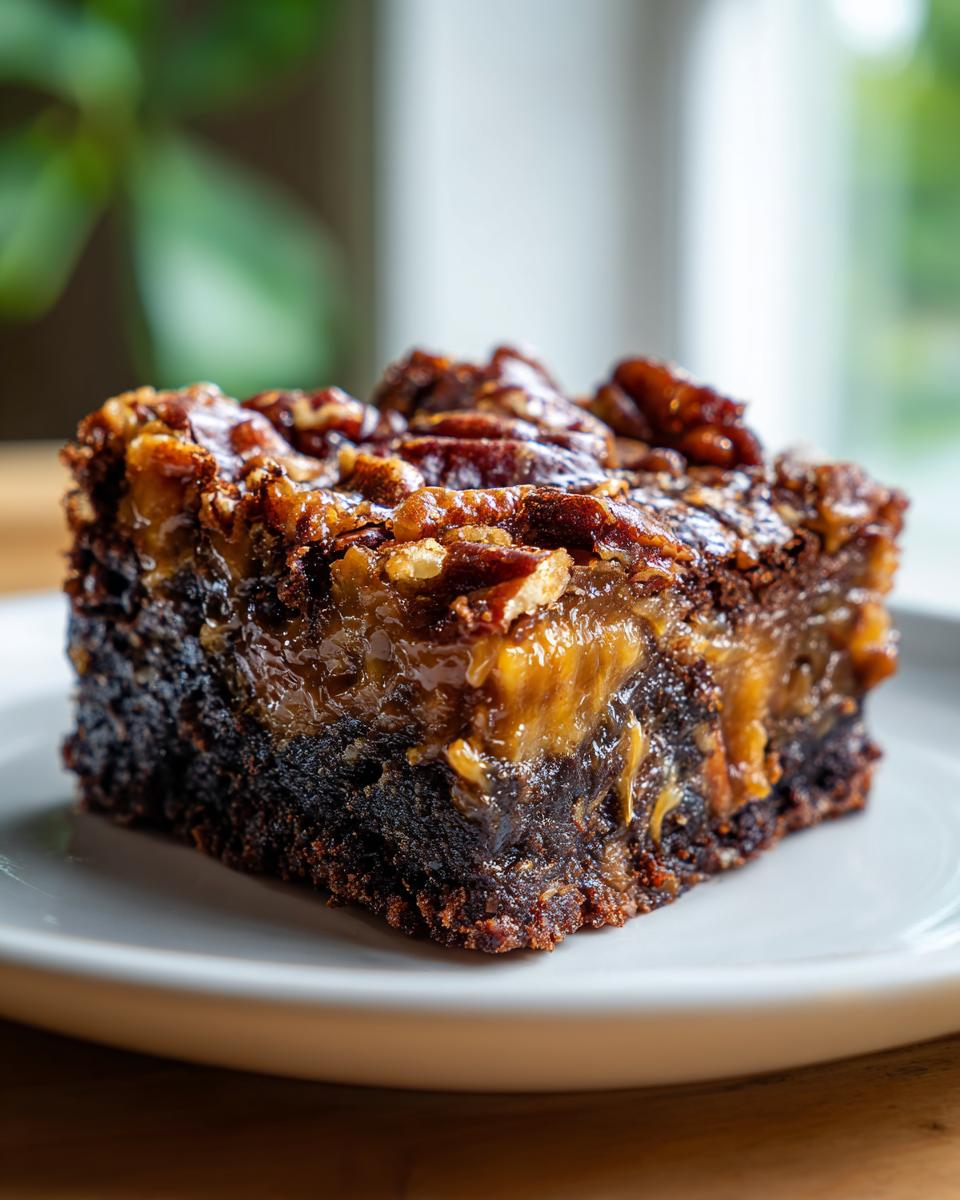
- The Texture Contrast is Everything: You get that super dense, melt-in-your-mouth, fudgy brownies layer on the bottom, which holds up perfectly to the incredibly gooey, sticky topping. It’s a textural dream!
- Instant Gratification with an Upgrade: We keep it simple by using a box mix for the base, which means less fuss! But we bump up the flavor so much that no one will ever guess it wasn’t completely from scratch. It’s my favorite kind of easy brownie hack.
- That Perfect Sweet and Salty Balance: That little drizzle of salted caramel isn’t just for show! It cuts through the richness of the chocolate and the sweetness of the pie filling perfectly. These are truly sweet and salty desserts done right.
- Crowd-Pleasing Power: Whether it’s Thanksgiving or just a random Tuesday, these layered dessert bars make people lean in for a second look (and definitely a second bite). They disappear fast!
- Rich and Decadent Appearance: Even though they are simple to assemble, these look like you spent hours layering them up for a fancy bakery display. They really deliver on the decadent chocolate treats promise.
- Nutty Crunch Factor: The toasted pecans aren’t an afterthought; they provide that necessary, satisfying crunch against the soft layers below and above them.
If you’re looking for more intensely chocolatey bakes, you must try my Fudgy Red Velvet Brownies next!
Gathering Ingredients for Perfect Pecan Pie Brownies
When you’re blending two iconic desserts, you have to treat the ingredients with respect! As I always say here at HearthBite, if the parts are good, the whole thing is going to be spectacular. Since we’re simplifying the brownie layer with a high-quality mix, we use that time saved to focus on making the pecan pie topping absolutely divine. Don’t stress about measuring everything perfectly; just gather what you need, keep it fresh, and we’ll build our beautiful layered dessert bars together.
I want your bars to be the highlight of any dessert board, so pay close attention to the details here. Speaking of delicious homemade toppings, if you ever need a little bonus treat, you have to check out my recipe for easy homemade soft and chewy sea salt caramels. They are amazing poured right over these!
For the Fudgy Brownie Base (Boxed Mix Upgrade)
This is where we save time without sacrificing that crucial, dense chocolate satisfaction. The box gives you the basics, but we tweak it slightly to ensure we get that perfect fudgy texture instead of a cakey one. Here’s what you’ll need from the directions on your box, plus my small upgrade:
- One box of your favorite brownie mix (about 18 ounces). We want the recipe that calls for only oil, water, and eggs for the fudgiest results.
- Egg(s) and Oil/Butter as directed on the box.
- My Secret Tip: If the box allows you to substitute water for milk or leftover brewed coffee—do it! Using milk or coffee instead of water makes the chocolate flavor deepen so much. Just make sure that liquid amount still aligns with the “fudgy brownie” instructions!
For the Gooey Pecan Pie Topping
This is the star layer, folks. This mixture has to be buttery, sweet, and perfectly viscous so it sets up nicely around the nuts without burning. Make sure your pecans are lightly toasted—it wakes up their flavor!
- Pecans: 1 1/2 cups of pecans, chopped and lightly toasted. Trust me on the toasting; it makes them crunchier!
- Sugars: We need a mix here: 1/2 cup of light brown sugar, packed tightly, and 1/4 cup of granulated sugar. The brown sugar brings that warm molasses note.
- The Goo Factor: 1/2 cup of light corn syrup is essential for that classic, gorgeous gooey set underneath the nuts.
- Fat and Binder: 1/4 cup (which is 4 tablespoons!) of unsalted butter, melted, plus 1 large egg to help everything bind together beautifully.
- Flavor Notes: Don’t forget 1 teaspoon of vanilla extract and 1/2 teaspoon of salt to balance the sweetness.
- For the Swirl: We absolutely need 1/4 cup of heavy cream and 1/4 cup of salted caramel sauce for that final, decadent drizzle.
Step-by-Step Guide to Making Pecan Pie Brownies
Alright, folks, the fun part! This is where we take those glorious components and turn them into the layered dessert bars we’ve been dreaming about. Since we are using a box mix for the base, the timing is actually pretty quick, but we *must* be gentle when we start stacking the layers. Remember, we are aiming for a fudgy bottom and a gooey top on these pecan pie brownies—we don’t want to accidentally mix everything together and lose that beautiful contrast.
First things first: get that oven heated up! We want to preheat to 325 degrees Fahrenheit. Also, don’t skip the parchment paper trick. It truly saves your sanity later when you have to lift these heavy, rich squares out of the pan. If you love easy, impressive bars, this process is fantastic.
Preparing the Pan and Brownie Layer for Pecan Pie Brownies
For a 9×13 inch pan, line it with parchment paper, making sure you leave a generous overhang on the two longer sides. That overhang is your handle! Now, mix up your brownie batter exactly as the box directs, keeping that fudgy result in mind (meaning, don’t add extra liquid unless you want cake!).
Pour that beautiful chocolate mixture into your prepared pan and spread it out evenly. You don’t need to bake this layer first—we’re doing the whole thing in one go. I know it seems wild, but the fudgy base cooks perfectly underneath that rich pecan layer. If you want to see another quick dessert hack I love, check out these easy pecan pie brownies for comparison!
Creating the Buttery Pecan Topping Mixture
While the oven is warming up, let’s tackle that topping. Grab a medium bowl—no need to dirty the mixer for this! We are going to whisk together the wet and sugary components first until they are totally smooth.
In that bowl, whisk together the brown sugar, granulated sugar, corn syrup, the melted butter, the egg, vanilla, and salt. It should look syrupy and slightly thick. Now, gently fold in those toasted pecans until they are evenly coated in that syrupy mix. Don’t go crazy stirring; we just want them distributed.
Layering and Swirling the Pecan Pie Brownies
This is the delicate part where we build our towers of flavor. Take that buttery pecan mixture you just made and carefully spoon it over the raw brownie batter layer. It’s important to spread it gently so you don’t dig down into the chocolate, but try to cover as much surface area as you can.
Once the topping is spread (it doesn’t have to be perfect; remember, cracks add character!), grab your salted caramel sauce. Drizzle it randomly all over the top. Now, take a butter knife or a small offset spatula and gently drag it through the caramel and the pecan layer just once or twice. That little bit of swirling creates gorgeous ribbons of caramel throughout the topping, truly transforming this into one of those decadent chocolate treats!
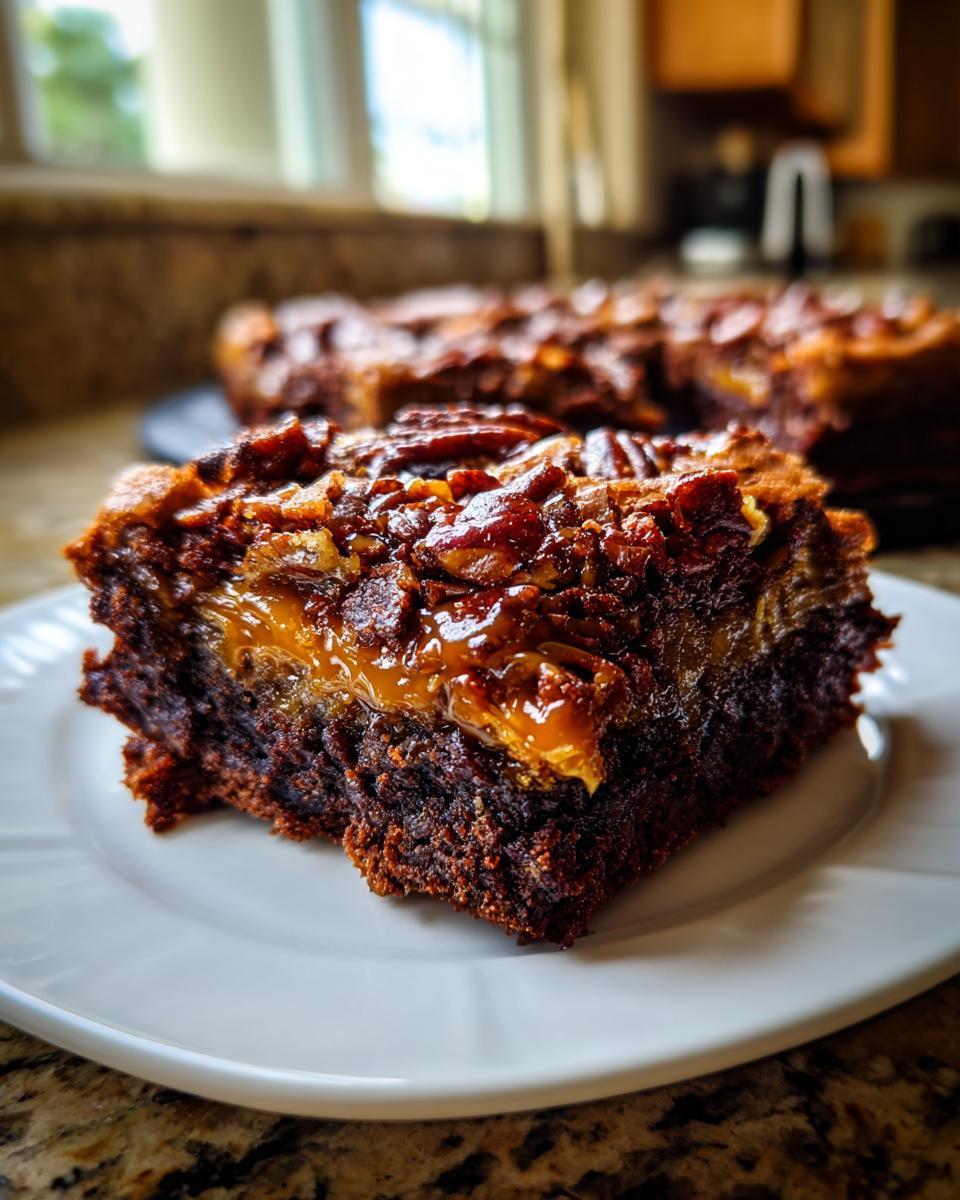
Slide that pan into the 325°F oven and bake for about 40 to 45 minutes. Remember the goal: the edges should look set, but when you test the center, you want moist crumbs clinging to the toothpick—not wet batter, but definitely not totally dry!
Tips for Perfect Fudgy Pecan Pie Brownies
Making these pecan pie brownies is easy because we use a box mix, but getting that perfect texture contrast takes just a little know-how. I’ve made enough batches to know exactly where things go wrong if you rush it! The biggest challenge here is keeping that bottom layer ultra-fudgy while ensuring the top sets enough that it doesn’t just run off when you cut it.
I learned a lot about patience making these, especially when dealing with that super gooey topping. If you want the very best results, keep Martha Stewart’s spirit in mind—precision pays off, even when you are taking a shortcut!
Don’t Overbake for Fudgy Results
This is the number one mistake people make with any brownie, and it’s doubly bad here because we have two layers to worry about! For the bottom layer to remain gloriously fudgy, you must pull these out of the oven when your test toothpick still shows moist crumbs attached. If that toothpick comes out totally clean, congratulations, you’ve made a chocolate pecan pie cake batter instead of a fudgy brownie!
It’s better to slightly underbake the center than to overbake it, especially because the residual heat in the pan (and the melting goo from the pecan topping) will finish cooking them as they cool. Keep that oven temperature at 325°F; anything higher and the topping will bake too fast while the base stays raw.
The Cooling Period is Non-Negotiable
I know, I know, they smell amazing right out of the oven, and the temptation to dig in is huge. But trust me on this: you need patience! If you try to cut these squares while they are warm, you end up with sticky, shapeless mounds of chocolate and pecan goo. That gooey topping needs time to firm up and adhere to the brownie base.
Let them cool completely on the counter—at least two hours, maybe longer if your kitchen is warm. If you absolutely cannot wait, stick the whole pan, wrapped loosely, into the fridge for an hour. That chilling process helps everything firm up beautifully so you get clean cuts, exactly like those pristine squares you see online. For more tips on achieving perfect textures, you can check out my guide on making fudgy chocolate crinkle cookies!
Why Toasting the Pecans Matters So Much
We want crunch—we need crunch! Raw pecans will soften slightly under that sticky corn syrup mixture, and honestly, they taste a bit drab. Toasting them before you toss them into the topping mixture wakes up all those rich, buttery oils.
It’s super simple: spread your chopped pecans on a dry baking sheet and pop them into that 325°F oven for about 8 to 10 minutes while you assemble your caramel swirl. Then, let them cool slightly before you stir them into the pecan pie mixture. This small step elevates these chocolate nut bars from good to absolutely unforgettable. For more insights on getting a good bake, sometimes I look at what other bakers are finding works well, like the advice in this article on pecan pie brownies.
Don’t Forget the Salt in That Swirl!
If you skip everything else, please don’t skip using salted caramel sauce for that final swirl on top! If you only have plain caramel, drizzle a little regular caramel and then sprinkle the tiniest pinch of flaky sea salt (like Maldon) over the top before it bakes. That hit of salt is what makes the entire bar feel sophisticated and keeps it from tasting overwhelmingly sugary. It cuts through the richness of the chocolate and makes you want another bite immediately!
Ingredient Notes and Substitutions for Pecan Pie Brownies
I always get so many questions when I post recipes that blend two favorites, and that’s great! It shows you’re paying attention. When we are dealing with these pecan pie brownies, the ingredients matter because the textures—fudgy vs. gooey—are relying on chemical reactions! I want you to feel totally confident tackling this, even if you’re missing one tiny thing in your pantry. As the founder of HearthBite, my job is to make sure our recipes work for *your* real-life kitchen.
We’re going to talk about swaps for the corn syrup and what happens if you’re out of pecans. Don’t worry; we won’t let a missing ingredient stop us from having that amazing chocolate pecan dessert experience!
Can I really use a brownie box mix?
Yes, absolutely! That’s one of the best easy brownie hacks we employ here. The bottom layer should set up firm enough to support the topping without getting cakey, which is why following your box’s instructions specifically for fudgy brownies is key. If your box gives you options for fudgy or cakey, choose the one that uses less liquid, oil, or water, depending on what they call for. It should look thick, not pourable like pancake batter, before it goes into the pan.
What can I use instead of corn syrup in the topping?
Corn syrup is the traditional ingredient that gives pecan pie that signature irresistible chewiness—it keeps the sugars from crystallizing too much. If you’re staring at your pantry and realizing you’re out of light corn syrup, don’t panic! You have a couple of options for your gooey pecan pie layer:
- Golden Syrup: This is the absolute closest swap. Use a 1:1 ratio. It behaves almost exactly the same way.
- Maple Syrup (Stronger Flavor): You can substitute with maple syrup, but know that the flavor will shift! You’ll get a lovely maple-pecan note, which is honestly delicious, too. I would use 3/4 cup of maple syrup for every 1/2 cup of corn syrup called for in the original recipe. Since maple syrup is thinner, the final topping might be *slightly* gooier, but it will still set.
If you’re looking for other ways to use corn syrup or maples in your baking for the holidays, you might want to check out my guide on making Southern banana pudding—it sometimes pops up as a substitute there, too!
Can I substitute the pecans?
If you have a nut allergy in the house or just ran out of pecans, you definitely have options, but remember that the name—and the crunch—will change! You have a few great choices for these rich dessert squares:
- Walnuts: Walnuts are the most common replacement for pecans in pie recipes. They have a slightly more earthy, sometimes bitter flavor that pairs wonderfully with dark chocolate. Make sure you toast them well!
- Almonds: Sliced or slivered almonds work nicely, providing a lighter crunch.
- Extra Crunch (No Nuts): If you need to go totally nut-free, you can replace the pecans with crushed pretzels or even crispy fried onions (oddly enough, they add a fantastic savory crunch that complements the caramel swirl!). Just use the same volume measurement.
Does the salted caramel have to be homemade?
Absolutely not! That’s the beauty of this layered dessert bars recipe; we are focusing on making the *structure* perfect. I included salted caramel sauce in the ingredient list because most people have a jar of store-bought caramel sauce lying around, or it is super easy to grab one. We save our energy for whipping up the core pecan pie mix!
If you do want to try making your own—and I highly recommend it for future baking adventures!—I have a full tutorial for homemade salted caramels. But for this recipe, grab what’s easy. The warm brownie layer will soften it up beautifully anyway!
Serving Suggestions for Your Pecan Pie Dessert
Now that you’ve pulled off this incredible textural feat—a fudgy brownie topped with a gooey, buttery pecan layer—the final step is presentation! These pecan pie brownies are so indulgent they basically stand up on their own, but a little extra love on the plate can turn them from a simple bar into the dessert centerpiece of your whole event. Since these are perfect for those cozy fall and winter gatherings, think about pairings that lean into that warmth and comfort.
When I serve these during the holidays, I always aim for a simple, elegant presentation that lets the chocolate and caramel shine. These aren’t the type of treats that need heavy frosting; they need a perfect counterpoint.
The Classic Pairing: Vanilla and Cream
You simply cannot go wrong dressing these up with something cold, rich, and creamy. The temperature contrast against the rich filling is just heavenly. I try to serve them slightly warmed (but not hot!) for the best gooey factor.
- A Scoop of Vanilla Bean Ice Cream: This is my absolute top suggestion. When you put a dollop of good vanilla bean ice cream right next to a warm square, the ice cream melts slightly into the caramel swirl. It’s messy, decadent, and totally worth it.
- Freshly Whipped Cream: If you don’t want ice cream melting everywhere, use homemade whipped cream. A simple dollop with maybe a tiny sprinkle of extra chopped pecans on top looks fantastic.
- Crème Fraîche: If you want something slightly less sweet but equally tangy, a small spoonful of crème fraîche adds an unexpectedly sophisticated tang that cuts the sweetness beautifully.
Beverage Pairings for Your Holiday Baked Goods
Because these bars are so rich—we’ve got chocolate, butter, syrup, and nuts all fighting for attention—you need a beverage that can stand up to that powerhouse of flavor. Think about what you’d serve with a slice of traditional pecan pie!
- Dark Roast Coffee: A strong, freshly brewed dark roast coffee is the backbone of any good post-dinner treat. The slight bitterness of the coffee balances the sweetness of the sugar and corn syrup in the topping. For the best experience, you should definitely try serving these alongside a side of my moist sour cream coffee cake, too!
- Bourbon or Dark Rum: For the adults at the party, a small pour of good bourbon acts just like a spice element in the dessert itself. It pairs unbelievably well with the toasted pecans.
- Milk (Yes, Really!): Don’t knock it ’til you try it! A tall, cold glass of whole milk with these pecan pie brownies sends me right back to childhood. It’s simple, nostalgic, and perfect for calming down that chocolate intensity.
Presentation for a Crowd
If you’re bringing these to a potluck or serving them as part of your Holiday Baked Goods spread, cut them into neat squares *after* they have cooled completely (this is crucial!). Arrange them neatly on a simple wooden board or a white platter. You can sprinkle a few extra toasted pecans or a light dusting of flaky sea salt across the top layer just before serving to make them pop!
Storage and Make-Ahead Options for Layered Dessert Bars
I totally get it—sometimes you need to bake ahead, especially when the holidays roll around and your oven space is already claimed by a turkey or a ham! The great news is that these chocolate nut bars actually benefit from a little chill time, which helps that gooey topping set up even better.
The key to keeping them perfect is airtight storage. Because we have rich chocolate on the bottom and that sticky, buttery layer on top, we need to protect them from drying out or absorbing any fridge odors. I learned the hard way that if you leave them uncovered, the topping gets weirdly tacky overnight!
Keeping Your Bars Fresh at Room Temperature
If you plan on eating these delicious bars within a day or two, you can absolutely keep them right on the counter. Because they set up so nicely after their initial cooling period, they are surprisingly stable! Just make sure you cut them after they are totally cool, or you’ll have slicing issues.
- Cut the cooled bars into individual squares.
- Arrange them in a single layer in an airtight container. If you absolutely must stack them, place a sheet of parchment paper or wax paper between each layer. This stops the sticky pecan topping from melding too much into the brownie layer above it.
- Store them at cool room temperature for up to 3 days. They should stay nicely fudgy and chewy.
Refrigerating for Extended Freshness
If you’re making these several days before you plan to serve them, or if your kitchen is just too warm, the fridge is your friend! The cold will firm up the brownie base substantially, making them almost incredibly dense and chewy—which some people prefer!
- Store them just as you would on the counter: in a tightly sealed, airtight container.
- They will keep beautifully in the refrigerator for up to a week.
- Pro Tip: If you pull them straight from the fridge, let them sit on the counter for about 20 to 30 minutes before serving. This allows the chocolate to soften slightly and the topping to regain some of that perfect gooey texture we worked so hard to achieve.
Can I Freeze These Chocolate Nut Bars?
Yes, you absolutely can freeze these! This makes them perfect for making way ahead of time for Thanksgiving or Christmas gatherings. Freezing works wonderfully because the layered structure holds up quite well once chilled solid.
- Cut the bars into individual squares first. This is much easier when they are cold!
- Wrap each square tightly in plastic wrap. Don’t skimp here—get a good seal.
- Place the tightly wrapped squares into a heavy-duty freezer bag or an airtight freezer container.
- They are good in the freezer for up to three months.
When you’re ready to enjoy them, you can thaw them right on the counter for a few hours, unwrapped, or you can even pop a frozen square in the microwave for about 15 seconds if you’re craving that warm, gooey moment immediately! For more ideas on how to prep ahead for the holidays, you might like my tips on making freezer jam, which saves so much stress later!
Frequently Asked Questions About Pecan Pie Brownies
I always love hearing what you all want to know once you see the finished product! Dealing with two layers means there are a few textures to manage, but these answers should cover the main things folks wonder about when making these show-stopping pecan pie brownies. These truly are that perfect intersection of easy baking and indulgence!
How do I guarantee that gooey texture in the pecan layer but keep the brownie fudgy?
This is the million-dollar question! It all comes down to oven temperature and timing. For the fudgy brownie base, you must keep the oven low—325°F is perfect. This slower bake allows the topping to melt and coat the nuts without hardening up too fast. Crucially, you need to follow the toothpick test for the brownie layer exactly: pull them when the toothpick comes out with *moist, sticky crumbs attached*, not wet batter, but definitely not clean. That residual heat finishes the cooking process without drying out that gooey layer.
Are these really considered an easy brownie hack if they have two distinct layers?
I totally think so! This recipe is really two simple recipes married together, which is why it’s brilliant. You skip the entire time-consuming process of making a traditional pecan pie filling from scratch, which involves careful measuring and temperature control of hot syrup. By using the box mix—our biggest easy brownie hack—we save 20 minutes right there! We combine the simple base with a quick, stovetop-style topping, making the overall process much less intimidating than baking two separate desserts.
Why are my pecan pie brownies so hard to cut into clean squares?
Ah, the struggle with any gooey brownie recipe! If you tried cutting them while they were even slightly warm, that’s your culprit. The corn syrup in the topping doesn’t fully stabilize until it has completely cooled down. My best advice is the cooling period I mentioned earlier: let them cool completely on the counter for hours, or chill them in the fridge for an hour or two. Once they are fully chilled, the layers grip each other, and you can slice them cleanly with a long, sharp knife. For extra-clean cuts, lightly wipe your knife with a touch of coconut oil between each slice, too!
Can I make these ahead of time for a holiday party?
Absolutely! Making these ahead is fantastic, and honestly, they taste even better the next day once all those flavors have had time to really meld together. You can make them up to two days in advance and store them covered tightly at room temperature. If you need them for longer, they freeze wonderfully! Check out my storage section for details on wrapping them individually so you can just pull out what you need. This is a great recipe to know for easy entertaining, and if you’re looking for other quick bakes, take a peek at some of my easy breakfast recipes for next morning!
If I use salted caramel, do I still need to add the 1/2 teaspoon of salt to the pecan mix?
Yes, you do! That extra salt in the pecan pie mixture is crucial because it balances the intensity of the corn syrup and the inherent sweetness of the brownie base. The salted caramel swirl gives you a ribbon of salted flavor on the very top, but the salt mixed throughout the pecan layer is what brings out the nutty flavor of the pecans and the depth of the brown sugar. Don’t skip it! If you decide to skip the swirl altogether, you’ll definitely need that pinch of salt in the topping. For more inspiration on using sweet and salty contrasts, you can read more about this delicious method over at The Love Recipe.
Nutritional Estimates for These Decadent Chocolate Treats
Now, listen up, because I get asked this all the time! When you make something this truly decadent, you know it’s a treat meant for special occasions, not for counting every single calorie you consume daily. We create comforting food here at HearthBite, and that means sometimes we embrace the butter and the sugar!
That said, I always want you to have a general idea of what you’re bringing to the table, especially when serving these to guests. These estimates are based on using a standard box brownie mix according to the directions for fudgy results, plus the pecan topping and caramel swirl, divided into 16 squares. Please remember, these are just estimates, and your actual values will change based on the specific brand of mix you use—our goal here is deliciousness first!
If you’re looking for ways to balance out your week after indulging in these rich squares, feel free to check out some of my lighter options for dinner, like my collection of healthy lunch recipes.
- Serving Size: 1 square
- Calories: 350
- Fat: 20g
- Saturated Fat: 7g
- Trans Fat: 0g
- Unsaturated Fat: 13g
- Carbohydrates: 42g
- Fiber: 2g
- Sugar: 35g
- Protein: 4g
- Cholesterol: 35mg
- Sodium: 180mg
See? Totally worth it for that combination of fudgy chocolate and gooey caramel and nuts! Just factor this deliciousness into your indulgence budget for the day!
Share Your Ultimate Dessert Fusion Experience
Well, we did it! We took something classic and made it twice as good by merging the best of the brownie world and the pecan pie world. That’s the HearthBite way—taking comfort food and making it feel extra special without making it ridiculously complicated. I truly hope you loved making these pecan pie brownies as much as I love sharing them.
Now, listen, that’s where you come in! When I pour my heart into developing these recipes, I rely on hearing from folks like you who test them out in your own kitchens. Did they turn out fudgy? Did your caramel swirl look perfect? Did your family give you the praise I know these bars deserve?
Tell Me What Happened in Your Kitchen!
I love seeing your incredible work, so please, leave me a rating and a comment below! Hearing that you’ve made this the go-to dessert for your Thanksgiving table or that they were a massive hit at the office potluck just validates all the recipe testing. Sometimes a little note gives me the energy to test the next crazy fusion idea!
- If you loved the texture, let me know if yours leaned more fudgy or slightly gooey!
- Did you stick with the salted caramel swirl, or did you try something different?
- How many squares did you *actually* manage to save for breakfast the next day? (Be honest!)
Tag Us in Your Decadent Chocolate Treats Photos
If you snapped a picture of your cooling rack masterpiece or your final plated dessert, please tag us on social media! Seeing your beautiful layered dessert bars is the best reward. I always try to share reader photos in my stories throughout the week.
Thank you so much for baking with me today. If you need something for dinner later this week to balance out all that sugar, feel free to browse my collection of quick and easy dinner recipes!
Happy Baking, my friends. Now go enjoy that amazing chocolate and nut combination!
PrintUltimate Fudgy Pecan Pie Brownies with Salted Caramel Swirl
Combine the rich, fudgy texture of a perfect brownie with the sweet, nutty topping of classic pecan pie. This recipe offers an indulgent dessert fusion, ideal for holidays or impressing guests.
- Prep Time: 15 min
- Cook Time: 45 min
- Total Time: 60 min
- Yield: 16 squares 1x
- Category: Dessert
- Method: Baking
- Cuisine: American
- Diet: Vegetarian
Ingredients
- 1 box (about 18 ounces) brownie mix (plus ingredients listed on box for fudgy brownies)
- 1 1/2 cups chopped pecans, lightly toasted
- 1/2 cup light brown sugar, packed
- 1/4 cup granulated sugar
- 1/2 cup light corn syrup
- 1/4 cup (4 tablespoons) unsalted butter, melted
- 1 large egg
- 1 teaspoon vanilla extract
- 1/2 teaspoon salt
- 1/4 cup heavy cream
- 1/4 cup salted caramel sauce (for swirling)
Instructions
- Preheat your oven to 325 degrees Fahrenheit. Line a 9×13 inch baking pan with parchment paper, leaving an overhang on the sides for easy removal.
- Prepare the brownie batter according to the package directions, aiming for a fudgy result. Pour the batter evenly into the prepared pan and spread it out.
- In a medium bowl, whisk together the brown sugar, granulated sugar, corn syrup, melted butter, egg, vanilla extract, and salt until well combined.
- Stir in the heavy cream and the toasted pecans until the mixture is uniform. This is your pecan pie topping.
- Carefully spoon the pecan pie topping mixture over the brownie batter layer, spreading it gently to cover the surface. Do not mix into the batter.
- Drizzle the salted caramel sauce randomly over the pecan topping. Use a knife or skewer to gently swirl the caramel into the topping layer.
- Bake for 40 to 45 minutes, or until the edges are set and a toothpick inserted near the center comes out with moist, fudgy crumbs attached, not wet batter.
- Let the brownies cool completely in the pan on a wire rack before lifting them out using the parchment overhang.
- Once cool, cut the dessert into squares. Serve these decadent chocolate nut bars at room temperature.
Notes
- For an extra rich, fudgy base, substitute water with milk or coffee as directed on the brownie mix box.
- Toasting the pecans enhances their flavor and crunch, making the nutty combination better.
- If you prefer a less sweet topping, reduce the granulated sugar in the pecan layer by two tablespoons.
- Allow the brownies to cool fully before cutting; this prevents the gooey topping from sticking excessively to your knife.
Nutrition
- Serving Size: 1 square
- Calories: 350
- Sugar: 35
- Sodium: 180
- Fat: 20
- Saturated Fat: 7
- Unsaturated Fat: 13
- Trans Fat: 0
- Carbohydrates: 42
- Fiber: 2
- Protein: 4
- Cholesterol: 35