
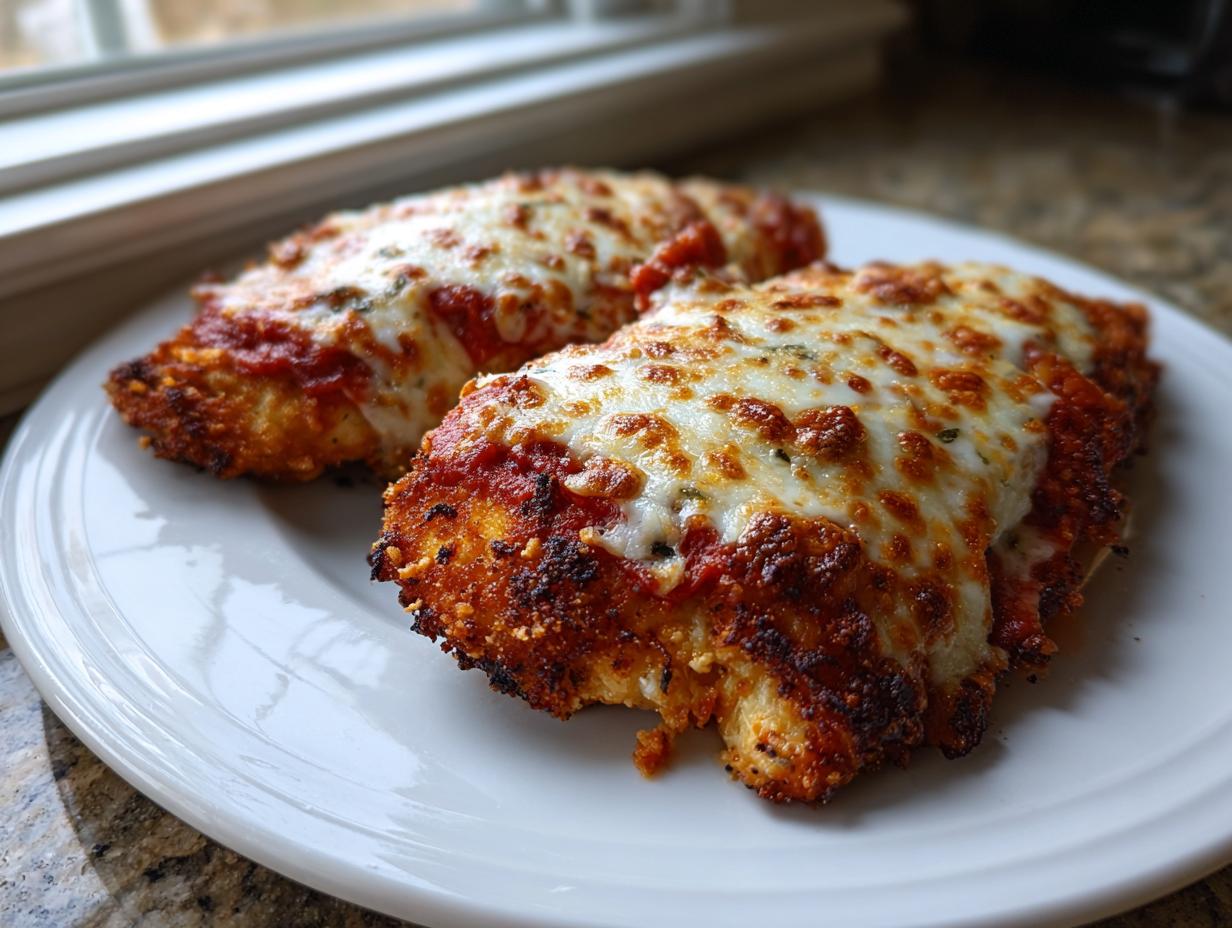
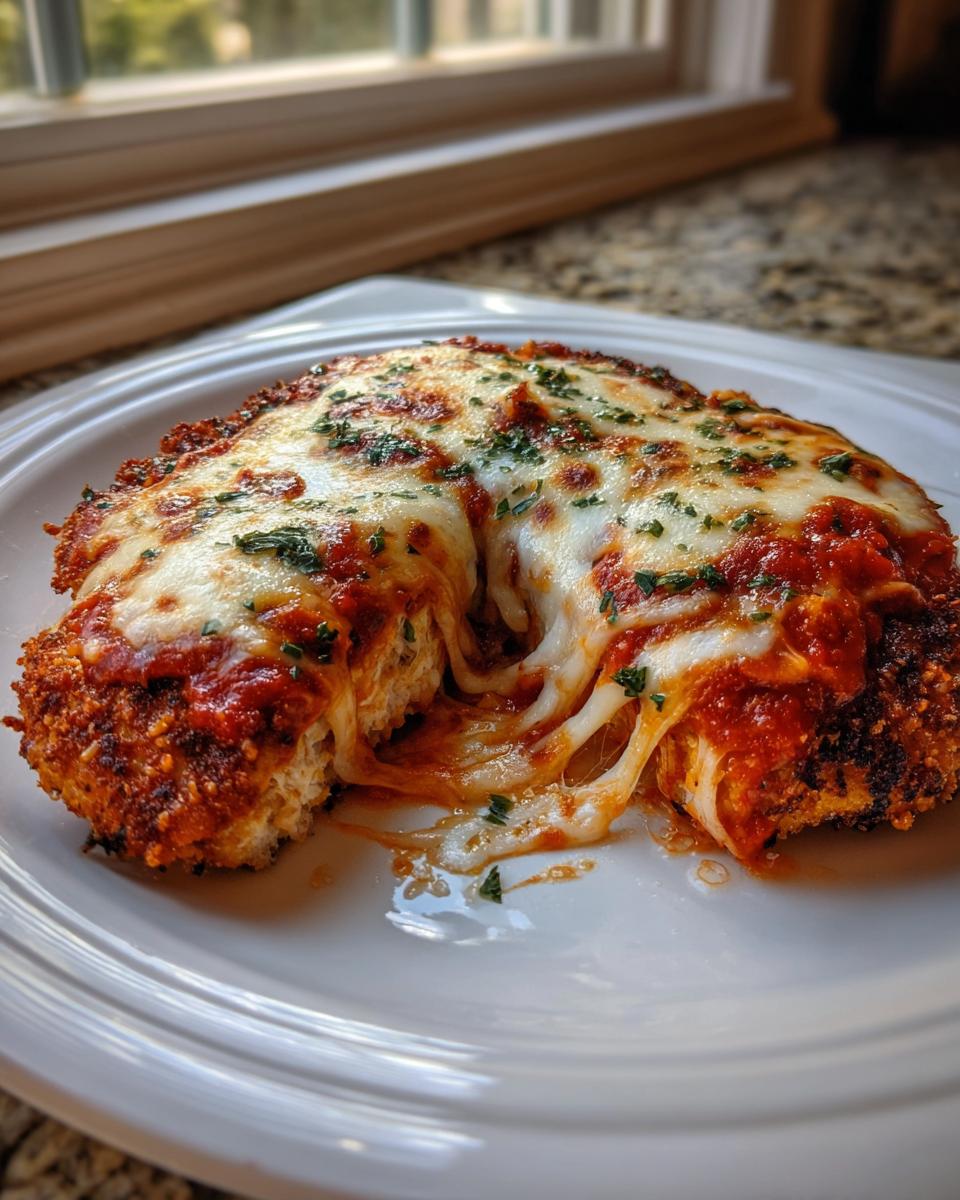
Oh, I know that craving! You want that big, warm hug of Italian comfort—the deeply savory marinara, the blanket of bubbly mozzarella—but you don’t want to deal with the mess, the splatter, or the heaviness of deep-frying. Trust me, I’ve been there! Here at HearthBite, my commitment as Sarah Miller is making sure our family favorites work reliably in *your* busy home. That’s why I perfected this baked chicken parmesan recipe. We call it the Ultimate Crispy Baked Chicken Parmesan for a reason: it delivers a juicy interior with a genuinely crunchy crust, and it’s ready in about 40 minutes. If you are searching for wonderful quick easy dinner recipes, this truly is the best baked chicken parmesan recipe for those hectic weeknights when you still want something special.
- Why This Baked Chicken Parmesan Recipe Works Every Time
- Gathering Ingredients for Your Baked Chicken Parmesan
- Step-by-Step Instructions for Perfect Baked Chicken Parmesan
- Expert Tips for the Best Crispy Baked Chicken Parmesan
- Making Ahead and Storing Your Baked Chicken Parmesan
- Serving Suggestions for Your Easy Italian Chicken Dinner
- Frequently Asked Questions About Baked Chicken Parmesan
- Nutritional Estimate for This Simple Baked Chicken Dinner
- Share Your Experience Making Baked Chicken Parmesan
Why This Baked Chicken Parmesan Recipe Works Every Time
The biggest question I always get is, “Sarah, how do you get it crispy without the fryer?” That’s the magic touch we focus on here at HearthBite! We skip the oil bath but keep all the great flavor and texture. This isn’t just another imitation; I promise this is better than fried chicken parmesan for a weeknight meal because it’s faster and less messy.
- We deliver a genuinely crispy baked chicken parmesan crust because we use Panko crumbs!
- It cooks fast, clocking in under 40 minutes total, which is perfect for a weeknight comfort food recipes night.
- The chicken stays incredibly juicy—no shoe leather here, ever.
Achieving Maximum Crunch with Panko
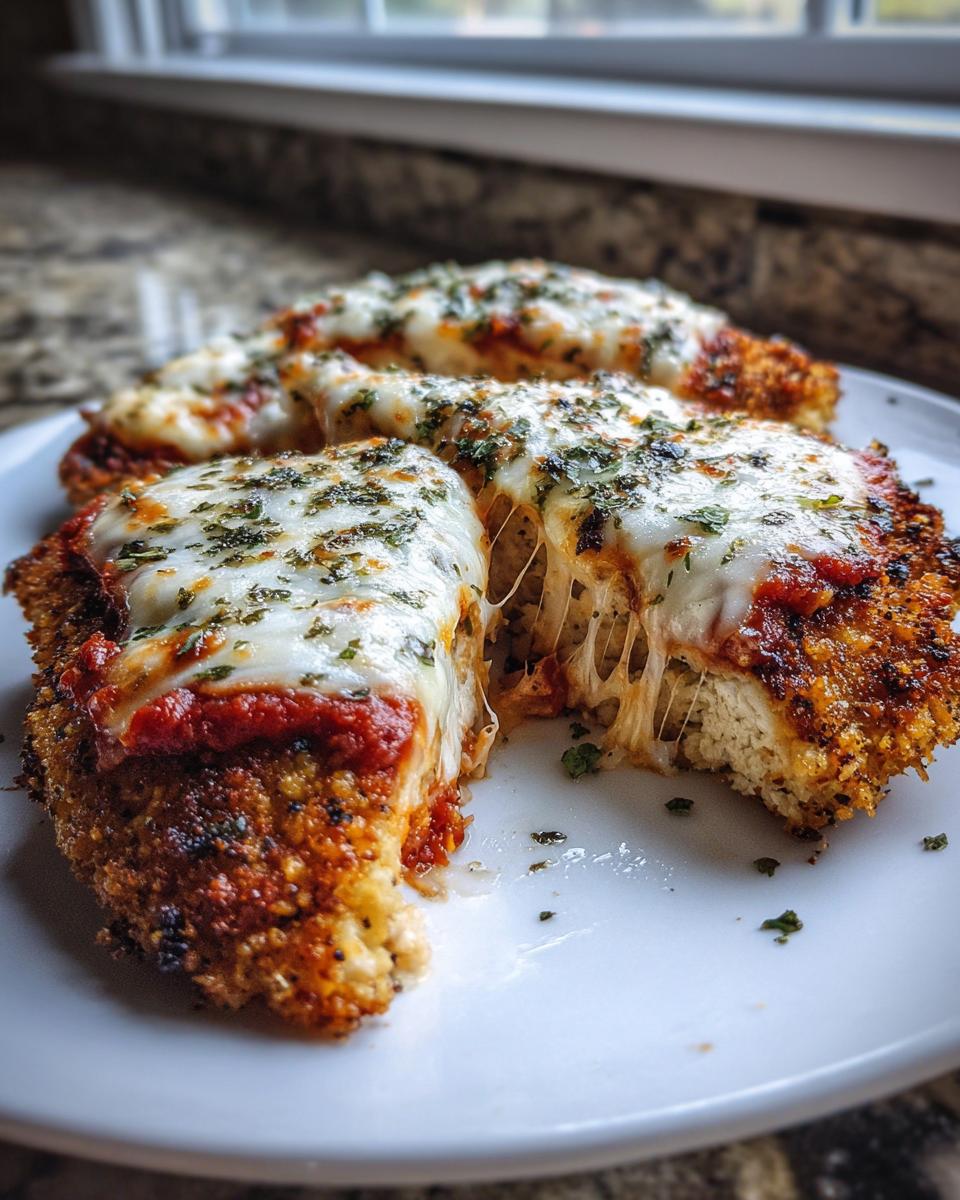
Standard breadcrumbs are just too flat and dense; they soak up sauce too quickly and turn soft. Panko breadcrumbs, those beautiful flaky Japanese crumbs, are our secret weapon! They create little air pockets so when they bake, they crisp up like tiny golden shingles. Pressing that combination of Panko and Parmesan firmly onto the chicken is what locks in the crunch before it even hits the oven.
Juicy Chicken Guarantee
You can’t rush thick chicken breasts, and if they cook unevenly, you get dry edges and raw centers. The hack is pounding! You take those chicken breasts and flatten them evenly to about half an inch thick. This ensures the entire cutlet cooks through at the exact same, quick pace. When the inside is perfectly cooked through, it stays unbelievably moist under that cheesy topping. No more dry chicken breast dinner ideas!
Gathering Ingredients for Your Baked Chicken Parmesan
When you’re making a recipe for the first time, the instructions are only as good as the shopping list you bring home, right? I always like to organize everything before I even turn the oven on. It keeps things running smoothly and means we can get this cheesy baked chicken on the table fast! Don’t skimp on quality here—especially the cheese and the sauce—because those are truly the stars of this easy Italian chicken dinner.
Chicken and Coating Essentials
We need three main things for the cutlets, plus our three-part dredging station setup. Remember, we’re aiming for that glorious, thick coating!
- Start with 3 boneless, skinless chicken breasts. Make sure they are about 6 ounces each, and give them a good pound until they are uniformly flat at ½ inch thickness.
- For the flour dredge, grab ½ cup of all-purpose flour.
- You’ll need 2 large eggs, and make sure you beat those until they are nice and frothy—we want them lightly beaten!
- Our crispy secret: 1 cup of Panko breadcrumbs. Don’t substitute this!
- We use Parmesan in two spots! For the coating, we need ½ cup of freshly grated Parmesan cheese mixed right into the Panko.
- Finally, for seasoning the crust, grab 1 teaspoon of dried Italian seasoning. Salt and pepper for seasoning the raw chicken are a given!
Sauce and Cheese Layers
This is where we deliver on the flavor and the gooey top. For the sauce, I usually grab my favorite low-sodium marinara, but use whatever rich tomato sauce you love! About ½ cup per serving should do it.
- You’ll need 1 cup of shredded low-moisture mozzarella cheese. I stress *low-moisture* because if you use fresh mozzarella packed in liquid, it will water down your crust, and we absolutely cannot have that!
- For the final topping, sprinkle on ¼ cup more of grated Parmesan cheese over the mozzarella.
- Oh, and don’t forget your oil for the pan! Lightly grease your sheet or use a cooking spray—I keep mine right next to me just in case.
Step-by-Step Instructions for Perfect Baked Chicken Parmesan
Okay, time to get cooking! I always tell folks here at HearthBite that the process for making this oven baked chicken parmesan is almost therapeutic once you get into the rhythm. It goes fast, but you have to be intentional about each step, especially when we are talking about waterproofing that crust so we get that unbelievably crunchy exterior. If you’ve got your ingredients lined up like we talked about, this is going to be a breeze. Remember, this is how we make our quick chicken parmesan recipe a weeknight winner!
Preparation and Dredging Setup
First things first: get that oven preheated to 400°F (200°C)! You want it hot and ready the instant your chicken is breaded. Next, grab your baking sheet. I highly recommend lining it with parchment paper—it makes cleanup nearly nonexistent, and cleanups are never fun on a busy night. If you don’t have parchment, just spray it lightly with cooking spray.
Now, the most crucial step for that crispy baked chicken parmesan texture: grab a stack of paper towels and pat those pounded chicken cutlets absolutely bone-dry. I mean it—any moisture on the surface will steam the breadcrumbs instead of crisping them. Once they are dry, hit both sides with salt and pepper.
Next, set up your dredging station—that assembly line of coatings. You need three shallow dishes lined up in this exact order: first dish has the flour, the second has your whisked eggs, and the third dish is your Panko, Parmesan, and seasoning mix. This order is everything!
Coating the Chicken Cutlets
Let’s dredge! Pick up one seasoned cutlet and follow me through the dance:
- First, lightly dust it in the flour. Don’t glob the flour on; just coat it and shake off any heavy excess back into the dish.
- Dip the floured chicken right into the egg wash. Make sure it gets coated completely, letting the extra egg drip off for a second.
- Finally, lay it into that Panko mix. This is where you need to put some muscle in! Press that Panko mixture firmly onto both sides. We want it fully covered and stuck on tight.
Place the coated chicken onto your prepared baking sheet. Before it goes into the heat, you need to give the tops a little encouragement to brown up nicely. Just grab a cooking spray and give the tops a quick, light mist. If you don’t have spray, brush them lightly with just a tiny bit of olive oil—that fat helps develop that golden color we love!
Baking and Topping the Baked Chicken Parmesan
Time for the first bake! Pop those cutlets into the hot 400°F oven for exactly 15 minutes. This gets the chicken mostly cooked and sets that crust so it doesn’t fall off when we add the toppings. Use that 15 minutes to get your side dishes ready!
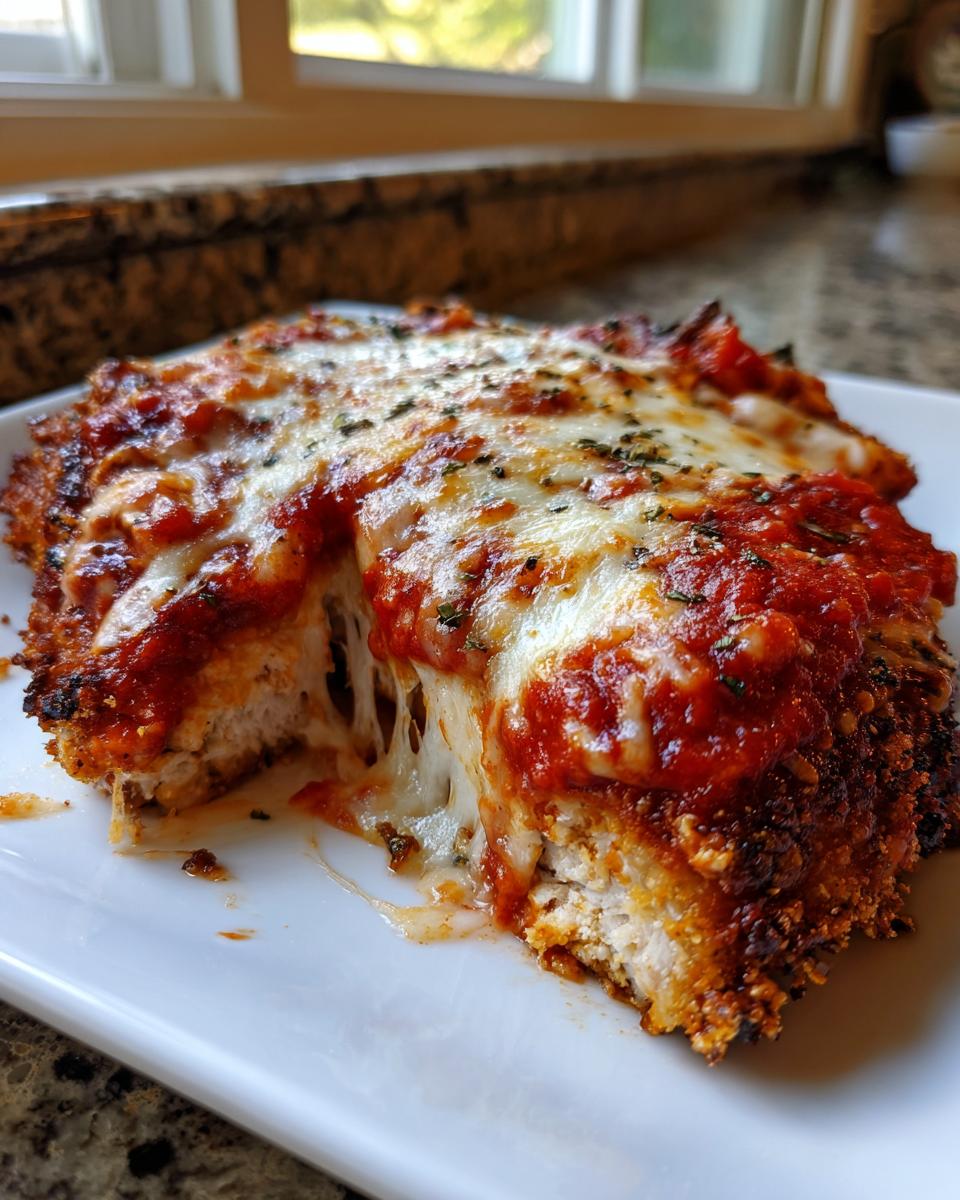
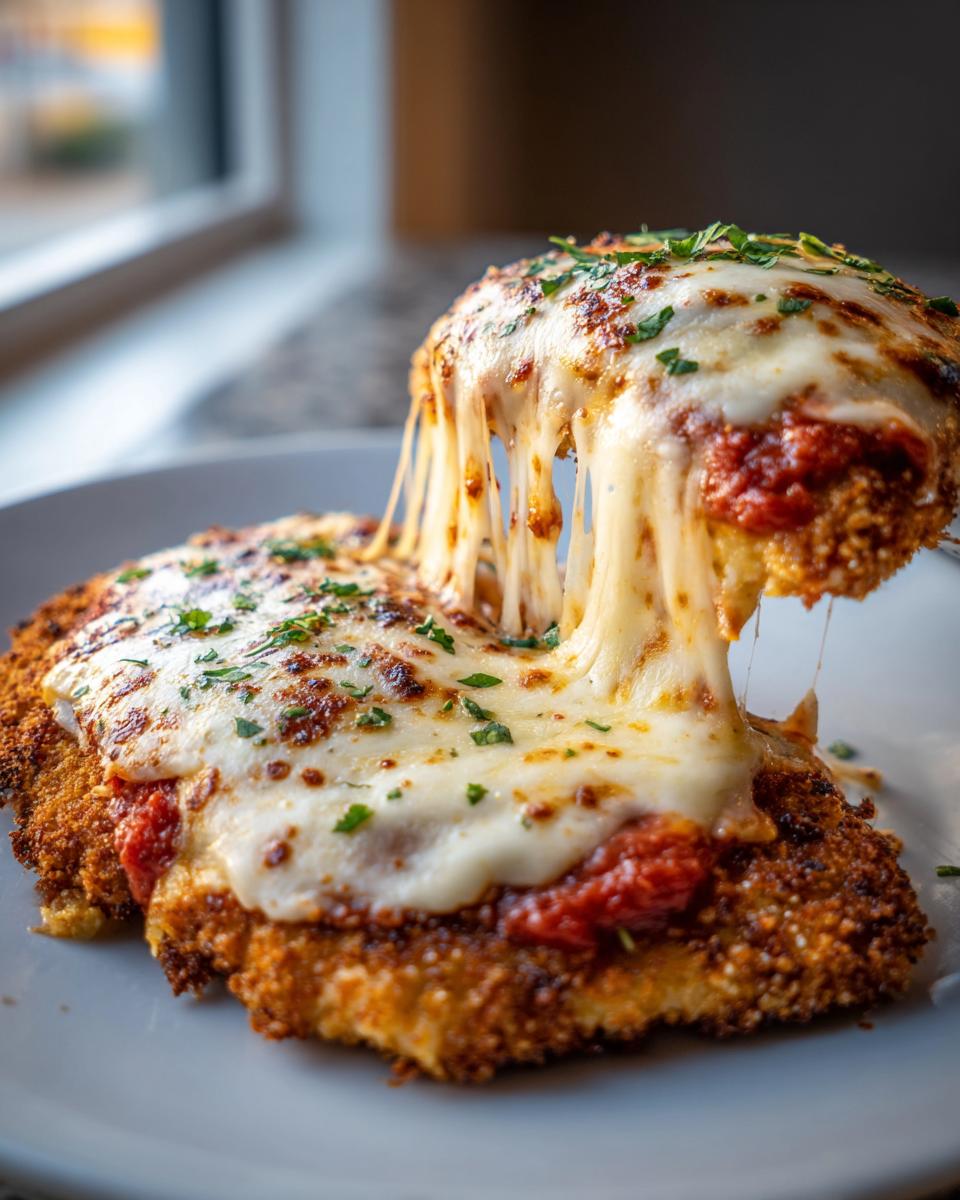
When 15 minutes are up, pull the tray out carefully. Now spoon about 2 tablespoons of your favorite marinara sauce right over the center of each cutlet—leave a small border around the edges dry so the crust stays exposed and crispy. Then, top generously with the mozzarella and sprinkle that remaining ¼ cup of Parmesan cheese over everything.
Back into the oven they go for another 8 to 10 minutes. Keep an eye on them! We are waiting for that cheese to get bubbly and melted, and for the internal temperature of the chicken to hit 165°F (74°C). If you want that extra, extra crispy edge, switch your oven to broil for the last minute or two. But listen to me: watch it like a hawk! Broilers are fast, and no one wants burnt cheesy goodness. Once it looks perfect, pull it out and let those beauties rest for 5 minutes before serving. That resting time makes sure all those juices settle back into the meat. You can find great pairing ideas in my quick easy dinner recipes section!
Expert Tips for the Best Crispy Baked Chicken Parmesan
I know you followed the steps, but let me give you a few little nudges that turn a good oven baked chicken parmesan into the absolute best. This is the stuff I learned keeping my mom happy when she wanted her Italian fix without the fuss! Consistency is everything when you are developing that crispiness in the oven.
First, let’s talk science: Make sure your baking sheet or tray is hot when the chicken goes onto it, or at least very warm. If you are using a standard sheet, preheating it slightly helps jump-start that crisping on the very bottom layer. If you can’t preheat the pan, using parchment paper (which we already talked about!) helps insulate it from sogginess.
Next, sauce quality matters tremendously. If your marinara is very watery, it steams the crust from the top down. Use a thick, rich sauce. If yours looks thin, simmer it on the stovetop for 10 minutes before you use it! This little trick ensures you get that gooey, melted cheese over bold tomato flavor without sacrificing the crunch underneath your cheesy baked chicken topping. You deserve a perfect result every time, especially when making simple baked chicken dinner.
Making Ahead and Storing Your Baked Chicken Parmesan
This recipe is honestly such a lifesaver for busy weeks, which is why I love being able to talk about the make ahead chicken parmesan potential it has! We all need to sneak in those lovely weeknight italian meals on nights when the clock is moving too fast.
The good news is you can absolutely prep these cutlets ahead of time. The key is stopping right before the first baking step. You can complete the entire breading process—flour, egg, Panko—and arrange them neatly on your parchment-lined sheet. Then, cover that whole tray tightly with plastic wrap and pop it into the fridge. I find they hold up beautifully if you prep them like this up to 4 hours ahead of time.
When you’re ready to eat, just pull that tray straight from the fridge and go right into the recipe steps! You might need to bump that initial baking time up by about 3 to 5 minutes since the chicken is cold, but trust me, it’s worth the extra minute or two to have dinner ready in a flash.
Now, for leftovers—because you will definitely have some! This cheesy baked chicken is still fantastic the next day, but the crust will naturally soften a bit once it’s covered in sauce and cheese in the fridge. To bring back some life to it, resist the urge to use the microwave. That will just steam everything! Instead, reheat individual portions briefly in a toaster oven or in a regular oven set to 350°F (175°C) until the cheese is gooey again. If you are determined to get it crispier, you can reheat it *uncovered* at 375°F (190°C) for about 10 minutes. That little bit of dry heat works wonders!
Serving Suggestions for Your Easy Italian Chicken Dinner
So, you’ve got this gorgeous, crispy, cheesy baked chicken sitting here waiting to be eaten. What do we serve it with? Because this is hearty, satisfying comfort food, you need sides that can stand up to the rich flavors of the marinara and mozzarella. You want to turn this recipe into a true family friendly chicken parmesan feast!
My go-to, of course, is pasta. Nothing beats twirling spaghetti around to soak up that extra bit of sauce that drips off the chicken. If you want something a little more robust than standard spaghetti, I highly recommend a beautiful, homemade lasagna—you can check out my recipe for best homemade lasagna recipe if you feel like taking the oven commitment up a notch that night!
But if you’re trying to keep it a little lighter after digging into all that glorious cheese, don’t forget about greens! A simple, bright side salad with a tangy Italian vinaigrette cuts right through the richness of the chicken parmesan beautifully. A simple side of steamed broccoli or roasted asparagus tossed with garlic and lemon zest is also fantastic. It’s a wonderful way to round out your easy Italian chicken dinner!
Honestly, whatever you pair it with, just make sure you have some crusty garlic bread ready. You need something sturdy to mop up any leftover sauce—that’s the rule in my house, and I’m sure it will be the rule in yours, too!
Frequently Asked Questions About Baked Chicken Parmesan
I know sometimes after going through a whole recipe, you still have those tiny little questions lingering, especially about keeping the texture perfect. We want this to be the best oven baked chicken parmesan you’ve ever made! Here are a few things readers ask me all the time about crunch, health, and speed.
Can I make this a healthier baked chicken parmesan?
Yes, absolutely! The best part about this recipe is that we skip the deep frying, which already shaves off a ton of unnecessary fat. That’s why this qualifies as a great healthy baked chicken parmesan option compared to the restaurant versions. If you really want to up the health factor, you can substitute the all-purpose flour with whole wheat flour. You can also swap the standard Panko for whole wheat Panko, though I’ll tell you, the crunch factor drops just a tiny bit! Also, always lean toward lower-sodium marinara sauce, and don’t overload on the mozzarella if you are watching dairy.
How do I prevent the crust from getting soggy?
Okay, this is my core mission in life: anti-soggy crusts! If you remember only two things, remember these: First, pat that chicken dry, pat it dry, pat it dry—we need NO surface moisture before coating. Second, use the Panko breadcrumbs; they are much better at resisting sauce absorption than regular crumbs. Third, don’t drown the chicken in sauce before the initial bake. You’re layering on just enough sauce to kiss the chicken, not suffocate it! And finally, serve it right away! If you let it sit for an hour, the steam gets trapped, and things soften up.
Can I use chicken thighs instead of breasts for this baked chicken parmesan?
You can, and they are usually even juicier because they have more fat, which is delicious! However, chicken thighs are generally thicker and have more connective tissue than the breasts we pounded thin, so they take longer to cook through. If you use boneless, skinless thighs, you should plan on adding about 10 to 15 minutes to the initial baking time before you add the sauce and cheese. You need to make absolutely sure they hit that 165°F internal temperature before melting the cheese on top!
If you’ve got more questions, always feel free to check out some of my favorite healthy lunch recipes for more inspiration on lighter dinners, or drop your queries below!
Nutritional Estimate for This Simple Baked Chicken Dinner
I always get asked about the numbers, especially because this healthy baked chicken parmesan option skips the frying. I want to be super honest with you right up front: these figures are my best estimate based on the standard ingredients listed above. The actual counts can jump around a bit depending on the brand of marinara sauce you use or how much cheese you sneak on there! (Don’t worry, I won’t judge the extra cheese!) This information is just a guide for our wonderful simple baked chicken dinner.
For one serving (which is one nice chicken cutlet) of this delicious lean chicken parmesan, here is what we are generally looking at:
- Serving Size: 1 cutlet
- Calories: Around 420
- Protein: A hefty 40 grams! This is why this makes such a satisfying meal.
- Fat: About 18 grams total fat, with 8 grams of that being saturated fat (mostly from that lovely melted mozzarella).
- Carbohydrates: Roughly 25 grams (this mostly comes from the breading and the sauce).
- Sodium: Around 550 mg, which is why I always encourage using a low-sodium marinara in the recipe notes!
Remember, because we are baking this instead of frying, we keep the fat content way down while keeping the flavorful integrity of a classic comfort food! This is what makes it the perfect heavy-hitter for your weeknight italian meals rotation.
Share Your Experience Making Baked Chicken Parmesan
And there you have it! This ultimate baked chicken parmesan is ready to be the star of your dinner table. We went through all the secrets to get that beautifully crispy crust and keep the chicken utterly tender inside, all without dirtying a skillet full of oil. It’s truly the way I want to enjoy this classic comfort food at home!
Now, the best part of sharing these recipes here at HearthBite is hearing from you! If you tried this method—especially the patting dry and the Panko pressing—please come back and let me know how it went. Did you manage to get that perfect crunch? If you happened to sneak in a different cheese or used a homemade pesto sauce instead of marinara, I would absolutely love to hear your spin on this cheesy baked chicken! Drop your rating (I’m hoping for five stars for that texture!) and all your thoughts in the comments section below. It helps others feel confident about tackling this recipe, and honestly, I just love knowing I helped bring a delicious, easy Italian dinner to your home.
Happy cooking, friends! And don’t forget to check out my easy breakfast recipes for the morning after—you might have some leftover chicken that could be fun in an omelet!
PrintThe Ultimate Crispy Baked Chicken Parmesan: Juicy Inside, Crunchy Outside (Ready in 40 Minutes)
Make the best baked chicken parmesan without frying. This recipe delivers a reliably crispy crust and juicy chicken, topped with savory sauce and melted cheese. It is an easy Italian chicken dinner perfect for weeknights.
- Prep Time: 15 min
- Cook Time: 25 min
- Total Time: 40 min
- Yield: 4 servings 1x
- Category: Dinner
- Method: Baking
- Cuisine: Italian-American
- Diet: Vegetarian
Ingredients
- 3 boneless, skinless chicken breasts (about 6 ounces each), pounded to ½ inch thickness
- 1 teaspoon salt
- ½ teaspoon black pepper
- ½ cup all-purpose flour
- 2 large eggs, lightly beaten
- 1 cup Panko breadcrumbs
- ½ cup grated Parmesan cheese (for coating)
- 1 teaspoon dried Italian seasoning
- ½ cup marinara sauce (low sodium preferred)
- 1 cup shredded low-moisture mozzarella cheese
- ¼ cup grated Parmesan cheese (for topping)
- Cooking spray or 1 tablespoon olive oil
Instructions
- Preheat your oven to 400°F (200°C). Lightly grease a baking sheet or line it with parchment paper.
- Prepare the chicken: Pat the pounded chicken breasts completely dry with paper towels. This step helps achieve a crispy crust. Season both sides of the chicken with salt and pepper.
- Set up your dredging station with three shallow dishes. Place flour in the first dish. Whisk the eggs in the second dish. In the third dish, combine the Panko breadcrumbs, ½ cup of grated Parmesan cheese, and Italian seasoning.
- Dredge each chicken cutlet: First, coat it lightly in flour, shaking off any excess. Next, dip it completely in the egg wash. Finally, press it firmly into the Panko mixture, ensuring the coating adheres well on all sides.
- Place the coated chicken cutlets on the prepared baking sheet. Lightly spray the tops of the cutlets with cooking spray or brush with a small amount of olive oil.
- Bake for 15 minutes.
- Remove the chicken from the oven. Spoon about 2 tablespoons of marinara sauce over the top of each cutlet. Top generously with the mozzarella cheese and the remaining ¼ cup of grated Parmesan cheese.
- Return the chicken to the oven and bake for another 8 to 10 minutes, or until the cheese is melted, bubbly, and the internal temperature of the chicken reaches 165°F (74°C). For extra crispiness, switch the oven to broil for the last 1-2 minutes, watching closely to prevent burning.
- Let the cheesy baked chicken rest for 5 minutes before serving. Serve with pasta or a side salad for a complete family friendly chicken parmesan meal.
Notes
- To ensure the chicken stays juicy, pound it evenly so it cooks through at the same rate.
- For the crispiest results, use Panko breadcrumbs instead of standard breadcrumbs.
- If you want a richer flavor, use a high-quality marinara sauce.
- You can prepare the breaded chicken up to the point of baking and refrigerate it for up to 4 hours for make ahead chicken parmesan preparation.
Nutrition
- Serving Size: 1 cutlet
- Calories: 420
- Sugar: 6
- Sodium: 550
- Fat: 18
- Saturated Fat: 8
- Unsaturated Fat: 10
- Trans Fat: 0
- Carbohydrates: 25
- Fiber: 2
- Protein: 40
- Cholesterol: 130