
If you’re like me, you celebrate International Hummus Day by wanting something deeper than the standard chickpea dip. We want flavor layering, right? I used to think hummus was just a simple pantry staple, but roasting that garlic changes everything! This Roasted Garlic Hummus completely transforms the flavor profile; it becomes mellow, almost sweet, and deeply comforting.
When I first started HearthBite, I focused on recipes that bring people together, and honestly, a homemade dip always does the trick. This recipe feels like a warm hug in a bowl. It’s so much more satisfying than anything store-bought, and it’s packed with fiber—a perfect healthy snack for when the family gathers around. Forget sharp lemon; we are aiming for smooth, mellow perfection here. You can read more about my philosophy over on the About Us page!
- Why This Roasted Garlic Hummus is Your New Favorite Healthy Dip
- Essential Ingredients for Perfect Roasted Garlic Hummus
- Mastering the Roasted Garlic Recipe for Deep Flavor
- Step-by-Step Guide to Homemade Hummus
- Tips for the Best Homemade Hummus Presentation
- Making Roasted Garlic Hummus Ahead of Time
- Variations on Your Roasted Garlic Hummus Recipe
- Frequently Asked Questions About Roasted Garlic Hummus
- Share Your HearthBite Roasted Garlic Hummus Experience
Why This Roasted Garlic Hummus is Your New Favorite Healthy Dip
I know you’re looking for something exciting but still good for you, and this is exactly that! Roasting the garlic mellows out that sharp bite, giving you a sweet, earthy flavor that standard hummus just can’t compete with. It moves beyond a basic dip and becomes a real treat.
If we’re going to make a dip, it might as well be powerful, right? This is a fantastic healthy dip for your afternoon snack rotation:
- It’s a wonderful high-fiber snack, thanks to all those hearty chickpeas.
- The roasting process ensures a deep, satisfying flavor payoff.
- It really shines as an authentic Mediterranean snack—perfect alongside olives and pita!
Making this means you get all the amazing taste without any guilt. You can check out some other ways we make healthy choices during the day over on my healthy lunch recipes page.
Essential Ingredients for Perfect Roasted Garlic Hummus
Okay, let’s talk ingredients! This is where we build that amazing, mellow flavor base. You simply cannot rush the garlic part—that is crucial for the final product. I’ve listed everything exactly as I use it. Trust me when I tell you, using a full head of garlic is non-negotiable for this specific roasted garlic recipe.
- 1 large head garlic (We’ll be roasting this whole puppy!)
- 1 (15-ounce) can chickpeas, rinsed and drained (Remember: draining well is key!)
- 1/2 cup tahini (Get a good quality one; it makes a huge difference in texture.)
- 1/4 cup fresh lemon juice (Fresh is the only way to go, please!)
- 2 tablespoons olive oil, plus more for serving (Drizzling on top at the end is the best part!)
- 1/2 teaspoon salt
- 1/4 teaspoon ground cumin
- 2-4 tablespoons ice water (This is how we get that restaurant-smooth texture!)
See? It’s all simple stuff we likely have around, but the preparation of that garlic is what turns this into something truly special for your next gathering.
Mastering the Roasted Garlic Recipe for Deep Flavor
This step, honestly, is the soul of our roasted garlic recipe. If you want that sweet, mellow flavor instead of sharp, overpowering garlic, you have to roast it right. We’re talking about transforming a pungent clove into something buttery and jammy. It’s worth those forty minutes in the oven, trust me!
You’ll want to set your oven to 400 degrees Fahrenheit. My expert tip here is about the cut: don’t slice too much off the top! If you take off too much, the olive oil runs right out and the cloves dry up. Just a thin little ‘cap’ off the top exposes the cloves without letting them dry out while they roast.
Prepping and Roasting the Garlic Head
First, preheat that oven to 400°F. Take your garlic head and slice just about 1/4 inch off the top where the cloves peek out. Drizzle just a tiny bit of olive oil right over that exposed surface. Wrap the whole thing up tightly in aluminum foil—we’re creating a little steam tent!
Pop it into the oven for 30 to 40 minutes. How do you know it’s done? When you poke the side gently (carefully, it’s hot!), the cloves should feel completely soft, almost mushy, and look golden brown. When they are cool enough to handle, you just squeeze the bottom, and the lovely roasted garlic squeezes right out of its papery skin! Don’t rush cooling, or you might burn your fingers!
Step-by-Step Guide to Homemade Hummus
Once that garlic is cooled, we move onto the fun part: blending everything into the dreamiest dip you’ve ever seen! This is where your Roasted Garlic Hummus really comes together. We use the food processor for this step, and it needs all the gooey, sweet garlic insides. Just squeeze those beautiful, soft cloves right out of their skins into the machine. You don’t want any of that papery stuff!
Next, toss in your rinsed and drained chickpeas, the tahini, that fresh lemon juice, the reserved 2 tablespoons of olive oil, salt, and cumin. Hit the power button and let it churn until it starts looking like… well, hummus, but maybe a little grainy at first. Be sure to scrape down the sides frequently; we don’t want any unmixed tahini hiding up there!
Blending the Roasted Garlic Hummus to Perfection
Now for the magic secret to smooth, restaurant-quality results. With the motor running—and I mean running!—you need to slowly add the ice water, a single tablespoon at a time. Seriously, don’t dump it in! Adding ice water slowly while blending whips air into the mixture, making your Roasted Garlic Hummus incredibly silky and creamy. I usually stop when I hit about three tablespoons, check the texture, and add a fourth if needed. You’re looking for a very smooth consistency.
Also, here’s a little bonus tip for true believers: if you want it ultra-velvety smooth, try peeling the skins off the chickpeas before you blend them. I know, it’s tedious, but if you’re aiming for luxury, it’s worth the effort! After you get that perfect creaminess, taste it! Does it need more salt? Maybe another tiny splash of lemon? Adjust until it tastes exactly right to your family.
If you’re looking for other recipes where texture is everything, you might want to peek at my guide on making creamy peanut sauce—the technique is similar!
Tips for the Best Homemade Hummus Presentation
You’ve made this amazing, mellow homemade hummus; you don’t want to just scoop it out sadly into a container! Presentation is everything, especially if you’re serving this for company. Remember that flavor layering we talked about? We can layer the flavors visually too!
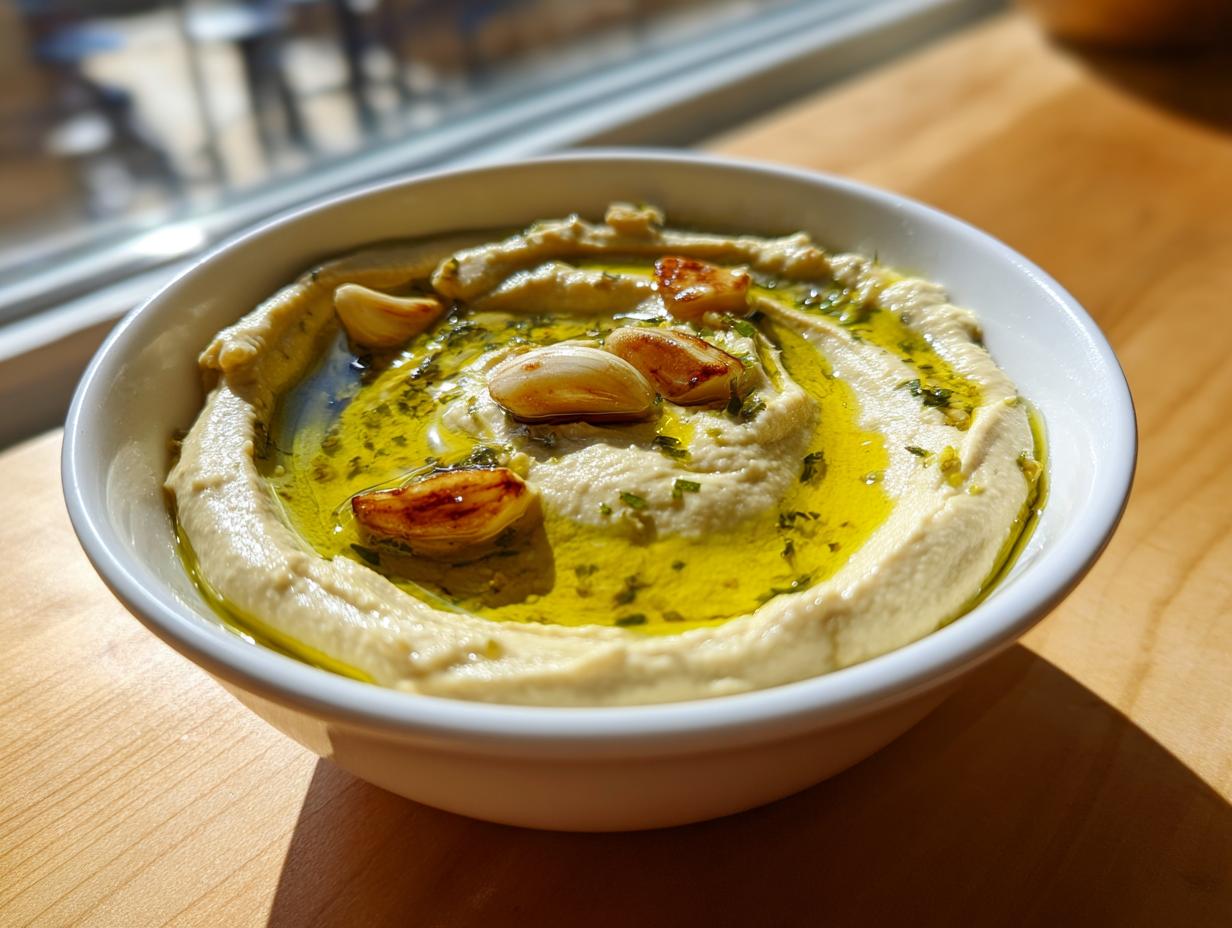
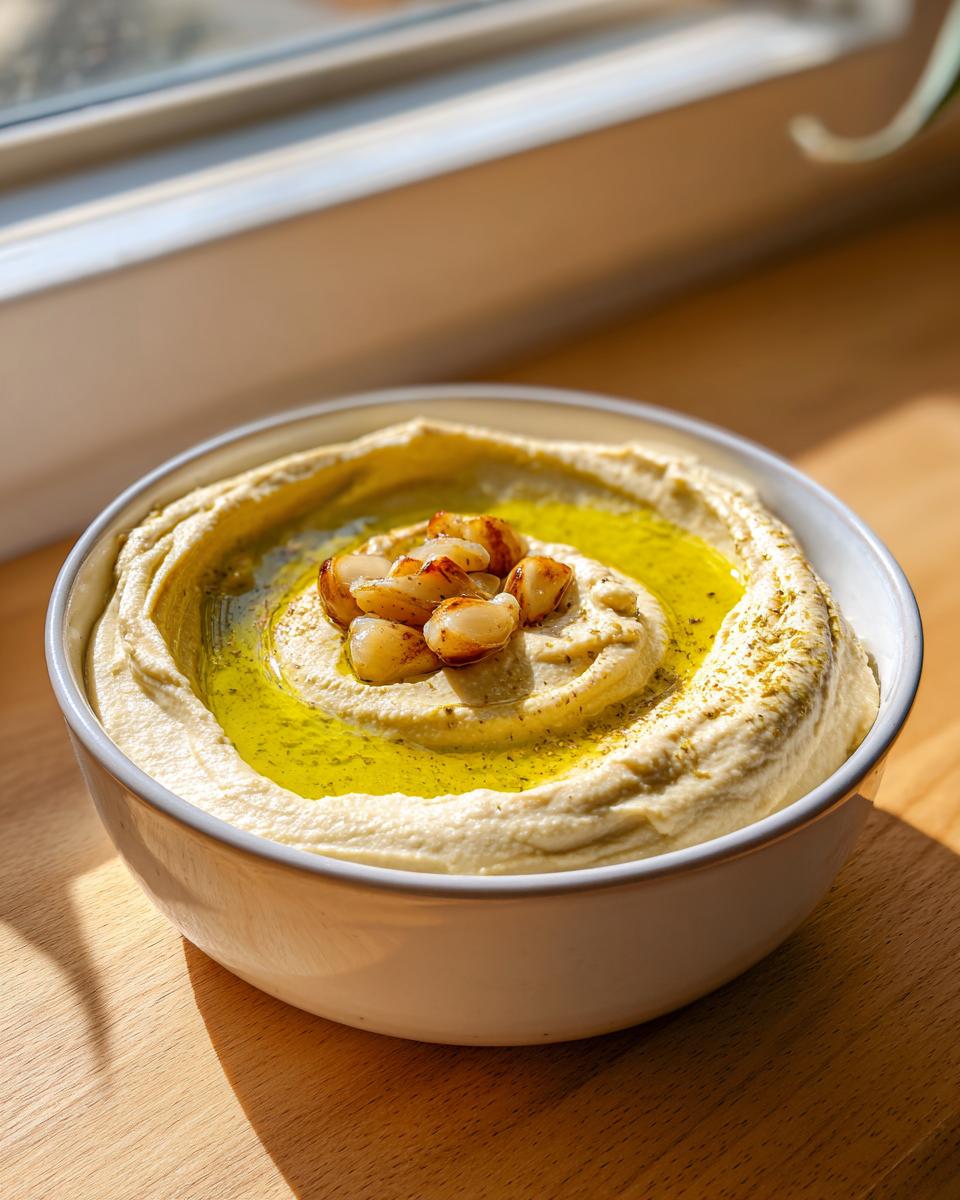
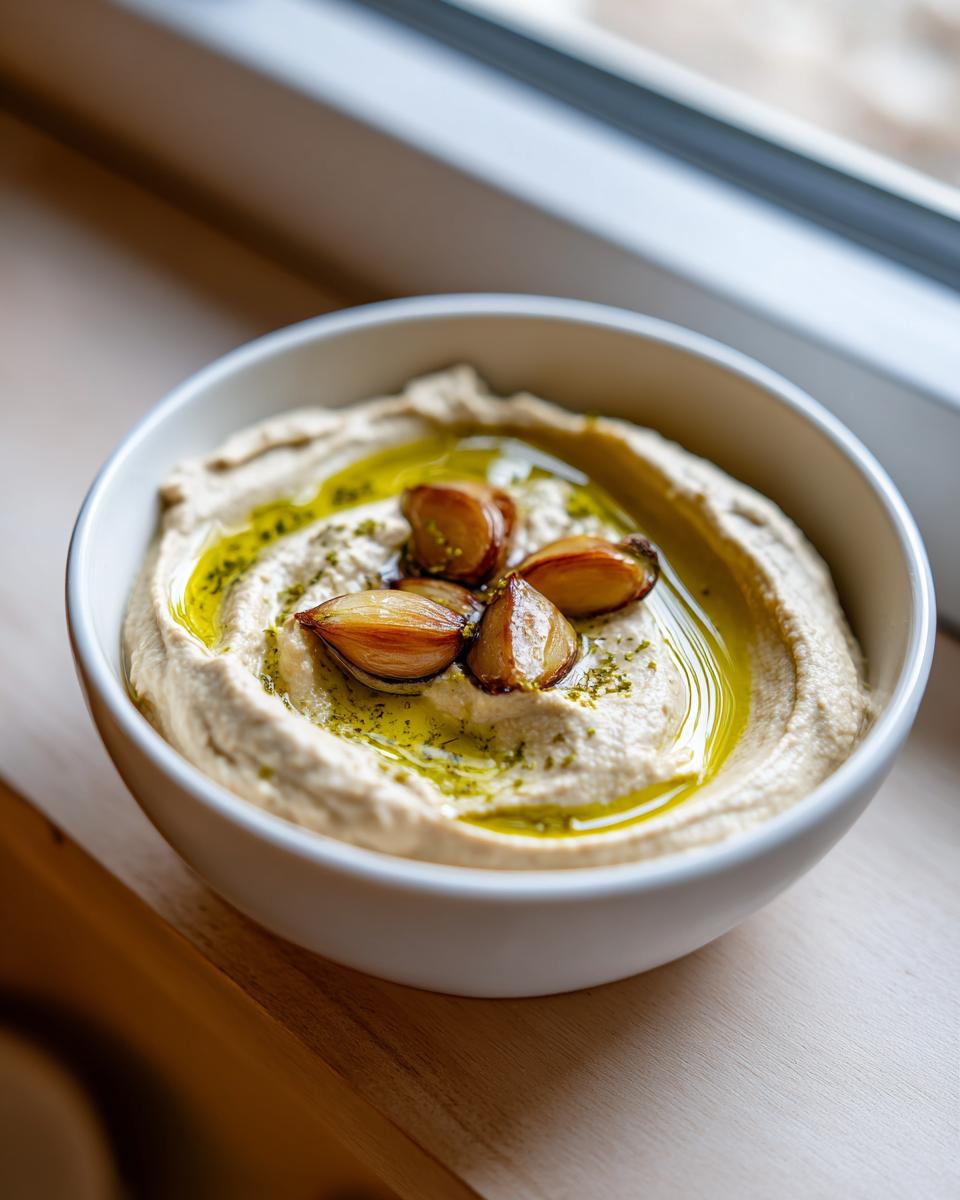
Once you transfer your hummus to that beautiful serving bowl—and please use your nicest one!—it’s time to garnish. The essential final touch, instructed in step nine, is that drizzle of extra virgin olive oil right over the top. Don’t be shy with it; it adds shine and reinforces that rich flavor we built.

To really lean into that ‘flavor layering’ vibe, try sprinkling some smoked paprika or maybe a tiny pinch of flaky sea salt over the oil pool. A little swirl of the back of a spoon makes a perfect little crater for the oil to settle in. If you’ve got some fresh parsley or chopped dill lying around, scatter that on for color!
Serve this proudly as the centerpiece of your Mediterranean snack platter. It looks incredible next to colorful chopped peppers, crunchy cucumber spears, or warm, fluffy pita triangles. I think presentation is almost as important as taste, and it shows people you truly cared enough to make it from scratch!
If you want other ideas for making appetizers look stunning, you have to check out my post on whipped feta dip—that one is always a showstopper at parties!
Making Roasted Garlic Hummus Ahead of Time
I totally get it—sometimes you want to make a big batch of this homemade hummus, or maybe you’re planning ahead for a big gathering. Good news! This recipe is fantastic for making ahead of time, which is such a lifesaver when you’re prepping for company.
The best part? You can roast the garlic way in advance! The recipe notes mention you can roast that garlic and keep it stored in the refrigerator for up to a full week. I often do this on a slow Saturday morning, just so I have that flavor base ready to go. It stores beautifully in an airtight container once it’s cooled completely.
When it comes to the final blended hummus, it stays super fresh in the fridge for about four or five days, provided you keep it covered tightly. Hummus is one of those glorious dips that sometimes even tastes better the next day once the roasted garlic flavor has really had time to marry with the tahini. If you have leftovers that are nearing the end of safe storage, you can try freezing it. I find that while it’s still perfectly safe frozen, the texture can sometimes get a little grainy when thawed. If you do freeze it, let it thaw overnight in the fridge, and then re-blend it for just a minute with a tablespoon of cold water to bring that creaminess right back!
It’s so nice to know you can prep this glorious healthy dip in stages. For more great meal prep ideas that save you time later, check out my tips on make-ahead casseroles!
Variations on Your Roasted Garlic Hummus Recipe
Well, now that you’ve mastered the base, let’s talk about layering! If you’re celebrating International Hummus Day or just feelin’ fancy, this is where you can really play around with flavors without messing up that perfect creamy texture we worked so hard for. Remember, the roasted garlic provides the mellow, sweet foundation, so anything you add just builds on that richness.
My absolute favorite way to change things up is adding smoked paprika right into the food processor with the rest of the ingredients. It gives the Roasted Garlic Hummus a touch of smokiness that pairs so well with the sweet garlic. Or, if you want something bright, finely chopped fresh parsley stirred in at the very end adds such a beautiful pop of green and freshness!
Another simple trick is zesting a small amount of lemon—just the yellow peel—and adding it in. You get the tang of the lemon without thinning out the dip with extra juice. You could also try spiking it with a tiny dash of cayenne pepper if you want a little heat kick at the end. Remember, all these additions go in during the blending stage or right at the end for stirring. Don’t be afraid to experiment; that’s how great recipes evolve!
If you’re serving this with other roasted items, you might want to check out my favorite garlic and herb roasted vegetables—the flavors really sing together!
Frequently Asked Questions About Roasted Garlic Hummus
I know you might have a few last-minute questions before diving in, especially if you’re trying to nail that perfect texture! This is such a fun recipe to try for International Hummus Day, but let’s make sure you get it right the first time.
Can I make this Roasted Garlic Hummus without a food processor?
You definitely can, but it takes more elbow grease! Hummus really needs heavy-duty blending power to get that beautiful creaminess. If you don’t have a food processor, a high-powered blender will work, but work in smaller batches. If you only have an immersion blender, mix the roasted garlic, tahini, and chickpeas first, and then slowly add the liquid. It won’t be quite as silky smooth as the food processor version, but it will still be delicious!
How do I make this Roasted Garlic Hummus smoother, like the kind you get at a restaurant?
Ah, you want that luxurious texture! My best advice is twofold. First, use the ice water trick—seriously, blend it while adding the water one tablespoon at a time. Second, if you have the patience, peel the skins off those chickpeas before blending. I mention it in the main steps, but removing the skins is a game-changer for achieving a truly flawless, velvety result. That extra work turns it into a luxurious healthy dip!
What is the best, easy way to celebrate International Hummus Day with this recipe?
That’s easy! You celebrate by making this savory batch of homemade hummus and serving it piled high with high-quality olive oil and maybe some toasted seeds on top. It’s perfect right alongside fresh veggies for a satisfying Mediterranean snack. When you make it from scratch, you appreciate the tradition so much more!
Can I roast the garlic a day before I plan to make the batch?
Yes, please do! As I mentioned earlier, roasting the garlic ahead of time is one of my favorite time-savers. Once it’s cool, just store the whole head or the squeezed cloves in an airtight container in the fridge. It holds that rich flavor perfectly for up to a week. It means your active blending time will be super fast, which is helpful when you’re rushing for an easy weeknight meal, though this recipe is maybe a little too special for just any old Tuesday!
If you’re looking for more recipes that are quick to assemble after a little prep work, jump over to my guides on quick dinner recipes or even some ideas for easy breakfast recipes!
Share Your HearthBite Roasted Garlic Hummus Experience
Now that you have every single secret for the creamiest, most mellow Roasted Garlic Hummus, I really, truly want to see what you create! Honestly, that’s the best part of opening up my kitchen here at HearthBite—seeing you all bring these recipes home to your own families.
When you make this batch, please come back and leave me a rating! Five stars means it’s officially a keeper in your household, and I check those ratings religiously! If you made any brilliant variations—maybe you added pine nuts or used a different spice blend—let me know in the comments below. I’m always looking for new ways to layer flavor into our favorites.
And if you happen to snap a picture of that beautiful presentation—that perfect olive oil swirl topping your homemade hummus—tag me on social media! I love featuring photos from our community in stories. It just makes my day to know this comforting, delicious dip made it from my hearth right to your table. If you ever have questions about the recipe or want to share feedback, don’t hesitate to reach out via the contact page!
PrintRoasted Garlic Hummus for International Hummus Day

Make this mellow, sweet roasted garlic hummus at home. It is a healthy, high-fiber dip perfect for a Mediterranean snack.
- Prep Time: 15 min
- Cook Time: 40 min
- Total Time: 55 min
- Yield: 6 servings 1x
- Category: Appetizer
- Method: Blending
- Cuisine: Mediterranean
- Diet: Vegetarian
Ingredients
- 1 large head garlic
- 1 (15-ounce) can chickpeas, rinsed and drained
- 1/2 cup tahini
- 1/4 cup fresh lemon juice
- 2 tablespoons olive oil, plus more for serving
- 1/2 teaspoon salt
- 1/4 teaspoon ground cumin
- 2–4 tablespoons ice water
Instructions
- Preheat your oven to 400 degrees Fahrenheit.
- Slice about 1/4 inch off the top of the garlic head to expose the cloves. Drizzle the cut surface with a little olive oil.
- Wrap the garlic head tightly in aluminum foil and roast for 30 to 40 minutes, or until the cloves are soft and golden brown. Let it cool completely.
- Squeeze the soft roasted garlic cloves out of their skins into a food processor.
- Add the rinsed chickpeas, tahini, lemon juice, 2 tablespoons of olive oil, salt, and cumin to the food processor.
- Process until the mixture is smooth, scraping down the sides as needed.
- With the motor running, slowly add the ice water, one tablespoon at a time, until the hummus reaches your desired creamy consistency.
- Taste and adjust salt or lemon juice if needed.
- Transfer the homemade hummus to a serving bowl, drizzle with extra olive oil, and serve with pita bread or vegetables.
Notes
- For a smoother texture, remove the skins from the chickpeas before blending.
- Roast the garlic ahead of time and store it in the refrigerator for up to one week.
- Serve this healthy dip with fresh vegetables for a low-carb option.
Nutrition
- Serving Size: 1/4 cup
- Calories: 180
- Sugar: 1
- Sodium: 210
- Fat: 14
- Saturated Fat: 2
- Unsaturated Fat: 12
- Trans Fat: 0
- Carbohydrates: 11
- Fiber: 4
- Protein: 6
- Cholesterol: 0