
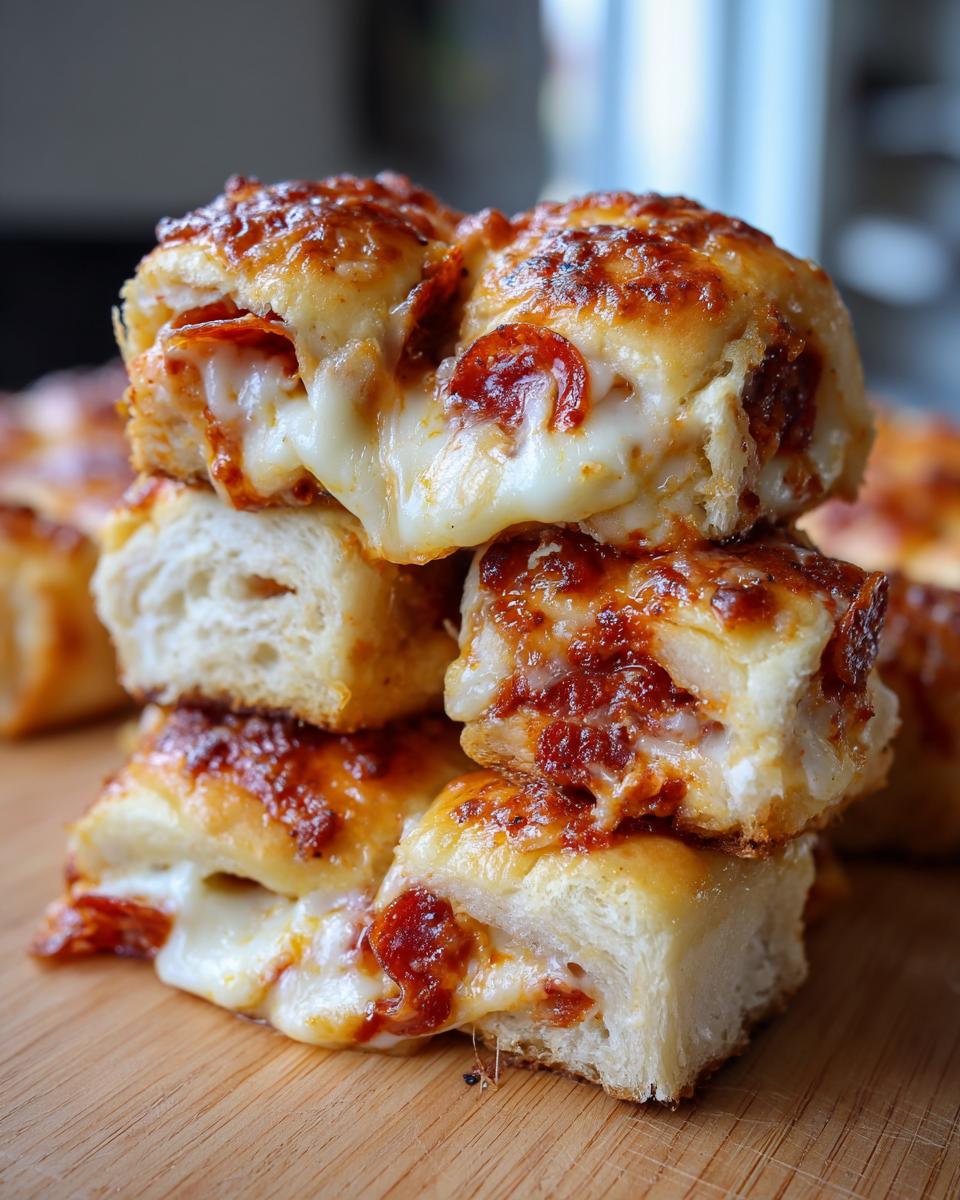
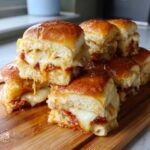
When you need a snack that disappears faster than you can say “game day coming,” you need something unbelievably simple and utterly satisfying. That’s why I’m sharing my absolute favorite little secret for gatherings: easy pizza sliders. Seriously, these Hawaiian roll sliders are pure magic because you assemble the entire tray in about ten minutes flat! Here at HearthBite, we believe those comforting moments are made around great food, not stressed-out cooking sessions. This recipe is meticulously tested—I’ve made it dozens of times before I felt confident enough to share it with you—to ensure that gooey, cheesy goodness is reliable every single time you pull that tray from the oven. It’s a little slice of comfort that brings everybody running to the table, and that’s what cooking is all about! If you love this kind of comforting simplicity, check out some of my other favorite comfort food recipes.
- Why These Easy Pizza Sliders Are Your New Go-To Recipe
- Gathering Your Ingredients for Perfect Pizza Sliders
- How to Prepare These Simple Slider Recipes Step-by-Step
- Tips for Success with Your Pepperoni Sliders
- Make Ahead Party Snacks and Storage for Pizza Sliders
- Serving Suggestions for These Crowd Pleasing Snacks
- Frequently Asked Questions About Hawaiian Roll Sliders
- Estimated Nutritional Data for One Pizza Slider
- Share Your Homemade Pizza Sliders
Why These Easy Pizza Sliders Are Your New Go-To Recipe
I hear you! Life gets busy, and sometimes you just need something that tastes like you slaved over it but actually took less time than making toast. These pizza sliders deliver serious flavor payoff for minimal effort. When I first served these, they were gone before the game even started! They are just wonderful quick dinner recipes when the evening feels hectic, too.
Perfect for Game Day Appetizers and Party Food Ideas
This is truly the ultimate crowd-pleaser. Because they are already baked together in one big sheet, they become perfect game day appetizers. You just bake the whole tray and then pull them apart! They are the superstar of all party food ideas because there’s no fuss with plates or forks.
Speedy Assembly for Quick Dinner Recipes
Prep time is my favorite part here—ten minutes, tops! That’s right, you can go from zero to cheesy goodness in minutes. If you need easy pizza sliders on the table fast, this is your winner. Seriously, what other full meal can you get ready that quickly?
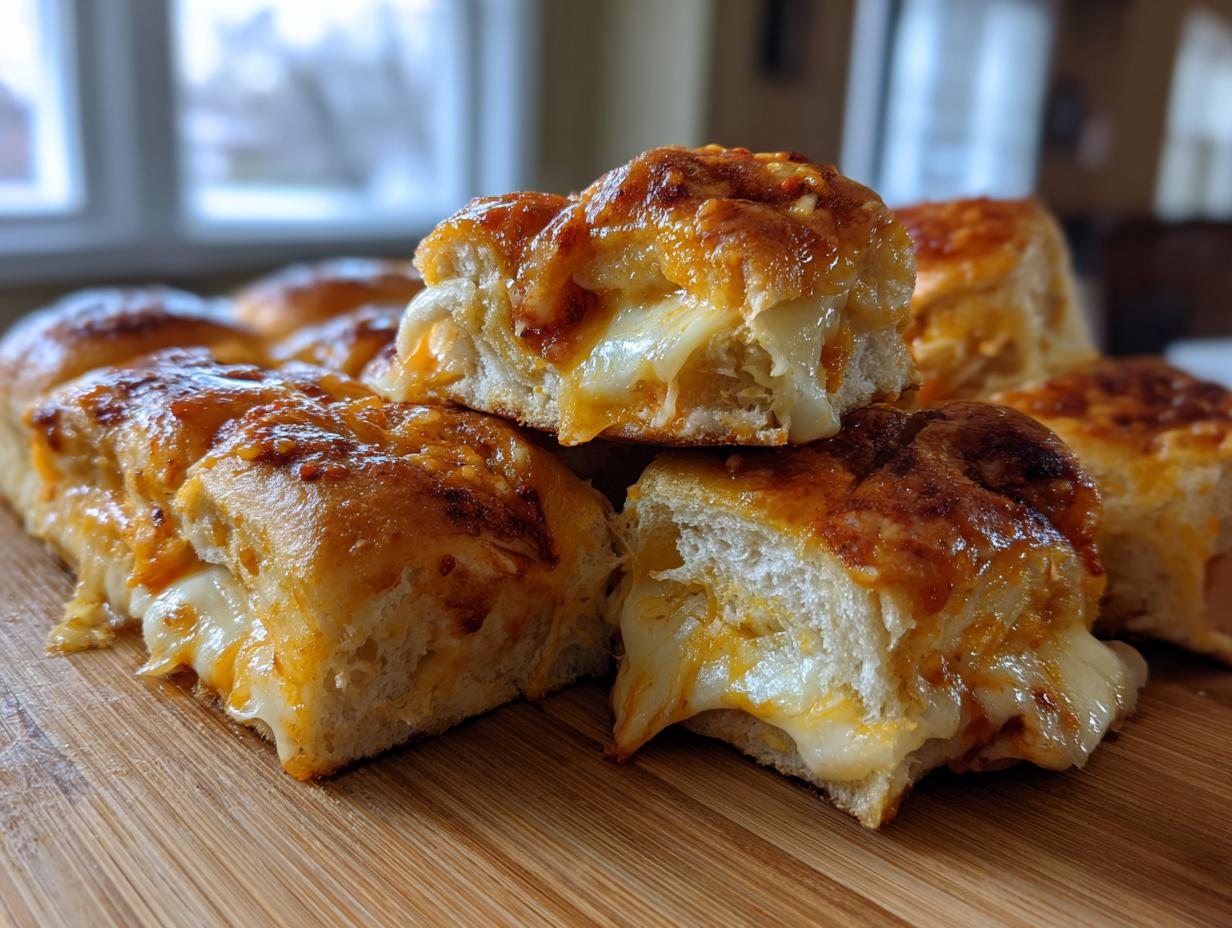
Irresistibly Cheesy Sliders Recipe Texture
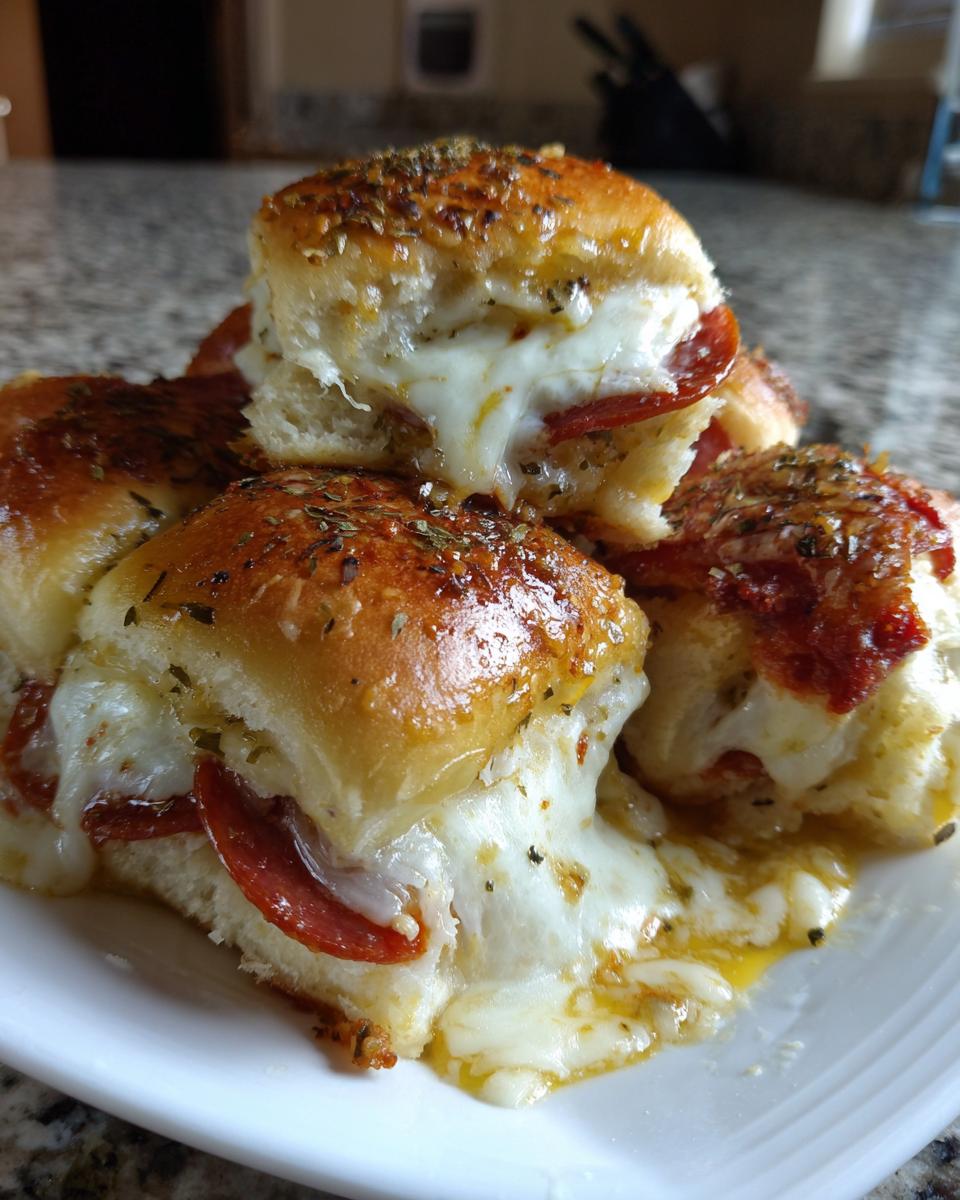
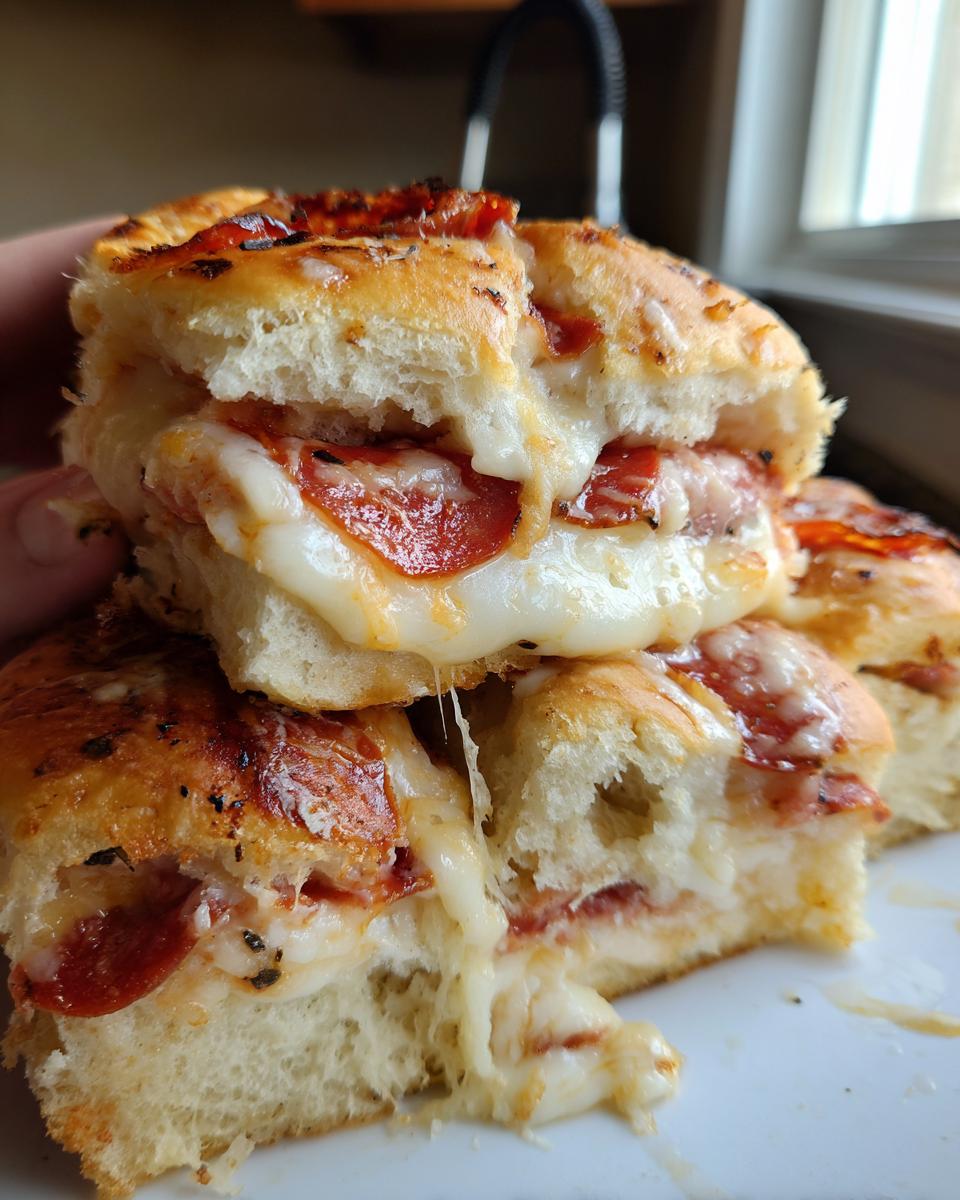
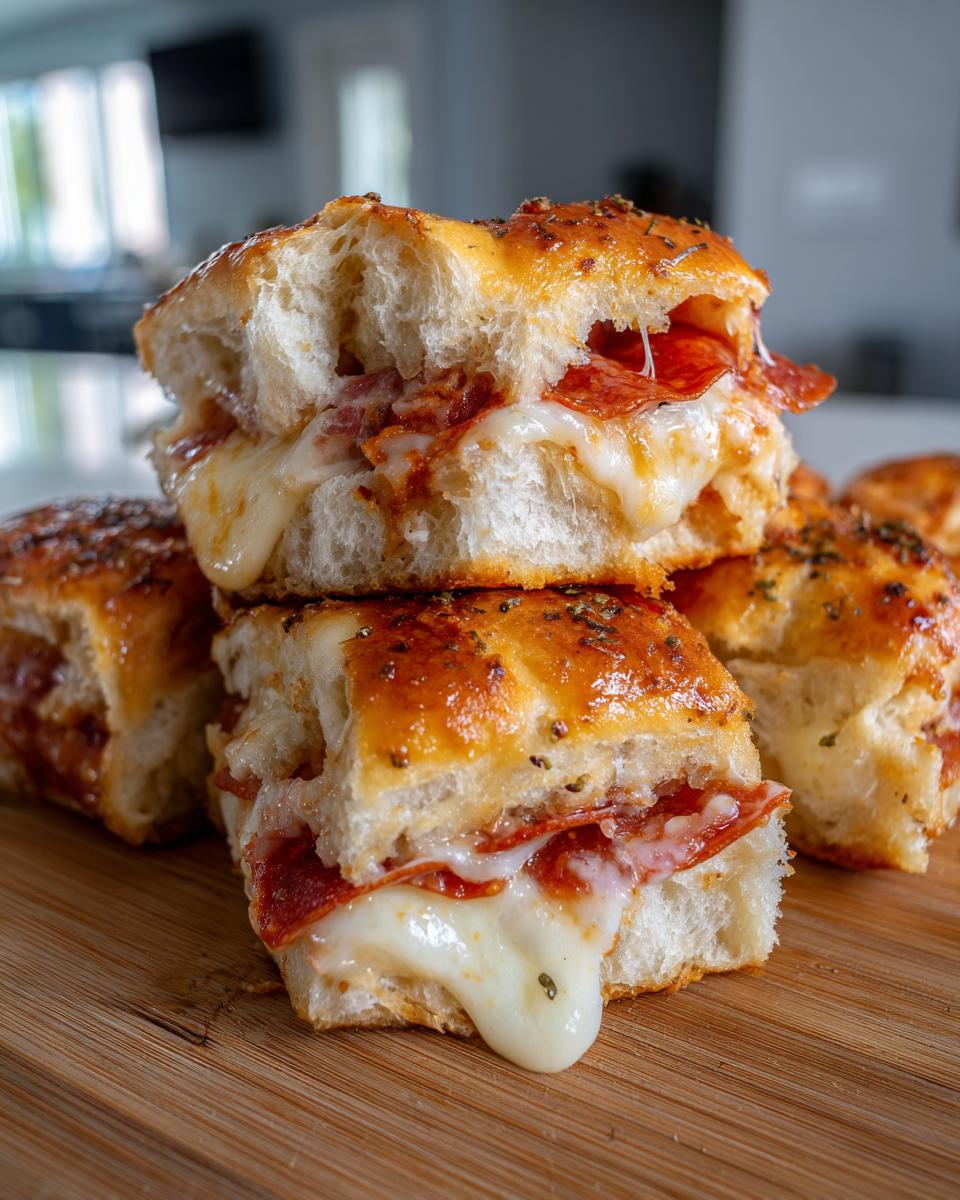
Oh, the goo factor! If you love that perfect cheese stretch, this cheesy sliders recipe is for you. That savory garlic butter glaze that we brush on top caramelizes just slightly while baking, sealing in the moisture and making the tops golden brown. The result is gooey, savory, and everything you want in a perfect garlic butter sliders bite.
Gathering Your Ingredients for Perfect Pizza Sliders
Don’t let the simple nature of these pizza sliders fool you; ingredient quality really makes a difference here! Since we aren’t adding a ton of complex layers, each component has to pull its weight. Luckily, everything you need is easy to grab at the store, and we aren’t messing around with making dough from scratch. Remember, the fun here is in the assembly, creating these amazing pull apart pizza sandwiches!
Before you start mixing up that wonderful glaze, grab everything and lay it out. It helps keep that ten-minute assembly promise. If you’re looking for a great shortcut on the sauce front, I have a fantastic one for a no-cook pizza sauce you can knock out while the oven preheats.
The Roll Base: Hawaiian Roll Sliders
This is non-negotiable for me, folks. You absolutely must use the 12-count package of sweet Hawaiian rolls. They have that hint of sweetness that cuts through the saltiness of the pepperoni and cheese perfectly. The trick for these Hawaiian roll sliders is keeping the whole block together for as long as possible. When you slice the package horizontally, try to keep the top half attached to the bottom half—it makes layering so much easier and sets you up for that perfect pull-apart moment later.
Cheese and Pepperoni Sliders Components
We need the gooey factor, so we’re using a dual-cheese approach. Get one cup of shredded mozzarella; that’s your melty masterpiece. Then grab half a cup of provolone. Provolone is fantastic here because it melts beautifully but has a bit more bite than mozzarella alone. For your meat, you’ll need half a cup of thinly sliced pepperoni. Thinly sliced is key so it doesn’t curl up into tiny, crunchy cups while baking!
Crafting the Garlic Butter Sliders Glaze
This glaze, bless its heart, is what elevates these from just “pizza on a roll” to “OMG, what is this amazing appetizer?” Melt down four tablespoons of good unsalted butter. Once it’s liquid gold, whisk in one teaspoon of garlic powder and half a teaspoon of Italian seasoning. That’s it! It sounds basic, but brushing this savory mixture evenly over the tops before the oven does wonders for both flavor and texture. It’s the secret sauce for delicious garlic butter sliders!
How to Prepare These Simple Slider Recipes Step-by-Step
Okay, now for the best part: putting it all together! This is where you see how quickly these simple slider recipes come together. The beauty of this method is that you are treating the entire 12-pack of rolls like one giant sandwich until it comes out of the oven. I promise, if you can stack ingredients, you can master these pizza sliders. Make sure your oven is set to 350 degrees Fahrenheit before you even touch the rolls, because every second counts when you’re assembling!
First things first, grab that 9×13 baking dish and grease it lightly—you don’t want any sticking drama later on. Then, here comes the very important technique that saves you so much trouble later. Thinking about other crowd-pleasing sheet pan meals? I have a killer recipe for easy taco pizza if you ever need a rotation!
Assembly: Layering the Pizza Sliders
Take your entire package of sweet rolls and, using a long serrated knife, slice them right through the middle horizontally. I mean straight across the whole sheet, keeping the tops connected to the bottoms. Lay the bottom halves gently into your prepared dish. This keeps everything lined up!
Next, take your marinara sauce—about a half cup should do it—and spread it carefully over the bottom layer of rolls. Don’t slather it too close to the edges, or things can get soggy. Now, evenly distribute your cheeses: the mozzarella and that provolone. Try to get a nice consistent layer so every little sandwich square gets some cheese when you pull them apart. Finally, lay those pepperoni slices neatly over the cheese. Remember, we want even distribution!
Place the top halves right back on top of your creation. See how easy that was? Now we make it smell incredible.
The Garlic Butter Brush and Baking Instructions
If you’ve already made your garlic butter glaze (and if you haven’t, go whisk those melted butter, garlic powder, and Italian seasoning together right now!), it’s time to use it. Grab a pastry brush—or even the back of a spoon if you’re in a pinch—and brush that glistening mixture all over the entire top surface of the rolls. Be generous! This is what makes the tops golden and traps all that pizza steam underneath.
Pop the whole tray into your 350°F oven. You’re looking for 12 to 15 minutes. You want the cheese totally melted and bubbly, and the tops should look beautifully golden brown. Once they are out, resist the urge to slice them immediately! I learned this the very hard way. Let them rest for about five minutes. This short rest allows the cheese to settle just a tiny bit, so when you slice between the rolls, you get that perfect, satisfying stretch without everything sliding out. That’s my trick for a great finish on these pizza sliders!
Tips for Success with Your Pepperoni Sliders
Even though these pepperoni sliders are practically foolproof—and that’s why I love them so much—a few little insights from my own testing can make them go from great to absolutely unforgettable. Remember, cooking is about making small choices that add up, and that’s how we build trust in recipes here at HearthBite!
The official recipe note calls for provolone, but let’s talk cheese swaps for a second. If you aren’t crazy about the slight sharpness of provolone, don’t stress! You can swap that out for Monterey Jack. It melts just as beautifully and gives you a milder, creamier finish to your pizza sliders, which the kids usually love. It’s all about what makes *your* family happy.
Now for a flavor boost. Before you brush on that glorious garlic butter glaze, try this simple addition: sprinkle about two tablespoons of grated Parmesan cheese right over the top of the pepperoni layer but under the top bun. When that melts and mixes with the garlic butter, it just amps up the savory factor tenfold. It’s an easy addition that tastes super sophisticated.
Also, if you are using extremely large cuts of pepperoni, you might find they shrink up a bit in the oven. To prevent those little grease cups, try giving your pepperoni a quick dab with a paper towel before layering them on. You still get all the flavor, but you manage the grease runoff, which helps keep your rolls from getting too soggy at the bottom. These little adjustments are what turn a good recipe into your signature dish. For more ideas on easy, grab-and-go bites, take a look at my collection of easy finger food recipes.
Make Ahead Party Snacks and Storage for Pizza Sliders
Okay, let’s talk about planning ahead, because who isn’t making party food ahead of time these days? If you are hosting a game day bash or a big birthday, you want to spend the actual party time enjoying your guests, not hovering over the oven. The great news is that these pizza sliders are absolutely fantastic as make ahead party snacks!
The recipe is designed so you can build the entire thing—bottom rolls, sauce, cheese, pepperoni, top rolls, and garlic butter glaze—all assembled in that baking dish. The key is covering it up tight. Once assembled, seal that dish with plastic wrap, or even foil if you don’t have a tight lid, and pop it straight into the refrigerator. You can safely keep them chilled like this for up to four hours before you plan on serving them. This buying yourself that time is a game-changer for a host, trust me!
Now, if you are baking them straight from the fridge, you need to adjust your timeline slightly. Cold ingredients take longer to heat through to that perfect, bubbly center. Since the original baking time is around 15 minutes, just add about 5 minutes to that time if you’re baking them cold. You’re looking for that same golden-brown top and fully melted cheese, but it will just take a bit longer to reach optimal temperature. You want them piping hot for the best experience!
What if you have leftovers? (I doubt it, these things vanish!) If, by some miracle, you have a few of these marvelous pizza sliders left over, don’t even think about the microwave. The microwave makes the rolls instantly soggy, and we worked too hard for that! For my favorite spicy dips, reheating is essential, and it’s the same here.
Instead, wrap the leftovers tightly again and store them in the fridge for up to three days. When you crave one later, pull just what you need and reheat them in a toaster oven or a standard oven set at 350°F for about 5 to 8 minutes. This second bake crisps the top slightly and gets that cheese perfectly re-melted. They taste almost as good the next day!
Serving Suggestions for These Crowd Pleasing Snacks
We all know these pizza sliders disappear fast on their own! But once you have this easy, satisfying snack ready, sometimes you need a little something extra to round out the spread, especially if you’re planning a long game day watch party. These crowd pleasing snacks are so versatile they pair well with just about anything, but I have a few favorites that really cut through the richness of the cheese and pepperoni.
If you’re setting these out for a group, don’t just serve them alone! Try adding a simple veggie element alongside these heavy hitters. They are wonderful served next to some crisp carrot and celery sticks with ranch dressing. The cool crunch is a perfect textural contrast to the warm, gooey bread.
Now, if you’re serving these easy pizza sliders as part of a dips buffet—and you absolutely should be—you need something zesty! Since these sliders already have that recognizable pizza flavor profile, you don’t want another heavy, cheesy dip right next to them. That’s why I always pair them with my famous easy Rotel Dip recipe. The slight tang and spice from those green chiles and tomatoes really brighten up the entire platter.
Finally, don’t forget dipping sauces! While the marinara inside is great, a little side of zesty ranch or a chunky marinara sauce for dipping those crispy corners can be fun. Some people even like a side of warm pizza sauce for dunking. It turns them into individual little pizza bites all over again!
Frequently Asked Questions About Hawaiian Roll Sliders
It’s totally normal to have a few questions when you’re swapping out ingredients or planning for leftovers. I know I always do! These Hawaiian roll sliders are so adaptable, but sticking close to the original method ensures that amazing, gooey result we are aiming for. I’ve pulled together some of the questions I always get asked about making these perfect for a crowd.
Can I use regular dinner rolls instead of Hawaiian rolls for these pizza sliders?
That’s a great question, and yes, you *can*, but I really, really recommend sticking with the sweet Hawaiian rolls if you can find them. The reason these pizza sliders turn out so special is that slight sweetness baked into the dough. It balances out the saltiness of the pepperoni and tomato sauce just beautifully. Regular yeast dinner rolls will work in a pinch—they’ll still be tasty—but they just won’t have that signature flavor pop that makes this recipe so addictive. They won’t be quite as soft, either!
What is the best way to reheat leftover cheesy sliders recipe portions?
This is crucial for texture enjoyment, my friends! Do NOT, I repeat, DO NOT use the microwave if you have any other option. The microwave steams the soft rolls and turns them chewy or gummy instantly, and we absolutely cannot let that happen to our beautiful cheesy sliders recipe!
Instead, go for heat that dries things out a little and brings back a tiny bit of crispness. The best method is the oven set at about 350°F. Pop the leftover pepperoni sliders on a baking sheet and warm them for about 5 to 8 minutes. If you have an air fryer, that works wonders too—maybe even faster, around 4 minutes at 325°F. They come out looking and tasting almost freshly baked!
On a related note, if you are making these for kid friendly meals to pack in lunchboxes the next day, you might want to check out my recipe for pizza muffins—they reheat much better in a microwave if you are ever truly stuck!
Estimated Nutritional Data for One Pizza Slider
I always try to give you guys all the information you need, right down to the basics! When we’re talking about party food, we know these pizza sliders are rich and savory, packed with cheese and that lovely buttery topping. So, here is what you can generally expect if you eat just one of these delicious little sandwiches. Remember, since we all use slightly different brands of sauce, cheese, or rolls, these numbers are a good guideline, but always know the real figures can vary based on what you put into your own tray.
I’m listing these estimates based on one single slider, which is a realistic single serving size when you’re enjoying a plateful of these easy pizza sliders at a gathering:
- Serving Size: 1 slider
- Calories: 280
- Fat: 15g
- Saturated Fat: 7g
- Carbohydrates: 25g
- Protein: 12g
- Sugar: 6g
- Sodium: 550mg
See? Not bad at all for something that tastes this indulgent! The sodium is a little high, as expected with pepperoni and processed cheese, but that’s the nature of great, bold pizza flavor. Keep that in mind when you’re stacking them high on your plate!
Share Your Homemade Pizza Sliders
Well, that’s it, friends! We’ve turned a simple package of Hawaiian rolls and some pepperoni into what I truly believe is the best appetizer you will ever make. I really hope you serve these during your next gathering, whether it’s a big football party or just a Tuesday night when everyone needs a little cheesy comfort.
The greatest joy for me here at HearthBite is knowing that my recipes are making their way into your homes and creating those wonderful, shared moments. Would you do me a huge favor? If you loved these pizza sliders as much as my family does, please take a second to come back here and leave a star rating. It helps other home cooks find reliable recipes just like this one!
And if you send me a photo of your beautiful, gooey, garlic-buttered tray via the contact page, I might even feature it on our social media! Seriously, nothing makes me happier than seeing these easy, comforting dishes feeding happy people. Happy baking, and I’ll see you at the next amazing bite!
PrintEasy Pepperoni Pizza Sliders with Garlic Butter Glaze
Make these incredibly easy pull-apart pizza sliders using Hawaiian rolls for a guaranteed crowd-pleasing snack. They are loaded with mozzarella, pepperoni, and topped with a savory garlic butter glaze that makes them gooey. Perfect for game day food or simple party appetizers.
- Prep Time: 10 min
- Cook Time: 15 min
- Total Time: 25 min
- Yield: 12 servings 1x
- Category: Appetizer
- Method: Baking
- Cuisine: American
- Diet: Vegetarian
Ingredients
- 1 (12 count) package Hawaiian sweet rolls
- 1/2 cup marinara sauce
- 1 cup shredded mozzarella cheese
- 1/2 cup shredded provolone cheese
- 1/2 cup thinly sliced pepperoni
- 4 tablespoons unsalted butter, melted
- 1 teaspoon garlic powder
- 1/2 teaspoon dried Italian seasoning
Instructions
- Preheat your oven to 350 degrees Fahrenheit. Lightly grease a 9×13 inch baking dish.
- Carefully slice the entire package of Hawaiian rolls in half horizontally, keeping the rolls connected. Place the bottom halves in the prepared baking dish.
- Spread the marinara sauce evenly over the bottom layer of rolls.
- Sprinkle the mozzarella and provolone cheeses over the sauce.
- Arrange the pepperoni slices evenly over the cheese layer.
- Place the top halves of the rolls over the pepperoni.
- In a small bowl, whisk together the melted butter, garlic powder, and Italian seasoning to create the garlic butter glaze.
- Brush the entire top surface of the assembled sliders generously with the garlic butter mixture.
- Bake for 12 to 15 minutes, or until the cheese is melted and bubbly and the tops are lightly golden brown.
- Remove from the oven and let rest for 5 minutes before slicing between the rolls. Serve warm.
Notes
- You can substitute provolone cheese with Monterey Jack for a milder flavor.
- For extra flavor, add a sprinkle of grated Parmesan cheese over the garlic butter before baking.
- These sliders are excellent for make ahead party snacks; assemble completely, cover, and refrigerate up to 4 hours before baking. Add 5 minutes to the bake time if baking straight from the refrigerator.
Nutrition
- Serving Size: 1 slider
- Calories: 280
- Sugar: 6
- Sodium: 550
- Fat: 15
- Saturated Fat: 7
- Unsaturated Fat: 8
- Trans Fat: 0.2
- Carbohydrates: 25
- Fiber: 1
- Protein: 12
- Cholesterol: 35