
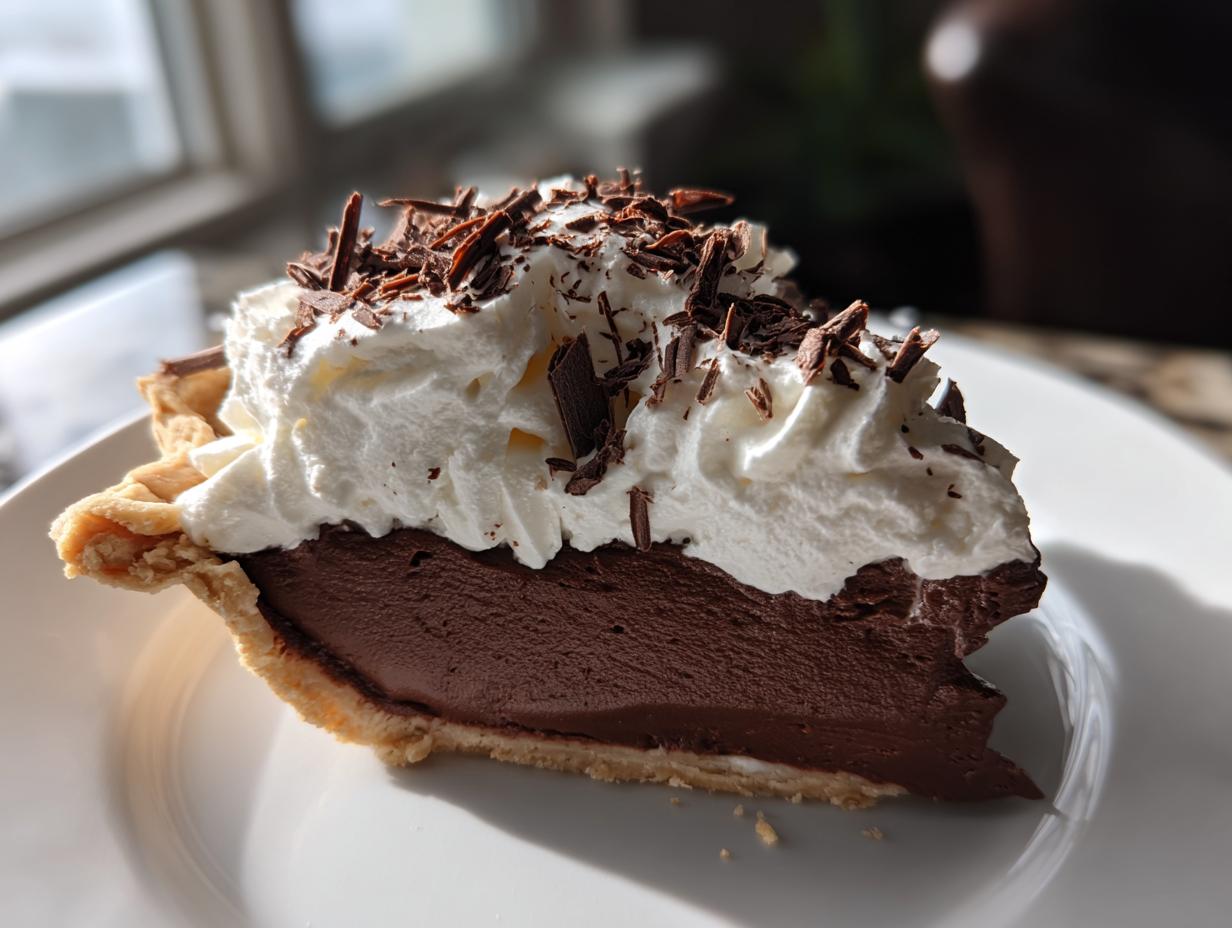
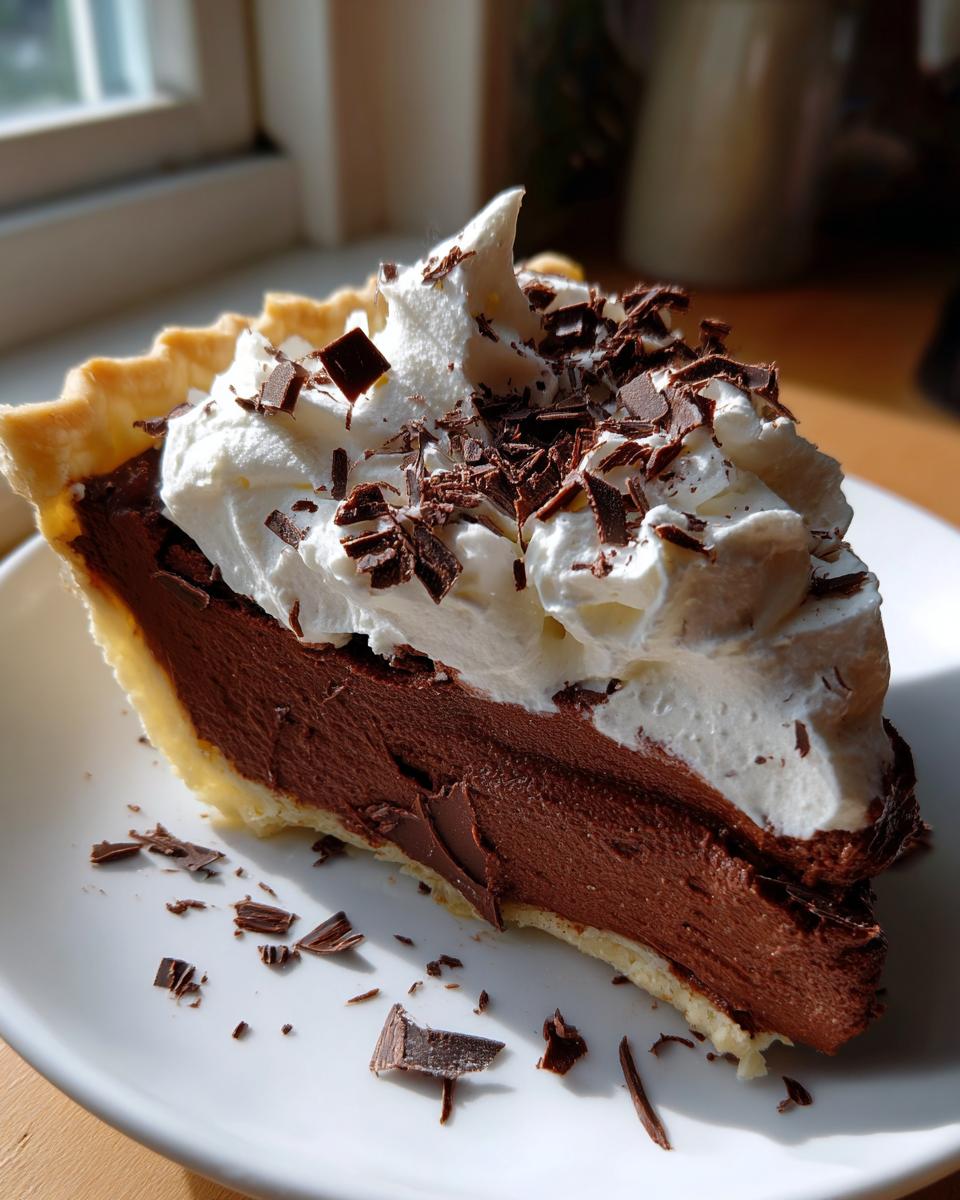
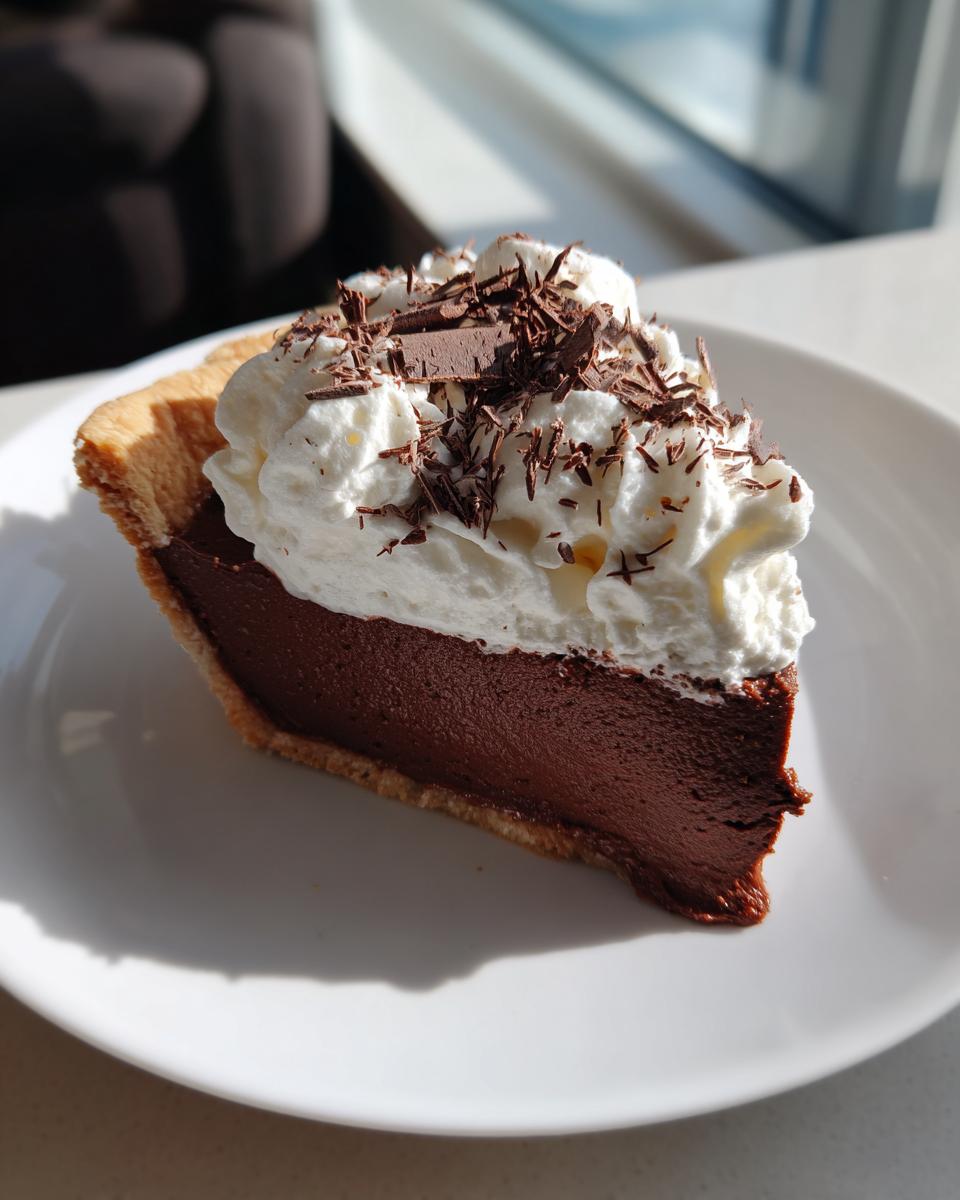
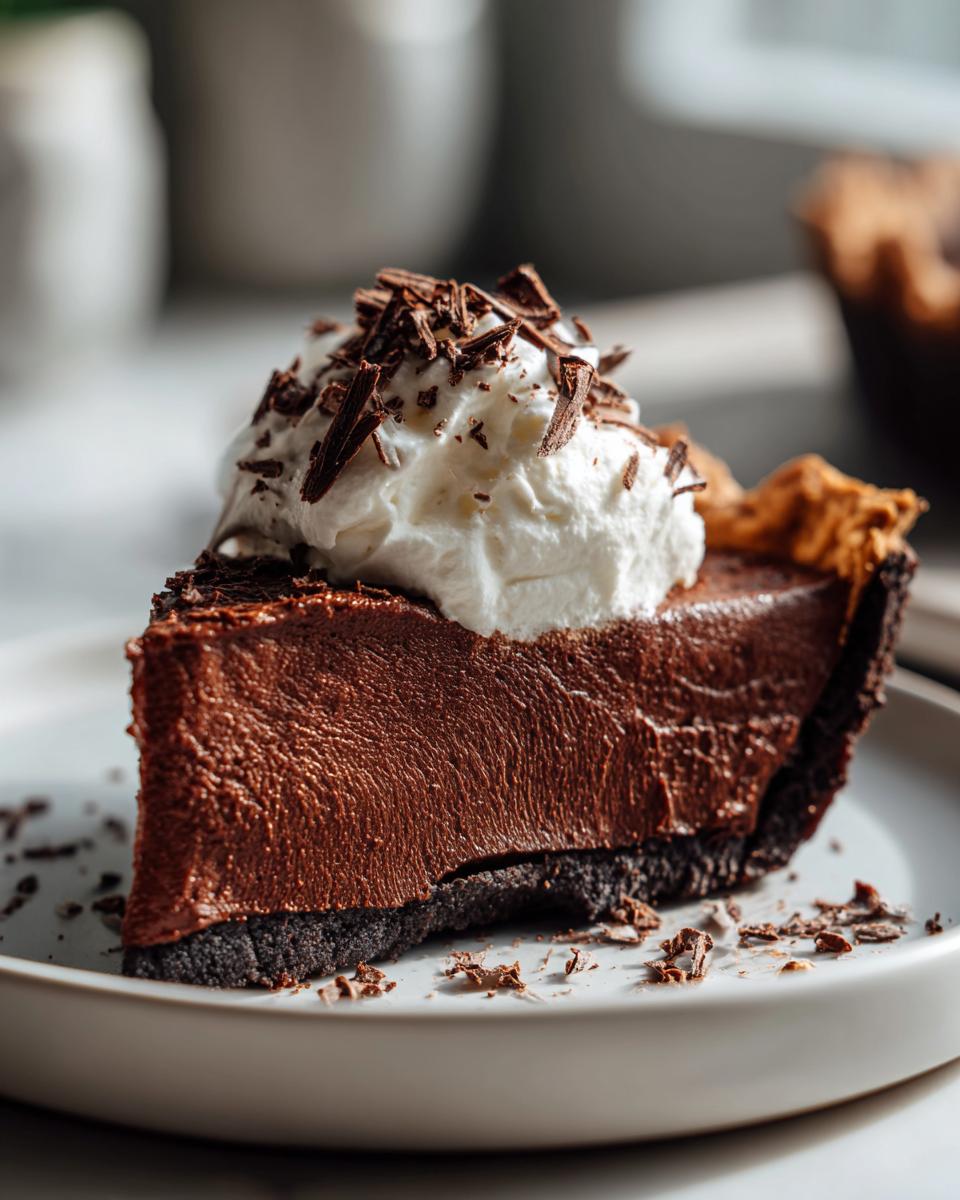
When the craving hits for a truly decadent chocolate dessert, something that tastes like pure indulgence without being overly complicated, I immediately turn to my French Silk Pie recipe. Here at HearthBite, we believe the best food comforts the soul, and nothing feels more luxurious or special than this pie. It’s rich, it’s airy, and trust me, it works every single time because I’ve tested it until it was perfectly reliable for my own family gatherings. This specific recipe takes that classic velvety smooth dessert texture and wraps it up beautifully, ready for your table!
- Why This is the Best French Silk Pie Recipe You Will Make
- Ingredients for Your Decadent Chocolate Pie
- How to Make the Ultimate French Silk Pie
- Tips for a Perfect French Silk Pie Every Time
- Make Ahead Dessert and Storage for Your French Silk Pie
- Serving Suggestions for this Holiday Dessert Pie
- Variations on the Classic French Silk Pie
- Frequently Asked Questions About French Silk Pie
- Sharing Your Homemade French Silk Pie
Why This is the Best French Silk Pie Recipe You Will Make
If you’ve ever skipped making a homemade chocolate pie because you worried about texture or safety, this recipe is for you. We are aiming for the Best French Silk Pie Recipe here, which means it has to be unbelievably rich and deeply chocolatey, yet surprisingly light. My focus? That velvety chocolate dessert finish that you just can’t beat. I made sure the eggs are gently cooked, taking away any worry while maximizing that luxurious mouthfeel. We achieve a texture that is consistently perfect, much like the famous restaurant versions!
Achieving That Silky Smooth Dessert Texture
The secret to calling this a Silky Smooth Dessert lies in two small, non-negotiable steps. First, after you cook that sugar-egg mixture, you absolutely must strain it through a fine-mesh sieve. Don’t skip this! It catches any tiny bit that might have cooked unevenly, guaranteeing you zero graininess. Second, after melting the chocolate and whipping the cream, you fold them gently—super gently! Remember Step 6? We lighten the chocolate with one-third of the whipped cream first, then fold the rest in slowly. This keeps all the air you worked so hard to create, resulting in that airy, mousse-like structure rather than dense pudding.
If you want another example of a rich, guaranteed-to-work chocolate recipe, you should check out my guide for the Ultimate Moist Chocolate Fudge Cake sometime!
Ingredients for Your Decadent Chocolate Pie
Okay, let’s talk about what you need to create this incredible Decadent Chocolate Pie. Because this pie relies heavily on texture, ingredient quality and temperature really matter here. We’re keeping the list tight—it’s not about a million fancy things, it’s about making the core ingredients shine!
- 1 (9-inch) pre-baked pie crust (I know, hold on, we’ll talk crust options below!)
- 1 cup granulated sugar
- 4 large egg yolks
- 1/2 cup cold water
- 1 cup unsalted butter, softened (make sure this is actually soft, not melty!)
- 4 ounces unsweetened chocolate, melted and cooled slightly
- 1 teaspoon vanilla extract
- 1/2 teaspoon almond extract (Don’t skip this! It brightens the chocolate flavor so much.)
- 1 cup heavy whipping cream, chilled (Super cold is key for whipping!)
- 2 tablespoons powdered sugar
- Chocolate shavings, for garnish (The fancier your shavings, the better it looks!)
Crust Options for Your French Silk Pie
So, the recipe calls for a 9-inch pre-baked crust. I love using my favorite flaky butter crust for the classic look, but honestly, sometimes you just need speed, right? That’s where the Oreo crust comes in, making this an instantly easier dessert. It brings a whole different vibe to the party!
If you decide to go the chocolate route for the base of your French Silk Pie with Oreo Crust, here’s my quick ratio from the notes I keep tucked away. You’ll want to mix about 1 1/2 cups of very finely crushed Oreo cookies with 6 tablespoons of melted butter. Press that mixture firmly into your 9-inch pie plate and get it chilled while you make the filling. It sets up beautifully and tastes amazing against that creamy chocolate filling.
Graham cracker is great too, if you prefer something a little less intense than chocolate cookies. But regardless of what you choose, make sure that crust is fully cooled before you fill it, or you’ll start melting the filling before it even gets into the fridge!
How to Make the Ultimate French Silk Pie
Alright, let’s get down to business! This is where the magic happens, and where we turn simple ingredients into that impressive, decadent chocolate pie everyone raves about. While this French Silk Pie filling is cooked, the real skill comes in the assembly and cooling, so pay attention to those timings. We need patience at the start so we can enjoy the results later!
- Prepare your crust: If you’re using a flaky crust, make sure it is fully baked (pre-baked!) and completely cooled down. If you went with that amazing Oreo crust we talked about, press it into the pie plate and stick it in the fridge to firm up while you tackle the filling.
- Make the custard base: Grab a small saucepan. Whisk your sugar and egg yolks together first—get them looking pale. Then, slowly whisk in that cold water. Put this over medium heat. You need to stir constantly, seriously, never stop stirring, until the mixture thickens enough to coat the back of your spoon. If you have a candy thermometer, shoot for 160°F. The main thing here is just don’t let it boil, or you’ll end up with scrambled eggs, and nobody wants that kind of texture!
- Strain for perfection: Once it hits that thickness, yank it off the heat immediately. Now, this is key: push the mixture through a fine-mesh sieve into a clean bowl. This one little step separates a good pie from a great one. If you skip it, you risk little cooked bits getting into your filling. We want ultimate smoothness here! Let this base cool for about 15 minutes, giving it a gentle stir every now and then so it chills evenly.
- Cream the butter: In a big bowl, use your electric mixer to beat that softened butter until it looks light and genuinely fluffy. Then, very slowly, start beating in your cooled sugar-egg mixture. Keep mixing until everything looks perfectly combined and uniform.
- Add chocolate and flavorings: Mix in the melted, slightly cooled chocolate, vanilla, and that secret weapon, the almond extract. Beat it until your Rich Chocolate Filling looks deep brown and gorgeously consistent.
- Fold in the whipped cream: This step is vital for achieving that airy, mousse-like quality. Whip your heavy cream and powdered sugar in a separate, cold bowl until you get stiff peaks. Do not overmix! Now, take about one-third of that whipped cream and fold it into your chocolate base first. This is called “lightening the base.” It makes the heavy chocolate mixture happier about accepting the rest of the airy cream. Then, very, very gently, fold in the remaining whipped cream until you barely see streaks. You keep folding until it’s mixed, but you stop before you whip all the air out!
- Fill the crust: Spoon all that luscious filling into your cooled crust. Smooth out the top gently with an offset spatula.
- Chill completely: Cover the pie loosely with plastic wrap—make sure the wrap doesn’t touch the surface of the filling! Refrigerate this masterpiece for at least 6 hours, but honestly, overnight is always best to ensure it’s perfectly set.
- Garnish and serve: Right before you bring it to the table, top it with more fresh whipped cream and shower it with those gorgeous chocolate shavings. Slice and enjoy this amazing French Silk Pie!
Cooking the Custard Base for the Rich Chocolate Filling
Honestly, the custard part sounds intimidating, but it’s totally straightforward if you listen for the spoon test. Remember, we’re cooking those yolks just enough to thicken, not to scramble, which means medium heat and constant movement. As I always tell my friends at HearthBite, that straining step is non-negotiable if you want that unbelievable texture that makes this a true Melt in Your Mouth Pie. Think of the strainer as your final quality check for a super Rich Chocolate Filling!
Folding Technique for Creamy Chocolate Mousse Pie Filling
This is the difference between a silky pie and one that collapses flat! When you fold in the whipped cream, you are essentially introducing air into the dense chocolate base. We use that initial one-third fluff to gently bridge the two textures. After that, every movement should be careful—slicing down the middle and scooping up from the bottom. We are trying to preserve every single bubble in that whipped cream because that’s what turns the filling into the most fantastic, light, Creamy Chocolate Mousse Pie.
If you are looking for ways to elevate your baking game besides pastry, check out my tips on quick and easy dinner recipes—because even dessert masters need simple weeknight meals!
Tips for a Perfect French Silk Pie Every Time
Even though this recipe aims to be the most Easy French Silk Pie you’ve ever made, there are just a few insider secrets I’ve learned over the years from testing and tweaking. Remember those notes I keep on the recipe card? They aren’t just suggestions; they are essential for that truly decadent experience. If you follow these points, you’ll nail that heavenly texture every single time, whether it’s your first attempt or your tenth!
First up: Temperature control is everything, especially when dealing with the chocolate and butter. When you melt your unsweetened chocolate, you have to let it cool down a bit before you even think about adding it to the butter mixture. If that chocolate is too hot—even warm—it can cause the emulsion to break right there in the bowl. You’ll end up with pockets of chocolate instead of a smooth blend, and that ruins the whole silky promise! Wait until it’s just lukewarm to the touch before beating it in slow and steady.
Next, let’s talk about the butter consistency, which I mentioned earlier. It needs to be soft, like if you were leaving a fingerprint in it easily, but it absolutely cannot be oily or runny. If your butter has melted even a little bit, stick it back in the fridge for ten minutes! Creaming soft butter yields those tiny air pockets that give the filling structure. If it’s too warm, the air just squishes right out when it tries to bake or set.
Finally, the chilling time. I know the recipe says 6 hours minimum, but hear me out: you want this pie to set up like a dream because we are serving something so rich. If you cut into it too soon, it oozes onto the plate like a chocolate puddle, and that’s just sad. Give it that long chill—at least 8 hours, but overnight is my absolute preference. This resting period lets the fats solidify correctly around the air bubbles you folded in, resulting in that firm, yet utterly melt-in-your-mouth slice you’re looking for. It’s worth the wait, trust me!
For more foolproof recipes where precision pays off later, you have to try my guide on easy homemade soft and chewy sea salt caramels. Getting the temperature right there works just the same way!
Make Ahead Dessert and Storage for Your French Silk Pie
This is truly the secret weapon in my arsenal for holiday baking, which is why I love that the search intent clearly points out that this works as a fantastic Make Ahead Dessert. Seriously, if you’re hosting Thanksgiving or Christmas dinner, you want this pie done and tucked away chilling while you worry about the turkey! Because the filling relies on the fat and structure setting up properly, time—not speed—is your friend here.
You absolutely must give this pie at least 6 hours in the refrigerator before attempting to slice it. If you try to rush it, you’ll end up with a mess, and nobody wants a sloppy French Silk Pie presentation! I always tell people that you should plan for 8 hours, but overnight is the gold standard. This long, slow chill lets that rich chocolate filling firm up right into that velvety texture we worked so hard to achieve. It firms up beautifully, so don’t worry that it will get too stiff; it will stay creamy inside.
Now, about storage: you need to protect that beautiful mountain of whipped cream you put on top. If you cover the pie tightly with plastic wrap, the condensation will make the cream weep, and that’s just disastrous! You need to cover it loosely, ensuring the wrap doesn’t actually touch the surface of the cream. I usually use toothpicks poked strategically into the edges of the crust to hold the plastic wrap up a few inches above the topping. If you plan to keep it for more than a day, you might want to hold off on the final whipped cream topping and just add that right before serving.
How long does it last? Well, typically you can keep a well-covered French Silk Pie in the fridge for about 3 to 4 days. It stays incredibly moist because of the fat content, so it doesn’t dry out like a regular cake, which is fantastic if you need to make dessert early in the week!
If you’re looking for other stellar make-ahead recipes for your busy holiday schedule, you seriously need to check out my recipe for Easy Homemade Strawberry Freezer Jam. It’s another cook-once, enjoy-all-season winner!
Serving Suggestions for this Holiday Dessert Pie
You’ve made this incredibly rich chocolate pie, and now it’s time for the grand finale! Serving a Holiday Dessert Pie this decadent means you need accents that balance the richness, not compete with it. It should look beautiful on the table, too. After all that hard work, we deserve a little pomp and circumstance, right?
My absolute favorite way to serve this French Silk Pie is slightly simplified but elegant. I always have some freshly whipped cream set aside—not the stuff mixed into the filling, but stiff peaks you pipe right onto the slice just before it hits the plate. A generous dusting of high-quality cocoa powder or some dramatic chocolate curls on top of that whipped cream makes it look bakery-worthy instantly.

But if you want to cut through that deep, dark chocolate flavor, you need a little brightness. A vibrant raspberry coulis drizzled artfully around the slice is perfection. The tartness of the berries is just the counterpoint this rich filling needs. If you don’t want to fuss with a sauce, a small dollop of tart cranberry sauce works wonderfully, especially around Thanksgiving or Christmas!
For that cozy holiday feel, I always serve a slice alongside a strong, freshly brewed coffee. The slight bitterness of the coffee really enhances the dark chocolate notes in the pie. If you’re serving this after a big meal, sometimes simple is best. A small cluster of fresh, perfect strawberries or a few tart pomegranate seeds scattered on top gives you color and a little pop of freshness. It just feels complete!
Speaking of holiday favorites, if you need a lighter treat to balance out all that richness, you have to try my Cranberry Orange Cookies recipe! They’re bright, zesty, and taste like true winter comfort.
Variations on the Classic French Silk Pie
While I adore making this classic, deeply satisfying French Silk Pie, I know sometimes you need a little twist, or maybe you just need it faster! That’s why I’ve always kept notes on a few easy variations. You can play around with the flavor profile or even change the entire format without losing that signature creamy richness. You’ve got choices, friends!
First, let’s talk flavor additions! The primary recipe uses vanilla and a touch of almond extract, which is pure classic perfection. But if you’re feeling adventurous, try swapping out the almond for something richer. A half teaspoon of orange extract works wonders if you like that dark chocolate/citrus combination, or if you’re really feeling festive, add just a tiny pinch of espresso powder to the melted chocolate. It deepens the chocolate flavor so much, making it taste like you used the most intense, dark chocolate imaginable.
Next, the texture switch-up. Many people search for a No Bake Silk Pie experience, and while our main recipe requires cooking the eggs, you can adapt this concept easily. If you are dead set on avoiding the stovetop completely, look for recipes that skip the cooked custard base entirely, often relying heavily on stabilized whipped cream and a melted chocolate ganache base mixed into the chilling agents. It won’t have that exact sturdy, rich custard base, but it delivers incredible chocolate flavor fast!
And for the easiest transition? Bars! If you struggle with getting a perfect slice from a pie plate, turning this into a slab pie is genius. You just spread the entire batch of filling into a 9×13 inch baking dish lined with parchment paper (leave some overhang so you can lift it out later!). Cut it into squares instead of wedges. It’s easier to serve at a party, and everyone gets a perfect corner piece, which, let’s be honest, is the best part anyway!
If you love the idea of easy, no-fuss chocolate desserts made with crushed cookies, you absolutely must check out my foolproof Easy No-Bake Oreo Cheesecake recipe. It scratches that same creamy, deeply satisfying itch!
Frequently Asked Questions About French Silk Pie
Whenever I post this recipe online, the questions always roll in about the texture, the crust, and yes, those eggs! It’s smart to ask, because you want every bite of this rich dessert to be perfect. Here are the things I hear most often about making the best French Silk Pie.
Is it safe to eat French Silk Pie if it contains eggs?
That is such an important question, and I absolutely want you to feel safe enjoying this! In my recipe, we specifically cook the egg yolk and sugar mixture gently on the stovetop until it reaches 160°F, which is the temperature needed to pasteurize the yolks. That cooking step eliminates any worry about raw eggs, but it’s also critical for texture! Cooking it causes the mixture to thicken, which is the foundation of our custard base. So yes, thanks to that careful cooking (Step 2!), this pie is safe and wonderfully smooth!
What is the best crust to use for this pie?
Oh, you have choices here, and honestly, all of them are delicious! The recipe uses a pre-baked, flaky pie crust, which gives you that traditional, buttery contrast to the rich filling. But you know I love shortcuts that still deliver flavor, so the Oreo crust is a huge favorite around here. If you search around, you’ll also see graham cracker crusts suggested. For me, if I’m going for ultimate decadence, Oreo wins. If you need speed and flavor, you can’t go wrong with chocolate!
How hard should the filling be when chilled?
When your French Silk Pie is perfectly set after that long chill time, it should be firm enough that your knife comes out clean when slicing, but it should absolutely not be hard or stiff like ice cream. You want that melt-in-your-mouth quality! It should yield easily to a fork. If it’s too soft, that usually means you didn’t chill it long enough, or you may have over-folded the whipped cream and introduced too much liquid too quickly. A properly set pie has a lovely structure but feels light, almost like a dense mousse.
Can I use Cool Whip instead of homemade whipped cream?
I totally get the appeal of using Cool Whip, especially if you’re looking for something faster! You certainly *can* substitute it for the heavy cream and powdered sugar in Step 6. If you do, you’ll skip the whipping step entirely. However, I strongly suggest you try making the homemade whipped cream at least once. Homemade cream, especially when folded in correctly, has a much more delicate, airy texture that really compliments the density of the chocolate filling in a way that the stabilized store-bought tubs just can’t quite match. It makes a difference in that luxurious mouthfeel!
If you love using whipped toppings in desserts, you absolutely have to check out my recipe for Easy Cool Whip Cookies next! They are a different kind of magical bake.
Sharing Your Homemade French Silk Pie
Now that you’ve gone through the process—from cooking that custard base to gently folding in all that airy cream—it’s time to enjoy the fruits of your labor! Seriously, nothing makes me happier here at HearthBite than knowing you’ve created something truly special and decadent right in your own kitchen.
I truly believe that food tastes better when it’s shared, so I would absolutely love to hear how your French Silk Pie turned out! Did you stick with the flaky crust, or did you go for the quick Oreo base? Did you add any extra zest to your garnish?
Please, if you loved this impossibly rich chocolate pie, take a moment to leave me a star rating down below in the comments section! Your feedback lets me know I’m keeping my promise to deliver reliable, comforting recipes that work for busy families. Also, if you snapped a picture of that gorgeous, velvety slice, tag me on social media! I adore seeing your creations. Happy baking, and enjoy every melt-in-your-mouth bite!
PrintThe Ultimate French Silk Pie: Rich, Velvety Chocolate Dessert Recipe

Discover how to make the most decadent French Silk Pie! This recipe delivers an unbelievably rich, creamy, and velvety chocolate filling set in a buttery crust. Perfect for holidays or any special occasion, learn the simple folding techniques to achieve that sought-after mousse texture and top it with glorious homemade whipped cream.
- Prep Time: 30 min
- Cook Time: 10 min
- Total Time: 6 hours 40 min
- Yield: 8 servings 1x
- Category: Dessert
- Method: No-Bake Filling
- Cuisine: American
- Diet: Vegetarian
Ingredients
- 1 (9-inch) pre-baked pie crust (flaky or Oreo crust recommended)
- 1 cup granulated sugar
- 4 large egg yolks
- 1/2 cup cold water
- 1 cup unsalted butter, softened
- 4 ounces unsweetened chocolate, melted and cooled slightly
- 1 teaspoon vanilla extract
- 1/2 teaspoon almond extract
- 1 cup heavy whipping cream, chilled
- 2 tablespoons powdered sugar
- Chocolate shavings, for garnish
Instructions
- Prepare your crust: If using a homemade flaky crust, bake it according to your preferred recipe and let it cool completely. If using an Oreo crust, press the crumbs into a 9-inch pie plate and chill while you make the filling.
- Make the custard base: In a small saucepan, whisk together the granulated sugar and egg yolks. Whisk in the cold water. Cook over medium heat, stirring constantly with a wooden spoon or heatproof spatula, until the mixture thickens enough to coat the back of the spoon (it should register 160°F on a candy thermometer). Do not let it boil.
- Remove the saucepan from the heat. Strain the mixture through a fine-mesh sieve into a clean bowl to remove any cooked egg bits, ensuring a silky smooth result. Let this mixture cool for about 15 minutes, stirring occasionally.
- Cream the butter: In a large bowl, beat the softened butter with an electric mixer until light and fluffy. Gradually beat in the cooled sugar-egg mixture until fully combined.
- Add chocolate and flavorings: Beat in the melted, slightly cooled chocolate, vanilla extract, and almond extract until the filling is uniform and rich.
- Fold in the whipped cream: In a separate, chilled bowl, whip the heavy cream and powdered sugar until stiff peaks form. Gently fold about one-third of the whipped cream into the chocolate mixture to lighten it. Then, gently fold in the remaining whipped cream until just combined, being careful not to deflate the air, which creates the mousse-like texture.
- Fill the crust: Spoon the velvety chocolate filling evenly into the cooled pie crust. Smooth the top.
- Chill: Cover the pie loosely with plastic wrap (do not let it touch the surface) and refrigerate for at least 6 hours, or preferably overnight, until the filling is completely set.
- Garnish and serve: Before serving, top the chilled pie with additional freshly whipped cream and sprinkle generously with chocolate shavings. Slice and enjoy this decadent chocolate pie.
Notes
- For a foolproof, classic texture, ensure your melted chocolate is not hot when added to the butter mixture; warmth can cause the filling to separate.
- If you prefer an Oreo crust, use 1 1/2 cups of finely crushed Oreo cookies mixed with 6 tablespoons of melted butter. Press into the pie plate and chill for 30 minutes before filling.
- This is an excellent make-ahead dessert; it sets best when chilled for 8 hours or more.
Nutrition
- Serving Size: 1 slice
- Calories: 450
- Sugar: 35g
- Sodium: 150mg
- Fat: 32g
- Saturated Fat: 18g
- Unsaturated Fat: 14g
- Trans Fat: 0.5g
- Carbohydrates: 38g
- Fiber: 2g
- Protein: 6g
- Cholesterol: 140mg