
Oh, who among us hasn’t felt that deep, immediate yearning when you see a box of Girl Scout cookies? Those little discs of chocolate, chewy coconut, and sticky caramel just transport you right back to childhood mornings! Well, I’ve taken those amazing flavors—the ones we all crave—and given them the ultimate upgrade. Forget the store trips; we’re making a show-stopping **Samoa Cheesecake** right here in your kitchen.
This recipe, developed with the same care Sarah Miller puts into all our HearthBite recipes, is pure, reliable comfort. We’re skipping the oven because sometimes, you just need that decadent flavor profile without any fuss. This indulgent, no-bake version captures every perfect layer of that iconic cookie blend. Trust me, once you try this filling, you’ll never look back. You can check out more of our favorite comfort food recipes to keep that feeling going!
- Why This No-Bake Samoa Cheesecake is Your New Favorite Girl Scout Cookie Dessert
- Ingredients for the Decadent No-Bake Samoa Cheesecake
- Step-by-Step Instructions for Your Samoa Cheesecake
- Tips for the Ultimate Creamy Caramel Dessert
- Making Variations of the Samoa Cheesecake
- Serving Suggestions for Your Showstopper Desserts
- Storage and Making Ahead for Your Samoa Cheesecake
- Estimated Nutritional Data for This Decadent Cheesecake
- Frequently Asked Questions About Making Samoa Cheesecake
- Share Your Perfect Samoa Cheesecake Creation
Why This No-Bake Samoa Cheesecake is Your New Favorite Girl Scout Cookie Dessert
Listen, I love baking, but sometimes you just need something truly spectacular that doesn’t require turning on the oven, especially when it’s warm outside. That’s why this no-bake **Samoa Cheesecake** comes out on top! It’s an incredibly reliable and easy cheesecake dessert that delivers all the nostalgic flavor bombs of those beloved cookies. We’re talking big payoff with minimal stress, and it sets up beautifully every single time. If you love my other no-bake cheesecake options, this one is going right to the top of your list.
Flavor Profile: Mastering the Caramel Coconut Cheesecake Elements
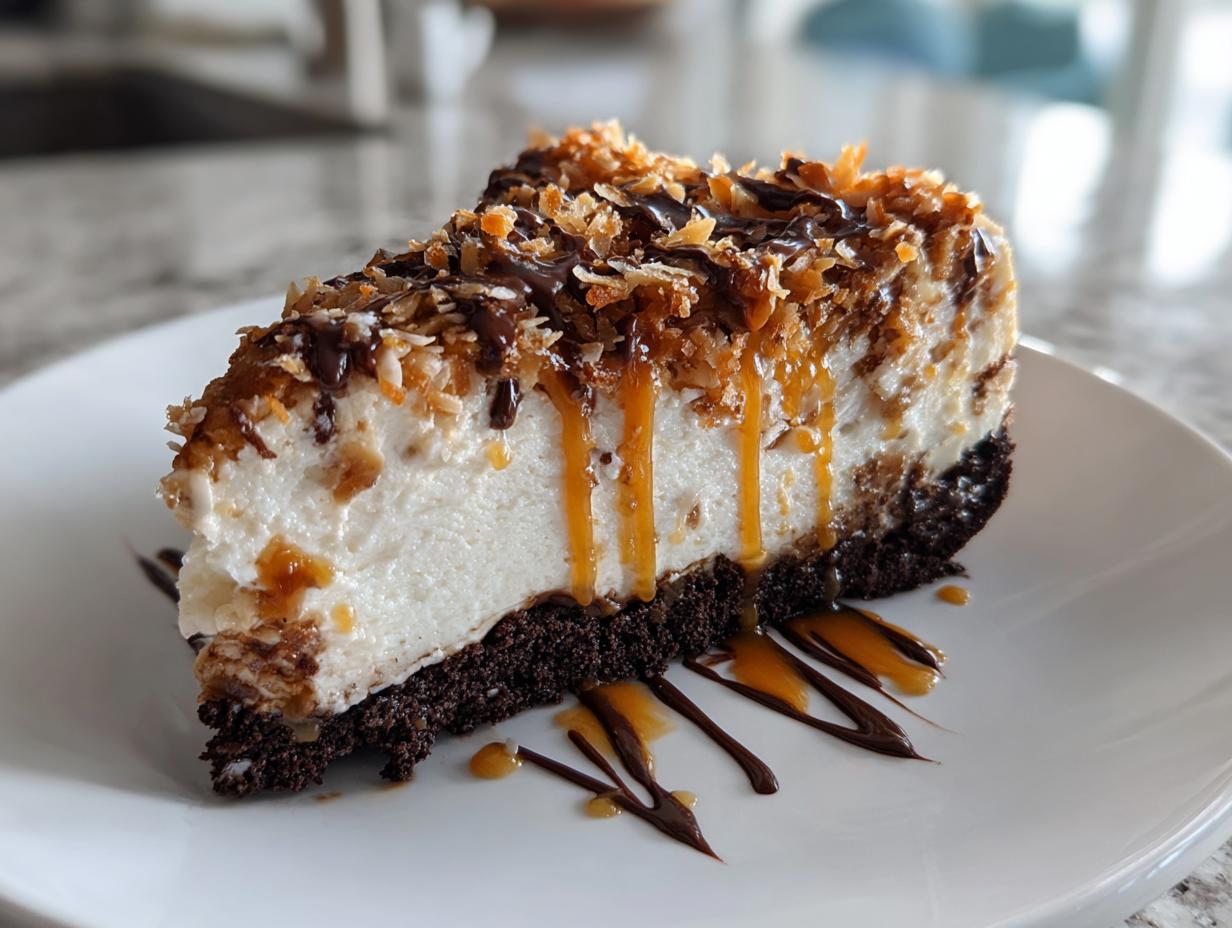
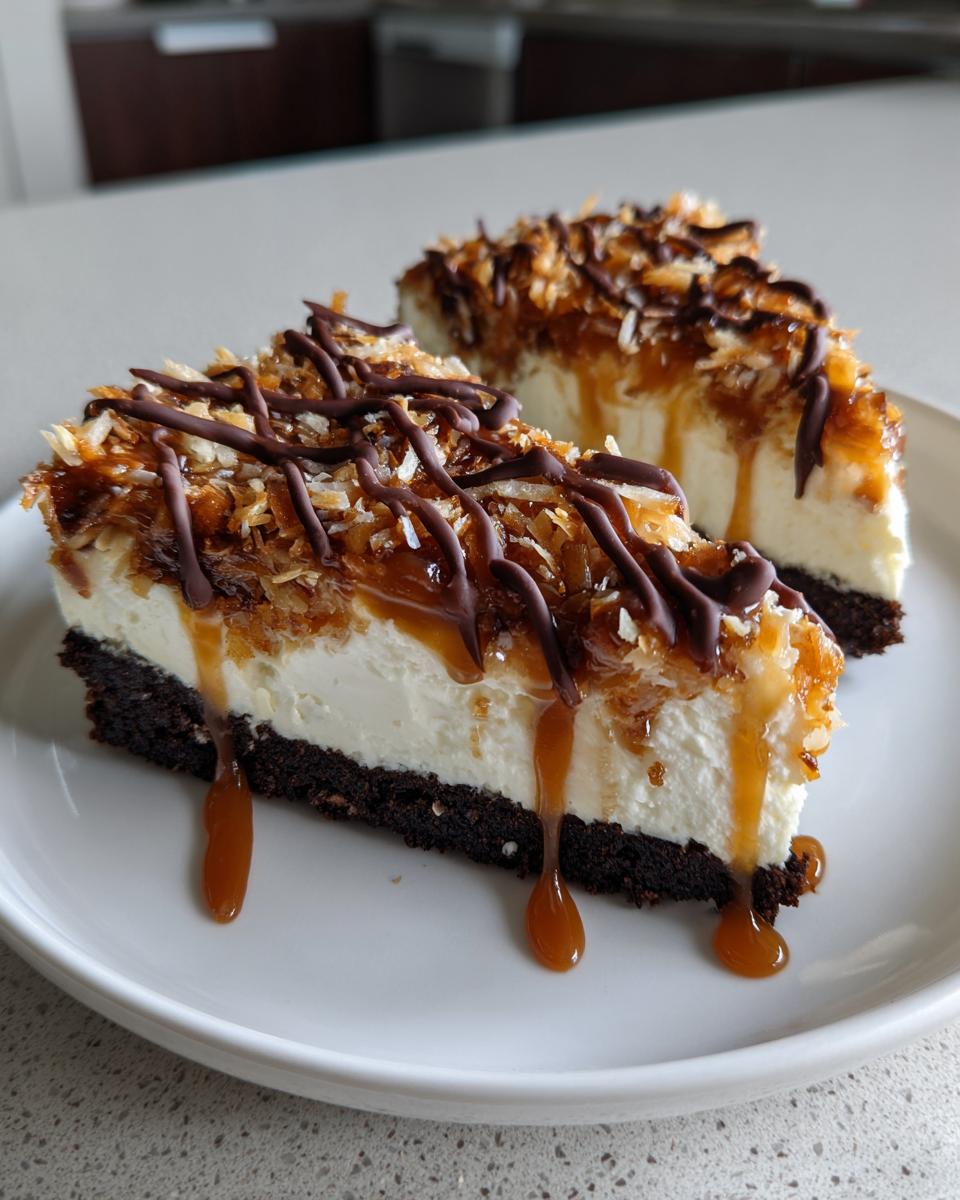
The magic here is balancing three main players perfectly. First, we have that satisfying, sturdy chocolate crust—it mimics the cookie base so well. Then comes the filling itself, which is unbelievably light and cloud-like, but with just enough tang. But the real showstopper is the topping, turning it into the ultimate Caramel Coconut Cheesecake experience. That combination of sticky caramel, crunchy toasted coconut, and melted chocolate? That’s how you turn a classic cookie into a magnificent showstopper dessert.
Ingredients for the Decadent No-Bake Samoa Cheesecake
When you’re making a dessert as layered and complex-tasting as this **Samoa Cheesecake**, you have to be precise with your ingredients. That’s how we guarantee you get that perfect balance of crunchy, creamy, and gooey every time. Don’t skimp here, because these simple components are what make the magic happen!
I’ve broken down exactly what you need below. If you want to make your own caramel sauce for that extra special touch, I highly recommend checking out my recipe for easy homemade soft, chewy sea salt caramels—it makes a difference!
For the Chocolate Cookie Crust
This base sets the theme for the whole dessert, giving us that deep chocolate note right from the start.
- 1 1/2 cups chocolate wafer cookie crumbs (make sure they are fine!)
- 1/4 cup unsweetened shredded coconut
- 6 tablespoons unsalted butter, melted
For the Creamy Filling
This is where we get that amazing, light texture. Make sure your cream cheese is truly softened; cold cream cheese equals lumpy filling, and nobody wants that!
- 2 (8 ounce) packages cream cheese, softened
- 1 cup powdered sugar
- 1 teaspoon vanilla extract
- 1/2 cup heavy cream, chilled (this needs to be cold to whip properly!)
For the Toasted Coconut Topping and Drizzle
This is the final flourish that screams ‘Samoa Cookie!’ We need plenty of caramel and that beautiful Toasted Coconut Topping.
- 1 cup caramel sauce (store-bought is great, homemade is even better!)
- 1 cup unsweetened shredded coconut (this is the batch we toast!)
- 1/4 cup semi-sweet chocolate chips
Step-by-Step Instructions for Your Samoa Cheesecake
Okay, now for the fun part! Since this is a no-bake dessert, the steps are super straightforward, but timing and texture are everything to get that signature creamy finish. We want this to be the Best Cheesecake Recipe you try all year! If you’re looking for more quick desserts, you might love how easy these easy, creamy mini cheesecake bites are, too.
Preparing the Chocolate Crust and Chilling
First things first, let’s lock in that base for your flawless Samoa Cheesecake. In a bowl, mix the chocolate cookie crumbs and the quarter cup of shredded coconut. Pour in the melted butter and stir until everything looks like wet sand. Press that mixture *firmly* into the bottom of your 9-inch springform pan—use the bottom of a straight drinking glass to really pack it down. Now, get that pan into the freezer! It needs to chill while we make the fluffy part.
Creating the Toasted Coconut Topping
While the crust is hardening up, let’s toast that coconut. Spread your cup of unsweetened coconut onto a dry baking sheet. Pop it into a 350°F oven for about 5 to 8 minutes. You have to watch it constantly, I mean *constantly*, because it goes from perfect gold to burnt dust in about three seconds flat! Once it smells wonderfully nutty, pull it out and let it cool down completely.
If you don’t want to turn the oven on, no sweat! You can absolutely toast the coconut in a dry skillet over medium heat. Just stir it non-stop until it’s beautifully golden. That’s my go-to when I’m already running the A/C!
Mixing the Cream Cheese Filling
Grab a big bowl and beat your softened cream cheese until it’s completely smooth—no lumps allowed! Then, gently mix in the powdered sugar and vanilla until it’s just combined. Now, you need a separate, clean, chilled bowl. Whip your cold heavy cream until you get stiff peaks—you know, when you lift the beaters and the cream stands straight up? Gently fold that whipped cream into the cream cheese mixture. We aren’t using gelatin or baking, so folding gently is the secret to keeping all those lovely air bubbles that make this a perfect Cheesecake with Caramel Swirl.
Assembly and Chilling for the Best Samoa Cheesecake
Pull that cold crust out of the freezer. Spread the cream cheese filling right on top and smooth it out. Take about half of your total caramel sauce and drizzle it artfully over the top. Then, take a skewer or a little knife and lightly swirl that caramel into the white filling—don’t mix it all up, we want nice ribbons! Cover it up loosely and this is the hardest part: let it chill in the fridge for a minimum of six hours, but honestly, overnight is when this Samoa Cheesecake really shines.
Finishing Touches: Caramel Drizzle and Chocolate
Once it’s totally firm, it’s time for the finale! Drizzle the remaining gooey caramel all over the surface. Now, generously sprinkle that beautiful, cool, Toasted Coconut Topping we made.
For the chocolate, just put the chips in a small bowl and microwave them in short 20-second bursts, stirring well in between, until it’s silky smooth. Drizzle that melted chocolate over everything. Seriously, look at that! Slice it carefully and enjoy this amazing Chocolate Caramel Cheesecake.
Tips for the Ultimate Creamy Caramel Dessert
If you want this Samoa Cheesecake to go from ‘really good’ to ‘absolutely perfection,’ there are just a couple of little tricks I swear by. Whenever I make any Creamy Caramel Dessert, the very first thing I do—before I even pull out the mixer—is set my cream cheese on the counter. Seriously, if it’s even slightly chilly, it won’t blend into that luxurious, smooth texture we’re aiming for. It needs time to truly soften, like an hour on the counter.
Remember that point about warming the caramel? Don’t skip it! If your leftover caramel sauce is stiff from the fridge, warming it up just a tiny bit makes the drizzle look so much prettier and more professional poured right off the spoon. For extra caramel goodness, I always suggest looking at my recipe for easy homemade soft, chewy sea salt caramels—homemade just tastes brighter!
Making Variations of the Samoa Cheesecake
One of the great things about a dessert inspired by a classic cookie is how much room there is to play around! While I absolutely insisted this recipe be a stress-free weekend treat—hence why we kept it a no-bake Samoa Cheesecake—I know some of you out there just prefer that slightly firmer, traditional cheesecake texture. You do you!
And if you don’t have chocolate wafers hanging around? Don’t panic! You can easily swap those out for buttery shortbread cookies or even vanilla wafers for the crust. It will taste a little less like the original cookie, but you’ll still get that wonderful, slightly salty base holding everything up. If you want to explore other rich, textural desserts, you can peek at my fudgy red velvet brownies recipe for a different kind of chocolate indulgence!
Should You Bake Your Samoa Cheesecake?
Since this recipe is designed to set in the fridge using whipped cream stability, baking it will completely change how it turns out. If you choose to bake it, you’ll need to add eggs (usually two) to the cream cheese mixture and use a water bath—which defeats the entire purpose of making an easy, no-bake dessert, in my opinion! Baked cheesecakes are firmer and denser, obviously. This no-bake version is lighter, fluffier, and melts beautifully in your mouth, which really complements that gooey caramel swirl. For a showstopper dessert in summer, stick to the chilling method!
Serving Suggestions for Your Showstopper Desserts
When you finally pull this gorgeous Samoa Cheesecake out to serve, you absolutely deserve to feel proud! This really is one of those showstopper desserts that draws everyone into the kitchen just by how stunning it looks. Because it’s so rich with caramel, coconut, and chocolate already, you don’t need much fuss on the side.
If you are serving it for a major event or as one of your featured Holiday Cheesecake Ideas, I like to keep the sides super simple. A tiny scoop of vanilla bean ice cream acts as a wonderful temperature contrast to the cool, creamy cheesecake. Or, if you’re having a fruit-heavy gathering, a very light berry compote—think tart raspberries or sharp blackberries—cuts right through that intense sweetness beautifully.
Presentation-wise, make sure you transfer the whole thing to a nice serving plate before taking the springform ring off; it makes the removal so much cleaner. And you can always check out my recipe for a Red Velvet Bundt Cake if you need another centerpiece dessert for your next big meal!
Storage and Making Ahead for Your Samoa Cheesecake
Since this is a no-bake recipe, we want to treat it like the beautiful, creamy dream it is! The best part about making a Samoa Cheesecake is that it practically begs you to make it ahead of time. Remember that mandatory 6-hour chill time? That’s really just the minimum. In fact, this dessert tastes even better and sets up even firmer after a full 24 hours in the fridge.
When you store it, you absolutely have to cover it loosely. I mean it! Cheesecakes love to soak up the smells of whatever else is hanging out in your refrigerator—whether that’s leftover onions or maybe some strong blue cheese. A loose layer of plastic wrap works perfectly, or if you’re worried about crushing that gorgeous Toasted Coconut Topping, you can stick toothpicks strategically into the sides of the filling to hold the wrap up tent-style.
It stores wonderfully in the fridge for usually four to five days. If you happen to have leftovers (I usually don’t, but you might be stronger than me!), you can freeze it, too! Wrap the entire cheesecake tightly in a couple of layers of plastic wrap and then another layer of foil. When you’re ready to thaw it, just move it to the fridge overnight. It comes out perfectly creamy, just like you made it yesterday. If you’re looking for other make-ahead treats, you should try my favorite easy Cool Whip cookies while you’re waiting for that cheesecake to set up!
Estimated Nutritional Data for This Decadent Cheesecake
Now, I always preach that we cook from the heart here at HearthBite, and honestly, when you’re dealing with chocolate, caramel, and coconut, you know this is going to be a treat! We eat these desserts for joy, not for daily vitamins. That said, for anyone tracking things—and you know I like to be transparent about what we’re serving our families—I’ve put together an estimated breakdown based on the ingredients we used in this recipe. Please remember this is just a guideline!
This data is based on dividing the whole dessert into 10 generous servings. If you manage to stretch it to 12 slices—kudos to your restraint!—the numbers per slice will naturally go down.
Here is the snapshot for one slice of this No Bake Cheesecake Recipe:
| Nutrient | Amount Per Serving |
|---|---|
| Serving Size | 1 slice |
| Calories | 450 |
| Sugar | 35g |
| Fat | 30g |
| Saturated Fat | 18g |
| Protein | 6g |
| Carbohydrates | 40g |
| Sodium | 250mg |
It’s rich, it’s decadent, and it definitely earns the title! Enjoy every moment of it.
Frequently Asked Questions About Making Samoa Cheesecake
It’s totally normal to have questions when you’re trying a highly-anticipated recipe for the first time! While this Samoa Cheesecake is built to be foolproof, I want to make sure you feel confident when you pull that beautiful thing out of the fridge. We want that caramel swirl to be perfect!
If you’re looking for more reliable results in desserts, I always suggest checking out my tips on my easy no-bake Oreo cheesecake—the techniques for setting the filling are very similar!
Can I use store-bought caramel sauce in this Samoa Cheesecake?
Oh, absolutely, yes! Store-bought caramel sauce is a lifesaver, and it works perfectly fine here. If you’re using it straight from the jar, though, I highly recommend microwaving it for about 10 to 15 seconds until it’s a little warmer and thinner. This makes it much easier to drizzle artfully across the top of the cheesecake. When it’s slightly warm, it flows beautifully before it sets.
What is the best way to toast coconut without burning it?
This is such an important step for that classic cookie flavor, and toasting the coconut without burning is all about being present! If you use the oven, keep the temperature at 350°F, but set a timer for 5 minutes and literally stand by the oven door. Stir it around the halfway mark. If you use the skillet method on the stovetop—which I often prefer—keep the heat on medium-low and stir constantly. You want it to turn a lovely golden brown, not dark brown, for that perfect Toasted Coconut Topping flavor!
How long does this No Bake Cheesecake Recipe last in the fridge?
Because we aren’t using eggs or baking this No Bake Cheesecake Recipe, it stays fresh really nicely! Covered tightly, it’s fantastic for about four to five days in the refrigerator. We find that the crust actually stays crisper if you wait to top it with the final caramel and chocolate drizzle until maybe an hour or two before you plan to serve it. But honestly, the flavor only gets better overnight!
Share Your Perfect Samoa Cheesecake Creation
Now that you’ve gone through all the steps—from pressing that chocolate crust to achieving that perfect, gooey caramel swirl—the only thing left is to share the joy! Creating one of these incredible Samoa Cheesecake bars is about more than just the recipe; for me, it’s about bringing family and friends together over something truly special.
I sincerely hope this recipe lands perfectly on your occasional table and feels like a hug in dessert form. I’d be absolutely thrilled if you took a moment to stop by and leave a rating or a comment below. Did you try my tip about warming the caramel right before drizzling? Did your chocolate crust come out picture-perfect? Tell me everything!
If you snap a picture of your gorgeous finished cheesecake—especially if it’s sitting out ready to be the star of a gathering—please share it on social media and tag us! Seeing your families connect over these HearthBite recipes is what keeps me going every single day. If you ever have questions or need a little clarification on a step, please don’t hesitate to reach out via our contact page. Happy serving!
PrintNo-Bake Samoa Cheesecake Recipe
Make this decadent no-bake cheesecake inspired by Girl Scout Samoa cookies, featuring a chocolate crust, creamy filling, toasted coconut, and caramel drizzle.
- Prep Time: 25 min
- Cook Time: 0 min
- Total Time: 6 hr 25 min
- Yield: 10 servings
- Category: Dessert
- Method: No-Bake
- Cuisine: American
- Diet: Vegetarian
Ingredients
- For the Crust: 1 1/2 cups chocolate wafer cookie crumbs, 1/4 cup unsweetened shredded coconut, 6 tablespoons unsalted butter, melted
- For the Filling: 2 (8 ounce) packages cream cheese, softened, 1 cup powdered sugar, 1 teaspoon vanilla extract, 1/2 cup heavy cream, chilled
- For the Topping: 1 cup caramel sauce (store-bought or homemade), 1 cup unsweetened shredded coconut, 1/4 cup semi-sweet chocolate chips
Instructions
- Prepare the crust: Combine the chocolate cookie crumbs and 1/4 cup shredded coconut in a medium bowl. Pour in the melted butter and mix until the crumbs are evenly moistened. Press the mixture firmly into the bottom of a 9-inch springform pan. Place the crust in the freezer while you prepare the filling.
- Toast the coconut: Spread the 1 cup of shredded coconut on a dry baking sheet. Bake at 350°F (175°C) for 5 to 8 minutes, watching closely, until golden brown. Remove and set aside to cool completely.
- Make the filling: In a large bowl, beat the softened cream cheese with an electric mixer until smooth. Gradually beat in the powdered sugar until combined. Mix in the vanilla extract.
- Whip the cream: In a separate, chilled bowl, whip the heavy cream until stiff peaks form. Gently fold the whipped cream into the cream cheese mixture until just combined. Do not overmix.
- Assemble the cheesecake: Spread the cream cheese filling evenly over the chilled crust. Drizzle about half of the caramel sauce over the top of the filling. Use a knife or skewer to gently swirl the caramel into the filling.
- Chill: Cover the pan loosely with plastic wrap and refrigerate for at least 6 hours, or preferably overnight, until the cheesecake is firm.
- Finish the topping: Once the cheesecake is set, drizzle the remaining caramel sauce over the top. Sprinkle the toasted coconut evenly over the caramel layer.
- Melt the chocolate: Place the chocolate chips in a microwave-safe bowl and microwave in 20-second intervals, stirring between each, until smooth. Drizzle the melted chocolate over the coconut topping.
- Serve: Carefully remove the sides of the springform pan before slicing and serving this decadent cheesecake.
Notes
- For an even richer chocolate flavor in the crust, substitute chocolate graham crackers for the chocolate wafer cookies.
- If you prefer a thicker, gooier topping, warm the remaining caramel sauce slightly before drizzling.
- You can toast the coconut in a dry skillet over medium heat if you prefer not to use the oven. Stir constantly to prevent burning.
Nutrition
- Serving Size: 1 slice
- Calories: 450
- Sugar: 35g
- Sodium: 250mg
- Fat: 30g
- Saturated Fat: 18g
- Unsaturated Fat: 12g
- Trans Fat: 0.5g
- Carbohydrates: 40g
- Fiber: 2g
- Protein: 6g
- Cholesterol: 95mg