
Oh, darling, are you ready to take your chocolate chip cookie game from good to absolutely legendary? Because I have the secret that transforms that classic childhood treat into something deeply comforting and utterly gourmet. We’re not just making cookies; we’re making memories richer, one caramelized bite at a time. Forget everything you thought you knew about simple baking because when we introduce comfort food to that beautiful butter, magic happens.
This recipe for brown butter chocolate chip cookies is what I turn to when I want to wrap my family (or myself!) in a warm, delicious hug. It’s about getting those perfect bakery-style results: thick, chewy centers and edges that just snap when you bite them. Trust me, once you smell that toasted, nutty aroma filling your kitchen, you’ll realize there’s no going back to plain old butter again!
- Why This Brown Butter Chocolate Chip Cookies Recipe is Your New Favorite
- Gathering Ingredients for Amazing Brown Butter Chocolate Chip Cookies
- The Essential Chocolate Chip Cookie Technique: Browning the Butter
- Mixing the Dough for Thick and Chewy Cookies
- Baking Your Brown Butter Chocolate Chip Cookies to Perfection
- Expert Tips for the Best Brown Butter Chocolate Chip Cookies
- Ingredient Notes and Substitutions for This Nutty Chocolate Chip Recipe
- Frequently Asked Questions About Brown Butter Cookies
- Storing and Reheating Your Homemade Cookies
Why This Brown Butter Chocolate Chip Cookies Recipe is Your New Favorite
I know, I know, every recipe claims to be the “best,” but this one actually backs it up. When you start with brown butter, you aren’t just adding fat; you’re adding a whole new dimension of flavor—that deep, toasty, almost caramel note. It’s what elevates a simple cookie into a truly gourmet chocolate chip cookie experience.
- Texture Perfection: We nail that chewy center every single time, guaranteed, surrounded by those delicate, crispy edges everyone fights over.
- Unmatched Flavor: That nutty, toasted butter flavor makes this the ultimate chocolate chip cookie. It’s complex without needing extra spices!
- Reliability: This specific technique ensures you get thick cookies that don’t just spread into sad, thin discs. My HearthBite standard always means reliable home baking.
If you loved how we perfected the texture in our bakery-style scone, you’ll trust this method for cookies, too. It’s all about respecting the ingredients!
Gathering Ingredients for Amazing Brown Butter Chocolate Chip Cookies
Before we dive into the fun part—the browning alchemy—we need to choose our players carefully. Think of this recipe as a symphony; every ingredient has a critical role. Since the butter is doing the heavy lifting flavor-wise, use the best unsalted butter you trust. And please, don’t skimp on the chocolate! That nice chopped bar makes a huge difference against the nutty base.
One little technical note I learned the hard way: always use room temperature eggs! They emulsify much better with the slightly cooled butter mixture, which means a smoother, more consistent dough. It really helps achieve those perfect chewy chocolate chip cookies.
Essential Components for Rich Brown Butter Cookies
- 1 cup (226g) unsalted butter (this is the star we’ll brown!)
- 1 cup (200g) packed light brown sugar
- 1/2 cup (100g) granulated sugar
- 2 large eggs, room temperature, please!
- 1 tablespoon vanilla extract
- 2 1/4 cups (270g) all-purpose flour
- 1 teaspoon baking soda
- 1 teaspoon kosher salt (this balances the sweetness)
- 1 1/2 cups (255g) semi-sweet chocolate chips or roughly chopped chocolate chunks
- Flaky sea salt for sprinkling (totally optional, but trust me on this one)
The Essential Chocolate Chip Cookie Technique: Browning the Butter
Okay, deep breath. This is where the magic happens, and honestly, it’s the single most important step for achieving those deep, rich notes in our brown butter chocolate chip cookies. Browning the butter—turning it into that glorious, nutty substance—is what separates the good cookies from the truly unforgettable ones. It’s how we get that signature, complex flavor that screams caramelized butter cookies.
Grab a light-colored saucepan; you need to see those milk solids change color, trust me on this one! Set your heat to medium. Let the butter melt completely, and don’t panic when it starts foaming up like crazy. That’s totally normal! Keep swirling the pan gently. Within about five to eight quick minutes, the bubbling will subside, and you’ll start seeing tiny brown specks forming at the bottom. The smell? It shifts from plain dairy to this incredible, warm, nutty perfume. That’s your cue!
Achieving Perfect Toasted Butter Flavor Desserts
The biggest danger here is going from perfectly brown to burnt black in like, two seconds. Don’t walk away! Once you smell that toasty aroma, pull it right off the heat. The goal is richly brown flecks settled at the bottom. If those little bits burn, the whole batch tastes bitter, and we can’t have that. We need that beautiful, deep flavor for truly toasted butter flavor desserts!
Immediately pour that glorious liquid gold into a large, heatproof bowl. This stops the cooking process right away so those brown bits don’t burn up in the hot pan. Now you have the base for the most spectacular brown butter chocolate chip cookies you have ever made. The flavor development achieved here is why we go through this little extra step!
If baking seems overwhelming sometimes, always remember that mastering one technique, like this one, can save future batches. I talk a bit more about staying confident even when things look scary in my guide to homemade marshmallow making—it’s the same principle: trust the process!
Mixing the Dough for Thick and Chewy Cookies
Now that our beautifully browned butter has cooled down a bit—and I mean let it rest for at least 15 minutes!—we can bring the rest of the dough together. Adding the eggs when the butter is too hot is a recipe disaster; it cooks the eggs a little and messes with the emulsification. We need that mixture smooth before we move on!
Whisk in your eggs one at a time, making sure the batter looks homogenous after each addition, followed by that gorgeous vanilla extract. This is where the structure starts building for our brown butter chocolate chip cookies, so take your time here to ensure everything is silky.
In a separate little bowl, I always mix my dry ingredients—flour, baking soda, and salt—before adding them to the wet stuff. This ensures the leavening is distributed evenly, which is crucial for getting that thick profile we love. Then, add the dry mix to the wet mixture slowly. And here’s where you have to stop yourself! Mix only until the flour streaks *just* disappear. Seriously, stop the mixer! Overmixing develops gluten, and gluten means tough, cakey cookies instead of the glorious chewy chocolate chip cookies we are striving for.
Finally, fold in those chocolate chunks—don’t beat them in! They should just be nestled in the dough. If you’re looking for other ways to guarantee softness, take a peek at my notes on pudding cookies; the science of a soft treat is similar!
The Secret to Gooey Center Cookies: Chilling the Dough
If you try to bake this dough right now, I guarantee it will spread out into a puddle. Chilling is non-negotiable if you want those beautiful, thick cookies that look like they came straight from a fancy bakery counter. We need that fat to firm up again.
Cover the bowl tightly and stick it in the fridge for a minimum of two hours. Honestly? I aim for overnight, up to 24 hours. This chilling time does two amazing things for our brown butter chocolate chip cookies: first, it controls the spread, keeping them thick, and second, it lets the flour fully hydrate and lets those nutty brown butter flavors really sink deep into the sugar. It’s the key to a superior chew and much deeper flavor!
Baking Your Brown Butter Chocolate Chip Cookies to Perfection
Alright, our dough is perfectly chilled, smelling incredible, and ready for action! This is the moment where we secure those glorious bakery style cookies we’ve been dreaming about. Remember, we are aiming for that visual contrast: crispy, golden brown on the outside, and beautifully soft in the middle.
First thing: crank that oven up to 375°F (190°C). I always use parchment paper on my baking sheets—it’s just non-negotiable for me when I’m making special cookies like these. It prevents sticking and helps them bake evenly on the bottom. If you want some tips on getting other baked goods perfect, check out my advice for making buttery pretzel bites; the pan prep principles are similar!
Scoop your dough aggressively! I use about three tablespoons for each cookie, keeping them nice and round, and then place them about two inches apart on the sheet. They will spread a little bit, but because the dough was chilled, they shouldn’t turn into pancakes. That chilling step really pays off here!
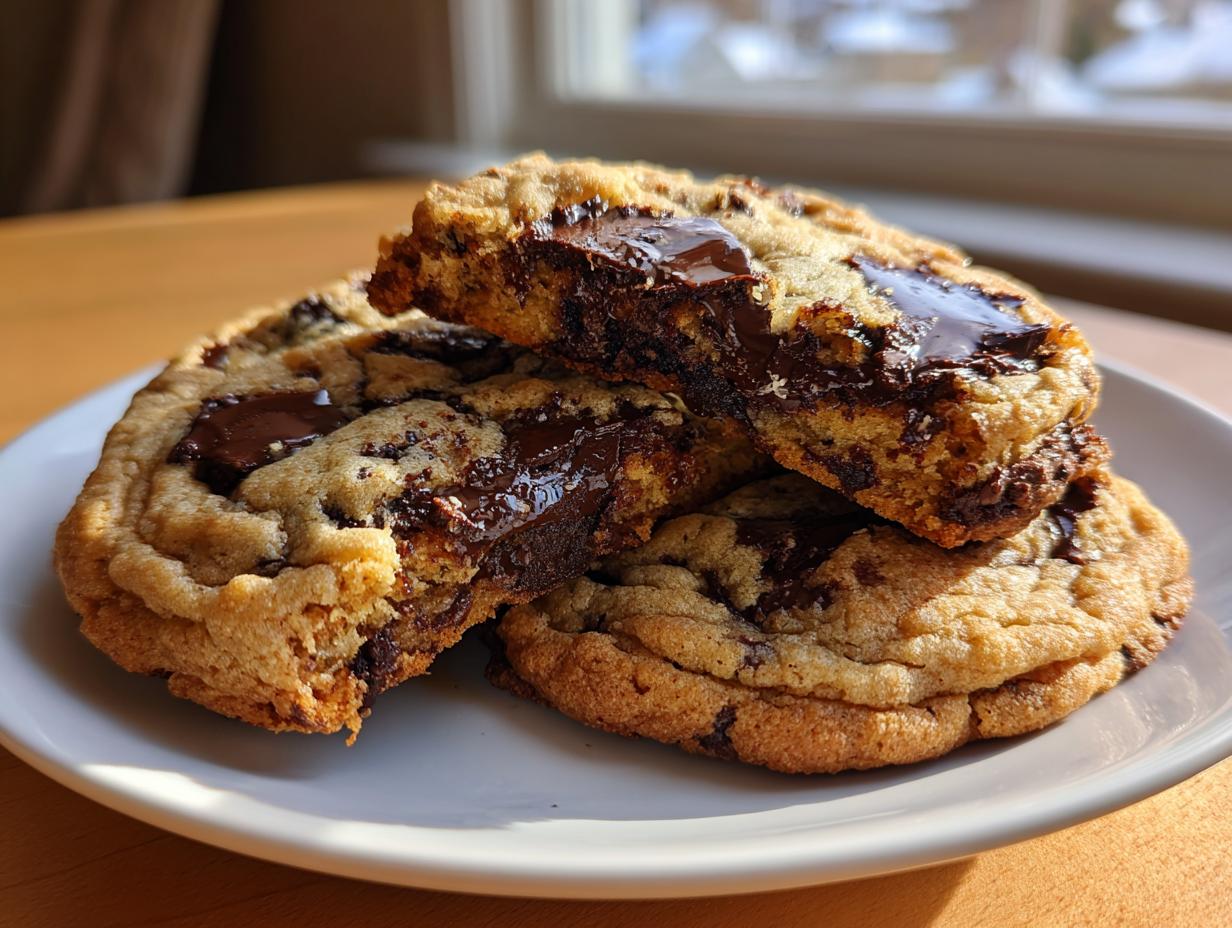
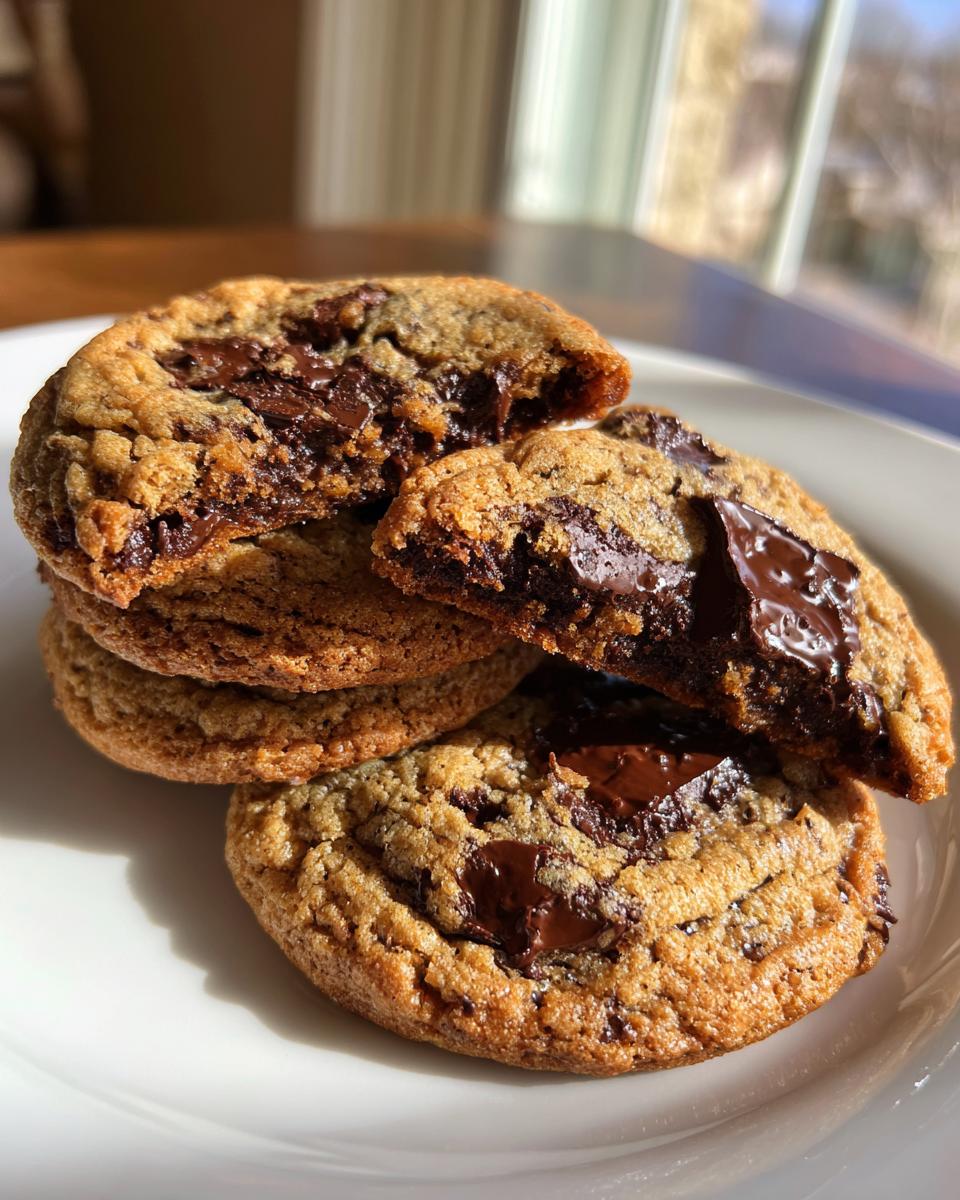
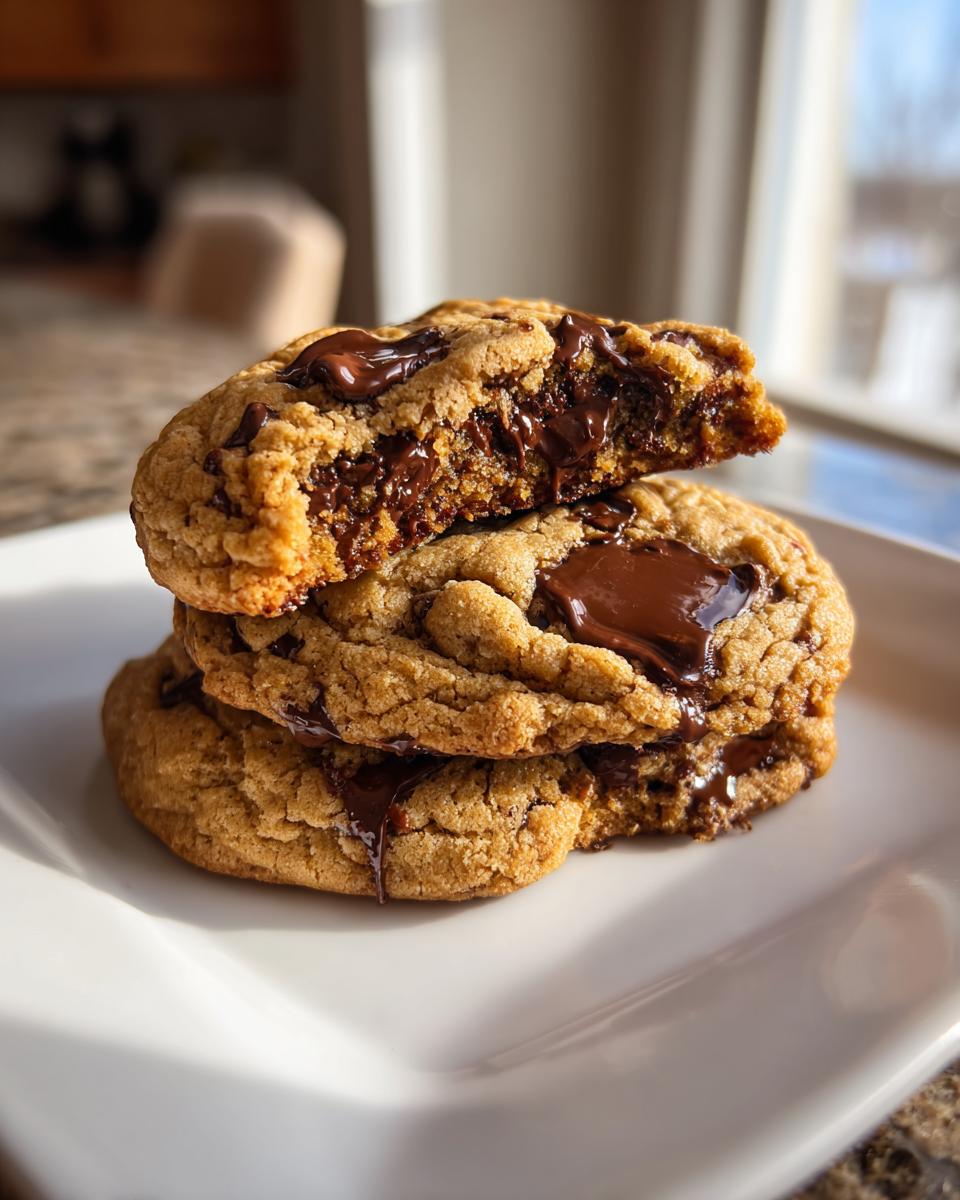
Now for the bake time. This is critical. Slide them into that hot oven for about 10 to 13 minutes. You’re watching for the edges to look set and golden brown, but honestly, the center needs to look a little bit *wrong* when you pull them out. I mean, they should look puffy, almost slightly underbaked, and a bit shiny. If they look completely done, they will be hard once cooled, and we want those gooey center cookies!
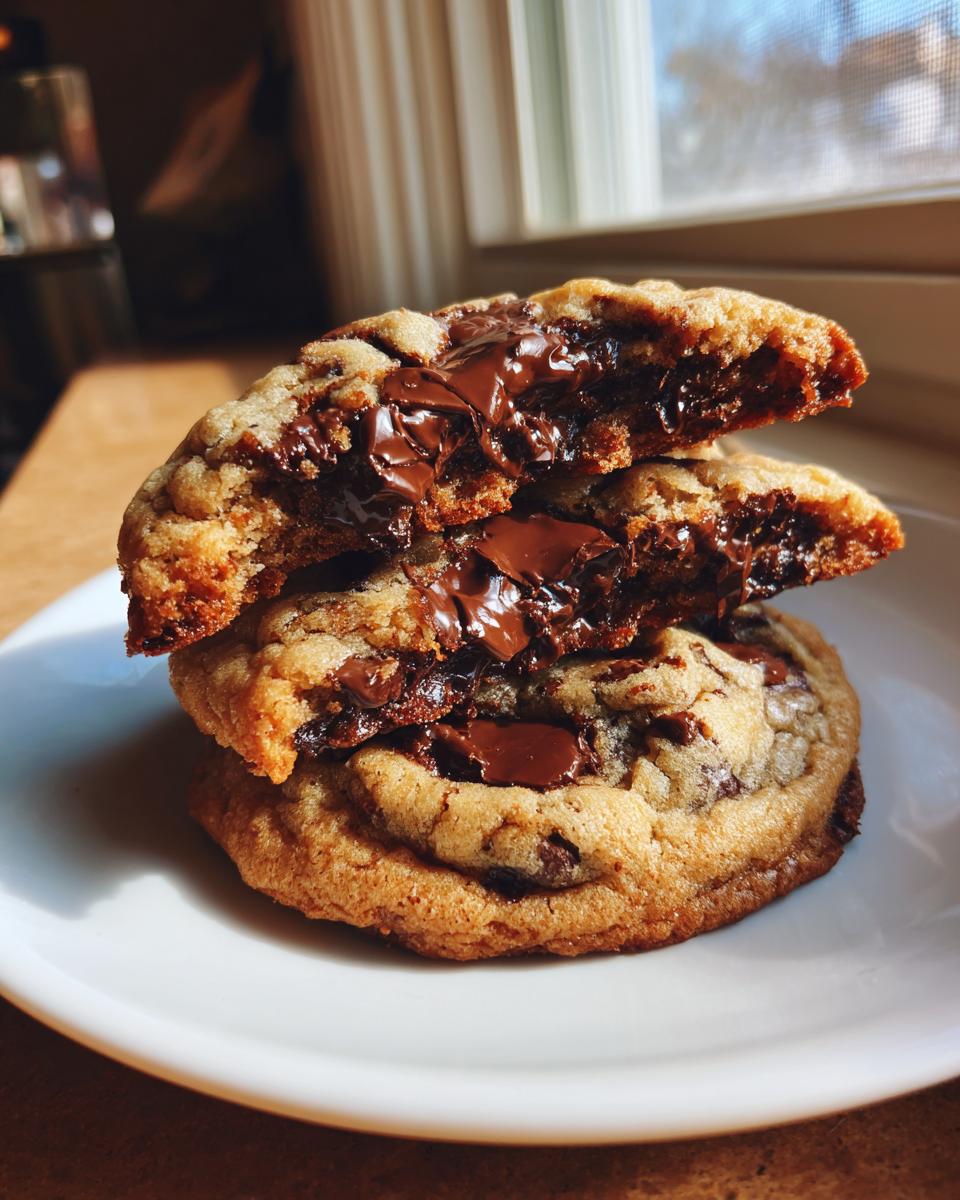
As soon as they come out, give the tops a delicate sprinkle of flaky sea salt if you’re using it—the heat helps it adhere beautifully. Let those brown butter chocolate chip cookies sit right on that hot pan for a full five minutes before you carefully usher them onto a wire rack. Seriously, don’t touch them before that five minutes is up, or they might collapse. They firm up perfectly as they cool there, locking in that chewy texture!
Expert Tips for the Best Brown Butter Chocolate Chip Cookies
When you’re aiming for that truly gourmet result, sometimes the difference between great and incredible is just one tiny detail. I gathered a few of my absolute must-dos from my own testing binder to make sure your brown butter chocolate chip cookies turn out perfectly every single time. These are the rules I live by!
First, let’s talk about that browning again: Pay attention to the milk solids! They should be a deep, beautiful brown—think rich hazelnut or coffee color—not burnt black. If you smell smoke, you need to start over, but if you smell deeply nutty, you have won the flavor lottery. This is the absolute foundation for that amazing nutty chocolate chip recipe.
Second, I can’t stress chilling enough. If you are tempted to skip chilling the dough because you’re impatient (and trust me, I totally get that craving!), they *will* spread thin. Chilling lets the flour absorb all that incredible browned butter flavor, guaranteeing those thick and chewy cookies.
My final little addition for texture? Use a mix of chocolate chips and roughly chopped chocolate bars—the different shapes melt differently, giving you those pockets of pure, glorious melted chocolate we all chase in our ultimate chocolate chip cookie!
If you’re looking for other ways to pack nutrition and flavor into snacks, check out my thoughts on putting together simple homemade protein bars. It’s all about maximizing flavor no matter what you’re baking!
Ingredient Notes and Substitutions for This Nutty Chocolate Chip Recipe
I always get questions when I post these decadent brown butter chocolate chip cookies about shortcuts, and honestly, to capture that deep, sophisticated flavor, we need to stick pretty close to the script. But I want you to feel empowered to bake with what you have, so let’s chat about substitutions, especially for our main ingredient!
The biggest question I always get is about the butter. Can you use salted butter instead of unsalted? Yes, you *can*, but you absolutely must adjust the salt down in the recipe—I’d cut the kosher salt in the dry mix by about half, maybe even a scant 3/4 teaspoon total. Since we are adding salt on top anyway, we really need control over the base flavor so it doesn’t end up tasting like a pretzel!
If you don’t have the time or the patience to brown the butter this time around (though I really beg you to try it for the best version of this nutty chocolate chip recipe!), you *can* use regular melted butter, but I promise you, you lose that beautiful, complex, toasty hint that makes these cookies famous. It becomes a regular, though still delicious, chocolate chip cookie.
Now for the chocolate! This is where you can really customize your brown butter cookies. I love a good mix! If you use semi-sweet, you get that classic sweet/salty balance. If you lean toward dark chocolate—say, 60% or 70% cacao—the slight bitterness really cuts through the richness of the browned butter beautifully. If you’re using milk chocolate, though, you might want to omit the flaky sea salt on top because milk chocolate adds a good bit more sweetness overall.
For those who loved my brown butter oatmeal raisin cookies, you know how much the fat impacts the chew! If you were trying to substitute shortening for butter, please don’t attempt it here—the flavor profile depends entirely on the milk solids in the butter caramelizing!
Frequently Asked Questions About Brown Butter Cookies
I know you might still have a few lingering doubts—especially when it comes to mastering that browning technique! That’s totally normal when you’re aiming for an elevated treat like these brown butter chocolate chip cookies. Here are the few things I hear most often while I’m busy sharing my quick dinner recipes!
Can I skip chilling the dough?
Oh, honey, I really, really wouldn’t if you want those perfectly thick and chewy cookies! Chilling the dough is my secret weapon for controlling the spread. If you skip it, the melted brown butter will cause your dough balls to spread way too thin in the oven, and you’ll end up with crispy flat discs instead of those gorgeous, thick, bakery style cookies we’re aiming for. Give it at least two hours, but trust me, 12 hours overnight is when the real flavor happens!
How do I know when the butter is perfectly browned?
This is the crucial part! Focus on your senses, not just the clock. The butter will foam up quite a bit initially, and then it will subside. When that happens, start paying close attention. You are looking for two things: first, the smell—it should become deeply nutty, like toasted hazelnuts. Second, look at the bottom of the pan; you want those milk solids to turn a gorgeous dark brown color. If it looks like dark sand, you’re there! If it looks black, you’ve burned it, oops! Immediately pull it off the heat if you hit that nutty perfume.
What makes these cookies so chewy?
It’s a few things working together, but the main driver for the incredible chew in these chewy chocolate chip cookies is twofold. First, we use more brown sugar than white sugar, and the molasses in the brown sugar helps keep moisture locked in—that means a softer center! Second, the chilling—we talked about it, but it keeps the cookies from overbaking and setting up too firm. The final secret for that gooey center cookie texture is pulling them out when they still look slightly pale and puffy in the very middle!
Can I use margarine or oil instead of butter?
For any brown butter cookie recipe, you simply cannot substitute the butter. The entire flavor profile of this nutty chocolate chip recipe hinges on browning the milk solids in real butter. If you used oil or margarine, you wouldn’t get those beautiful brown bits, and you wouldn’t develop that rich, toasted flavor. For this recipe, butter is the star!
Storing and Reheating Your Homemade Cookies
We’ve made the perfect batch of brown butter chocolate chip cookies—they are gooey, nutty, and utterly irresistible. But now we have to face reality: you probably won’t eat all 18 (or maybe you will, I won’t judge!). The trick to keeping them delicious for days is making sure they stay soft and don’t dry out or get stale.
The enemy of a perfect cookie is air! If you leave these beauties sitting out on a plate, the crispy edges will turn soft and the centers will harden overnight. To keep that glorious chewy texture locked in, you absolutely must place the completely cooled cookies into an airtight container. I layer them between sheets of parchment paper or wax paper—just a piece between each layer—so they don’t get sticky against each other.
If you stored them well, these cookies will stay wonderfully moist and chewy for about four to five days on the counter. Honestly? They rarely last that long in my house, but it’s good to know!
Now, what about reheating? Sometimes I just *need* that just-out-of-the-oven experience, especially if I’m having one with my evening tea. Popping a cookie back to life is super easy!
For the ultimate refresh, put one or two cookies on a microwave-safe plate and heat them for just 10 to 15 seconds. That little burst of warmth melts the chocolate just enough and softens the center again, making it feel like you just pulled them ten minutes ago. Instant gratification!
If you want that crackly edge back, you can pop them on a baking sheet at 350°F for about three minutes—just be careful not to overbake them, or you’ll lose that interior chew! If you’ve ever been obsessed with preserving the softness, you might love the techniques I use for my homemade soft caramels; it all comes down to controlling moisture!
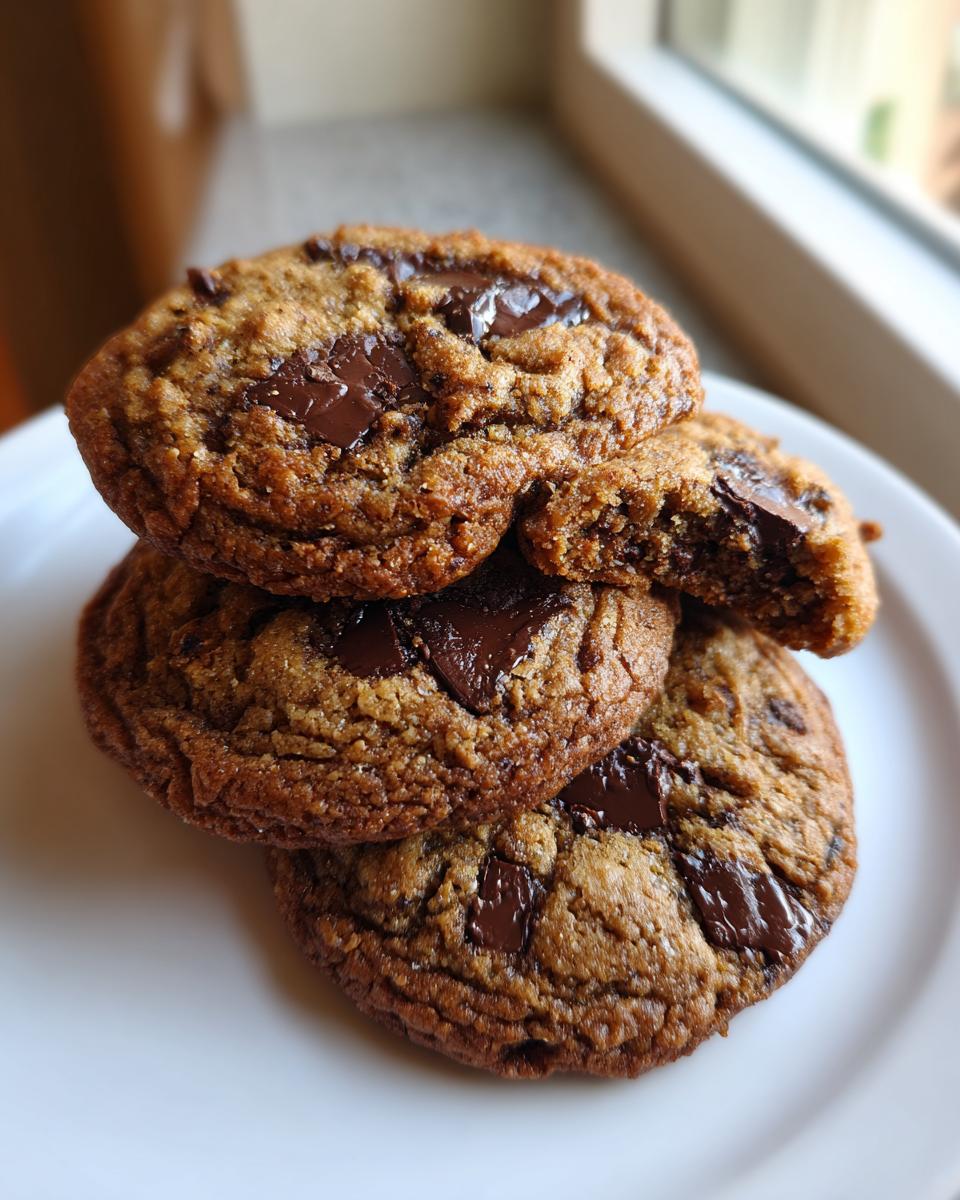
PrintThe Best Chewy Brown Butter Chocolate Chip Cookies

Achieve bakery-style chocolate chip cookies with rich, nutty flavor by using browned butter. This recipe yields thick cookies with perfectly chewy centers and crisp edges.
- Prep Time: 20 min
- Cook Time: 15 min
- Total Time: 2 hours 35 min
- Yield: 18 cookies 1x
- Category: Dessert
- Method: Baking
- Cuisine: American
- Diet: Vegetarian
Ingredients
- 1 cup (226g) unsalted butter
- 1 cup (200g) packed light brown sugar
- 1/2 cup (100g) granulated sugar
- 2 large eggs, room temperature
- 1 tablespoon vanilla extract
- 2 1/4 cups (270g) all-purpose flour
- 1 teaspoon baking soda
- 1 teaspoon kosher salt
- 1 1/2 cups (255g) semi-sweet chocolate chips or chopped chocolate chunks
- Flaky sea salt for sprinkling (optional)
Instructions
- Place the butter in a light-colored saucepan over medium heat. Melt the butter completely, then continue cooking, swirling the pan occasionally. The butter will foam, then subside. Watch closely as brown bits form at the bottom and the aroma becomes nutty. This takes about 5 to 8 minutes.
- Immediately pour the browned butter into a large, heatproof bowl. Add the brown sugar and granulated sugar to the hot butter. Whisk together until fully combined. The mixture will look sandy. Let this cool for 15 minutes.
- Add one egg, then the second egg, mixing well after each addition until the batter is smooth. Stir in the vanilla extract.
- In a separate bowl, whisk together the flour, baking soda, and kosher salt.
- Gradually add the dry ingredients to the wet ingredients, mixing on low speed until just combined. Do not overmix.
- Fold in the chocolate chips or chunks.
- Cover the bowl and chill the dough for at least 2 hours, or up to 24 hours, for the best flavor and texture. Chilling prevents spreading.
- Preheat your oven to 375°F (190°C). Line baking sheets with parchment paper.
- Scoop the chilled dough into balls (about 3 tablespoons each) and place them 2 inches apart on the prepared sheets.
- Bake for 10 to 13 minutes. The edges should be golden brown, but the centers should still look slightly underbaked and puffy.
- Remove from the oven. Immediately sprinkle the tops with flaky sea salt, if using. Let the cookies cool on the baking sheet for 5 minutes before transferring them to a wire rack to cool completely.
Notes
- Browning the butter is key for that deep, caramelized flavor. Watch the milk solids carefully; they should turn dark brown, not black.
- Chilling the dough is essential for thick and chewy cookies. Do not skip this step if you want bakery style results.
- For extra gooey centers, use a mix of chocolate chips and roughly chopped chocolate bars.
Nutrition
- Serving Size: 1 cookie
- Calories: 220
- Sugar: 18g
- Sodium: 150mg
- Fat: 13g
- Saturated Fat: 8g
- Unsaturated Fat: 5g
- Trans Fat: 0g
- Carbohydrates: 25g
- Fiber: 1g
- Protein: 2g
- Cholesterol: 45mg