

The holidays bring such wonderful chaos, don’t they? It’s all about that flurry of baking, trying to get everything perfect for the cookie exchange. If you want to bring the absolute showstopper this year—the one that disappears first—you need these Christmas Kitchen Sink Cookies. They are completely loaded, mixing that irresistible sweet and salty crunch into one deeply comforting holiday dessert. For me, recipes like this are what HearthBite is all about; they turn a simple afternoon of baking into a moment of pure, shareable joy that connects everyone around the table. If you’re looking for other amazing holiday bakes, check out my recipe for Christmas Cookie Bars while you’re here! Trust me, these loaded beauties are going to be your new tradition.
- Why These Christmas Kitchen Sink Cookies Are Your New Holiday Favorite
- Essential Ingredients for Ultimate Mix-In Kitchen Sink Cookies
- How to Prepare These Easy Kitchen Sink Cookies Step-by-Step
- Tips for Success with Your Ultimate Mix-In Cookies
- Storage and Reheating Instructions for Kitchen Sink Cookies
- Serving Suggestions for These Festive Dessert Ideas
- Frequently Asked Questions About Kitchen Sink Cookies Recipe
- Estimated Nutrition for These Crowd Pleasing Desserts
- Share Your Christmas Kitchen Sink Cookies Creations
Why These Christmas Kitchen Sink Cookies Are Your New Holiday Favorite
What makes these far more than just a standard chocolate chip cookie? Honestly, it’s their show-stopping appearance! When you walk into a holiday party with a plate of these, people stop and ask, “What *is* that?” I took my standard reliable base recipe and added every fun, festive texture I could think of. These are truly Easy Party Cookies because they look incredibly complicated but come together so nicely. I’ve tweaked the ratios repeatedly over the years to ensure they always bake up perfectly for reliable holiday baking, just like my grandmother taught me to verify every step. I love that I can point readers to great inspiration like the tips found over at incredible kitchen sink recipes!

The Perfect Sweet Salty Cookies Balance
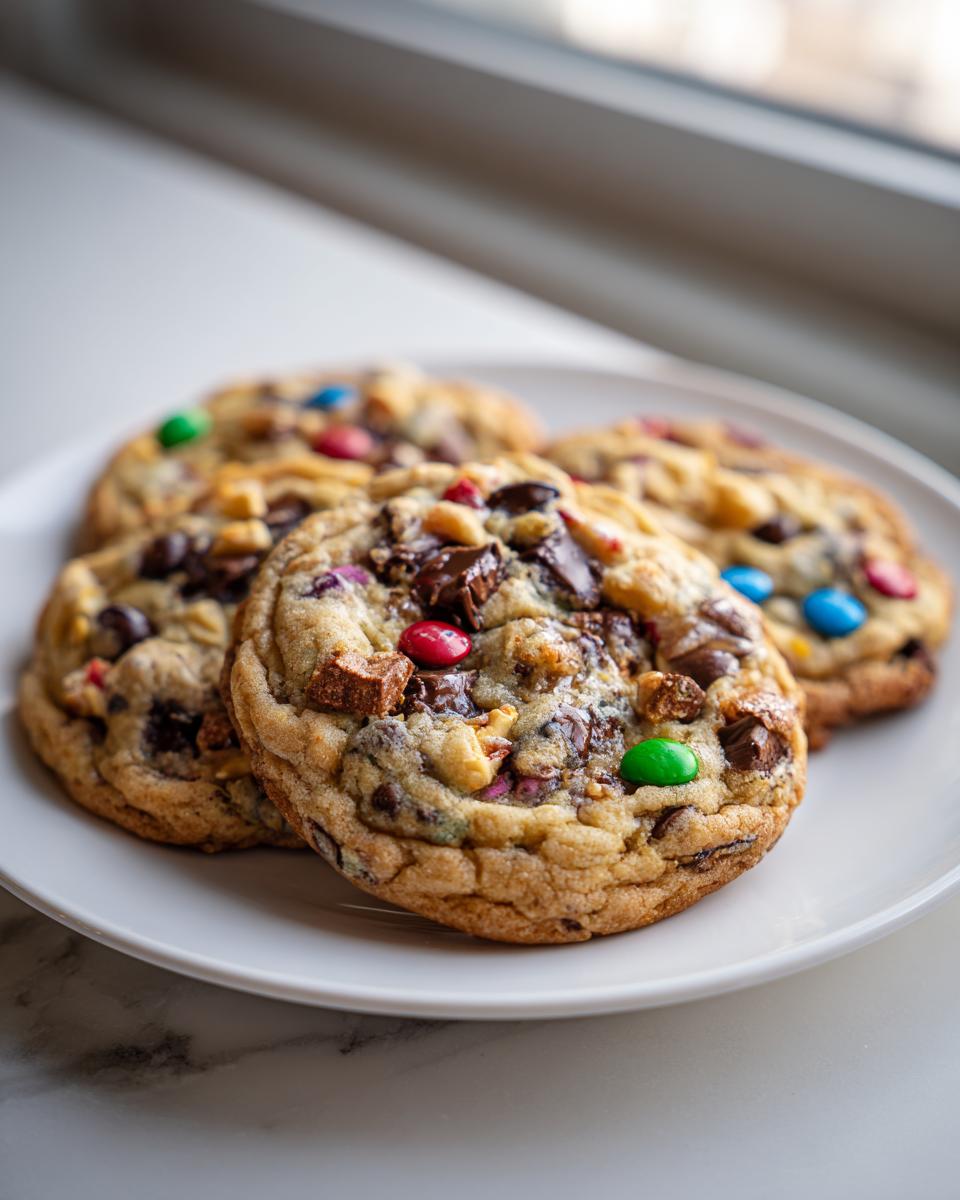
This is where the magic happens, right? We have the deep sweetness from two kinds of chocolate chips and those festive M&M’s, but then BAM! You get the crunch and saltiness from the pretzels and potato chips. That combination is just addictive. Don’t skip the potato chips, seriously; they add a certain shatteringly crisp texture that elevates the whole experience. It’s just the right amount of sweet and salty that keeps everyone grabbing another one. These are truly the definition of Sweet Salty Cookies.
Achieving the Best Chewy Kitchen Sink Cookies Texture
Look, everyone wants that perfect chewiness in the center, right? The secret here isn’t just the brown sugar—though that helps, of course! The real trick with our Kitchen Sink Cookies is pulling them out *just* before you think they are done. You want the edges set and golden, but the center should still look slightly soft, like it hasn’t quite settled. They finish cooking right on that hot baking sheet, giving you that chewy center against those perfectly crispy edges. It’s texture perfection!
Essential Ingredients for Ultimate Mix-In Kitchen Sink Cookies
When you’re making something as epic as Kitchen Sink Cookies, you can’t skimp on the quality or the preparation of the specific ingredients. I lay mine out like jewels before I even touch the stand mixer. Clarity here means success later! You absolutely must start with a full cup (that’s two sticks!) of unsalted butter that is truly softened—not melted, just perfectly yielding to a gentle press. Also, make sure your brown sugar is packed tightly; that molasses content is crucial for our chew factor. We need two full cups of flour in total, but don’t rush whisking those leaveners (baking soda and powder) together first so they distribute evenly throughout all those mix-ins we’re about to add.

The fun part is layering your mix-ins. I call for two kinds of chips—semi-sweet and white chocolate—because the combo adds depth. Then, the salty must-haves: crush your pretzels and potato chips coarsely. We want noticeable chunks of salty crunch in every bite! Honestly, seeing all those textures lined up makes me so excited to bake. If you want reliable results every time, check out my tips for making pudding cookies, which uses a similar technique for soft dough.
Ingredient Substitutions for Your Customizable Kitchen Sink Cookies Recipe
This is the beautiful part of our Kitchen Sink Cookies recipe—it’s totally yours to customize! If you don’t have festive M&M’s, use peanut butter chips or even toffee bits for holiday flavor. If you prefer a deeper chocolate note, swap out some white chips for dark chocolate. The salty element is flexible too; feel free to swap the potato chips for something like crushed salty nuts if that’s what you have on hand. Just try to keep the total volume of mix-ins roughly the same so the dough structure holds up. It’s all about *your* favorite combination!
How to Prepare These Easy Kitchen Sink Cookies Step-by-Step
This recipe is designed to be incredibly straightforward, which is exactly what we need when the holiday schedule gets hectic! We are aiming for efficiency here. First things first: get that oven preheated to 375 degrees Fahrenheit right away. Make sure your baking sheets are lined with parchment paper; this saves so much cleanup later, and for sticky, loaded cookies, it’s non-negotiable! Once our oven is waiting patiently, we move right into the mixing stage. Because these are so dense with additions, how we build the base dough really matters for texture control.
If you are looking for even faster cleanup, I have some great tips on my One Bowl Cookies post, although this recipe benefits from separating that dry whisking step just a bit.
Mixing the Dough for Perfect Kitchen Sink Cookies
We start by creaming that softened butter with both sugars until it looks pale and fluffy—that’s how we incorporate the microscopic air pockets needed for a good rise. Don’t rush this! Then, we beat in the eggs one at a time, followed by the vanilla. In a separate bowl, we whisk the flour, salt, soda, and powder. When combining the dry mix into the wet, you have to be cautious. Mix on low speed until you *just* see the streaks disappear. Stop! If you overmix here, you develop too much gluten, and those cookies will turn out tough instead of tender.
Baking Tips for Chewy Centers in Your Kitchen Sink Cookies
Once everything is folded in—and I mean *gently* fold in all those wonderful chips, candies, and crunches—it’s time for the oven. Drop rounded tablespoons onto your lined sheets, giving them about two inches to breathe. Here’s the crucial quality check for our Kitchen Sink Cookies: bake them for only about 9 to 11 minutes. You are looking for the edges to look set and just starting to turn golden brown. If the center still looks slightly soft and glossy, pull them! They need to sit on that hot pan for a full 5 minutes to finish setting up; this guarantees those soft, chewy centers everyone fights over. For more insight on getting that perfect texture, take a peek at what folks suggest on this site.
Tips for Success with Your Ultimate Mix-In Cookies
Even with a recipe this straightforward, sometimes things just don’t cooperate, especially when you’re cramming in so many wonderful things! If you notice your dough seems overly soft—maybe the butter you used was a hair too warm—don’t panic and don’t throw it out. My biggest piece of advice to build cookie authority is to chill the dough. Just pop that big bowl into the fridge for about 30 minutes.
I learned this the hard way one year when I was rushing to make a huge batch for my neighborhood coffee morning. The first tray spread out like thin, sad lace! Once I chilled the remaining dough, the fat hardened up just enough that the cookies held their beautiful mound shape while baking. It saved the whole batch. Seriously, chilling is your safety net for ensuring all those great mix-ins stay exactly where they should be and you get that beautiful loft.
If you love that salty note but want a different take, you might enjoy my recipe for soft, chewy sea salt caramels—it uses a similar attention to temperature for texture!
Storage and Reheating Instructions for Kitchen Sink Cookies
Because these Kitchen Sink Cookies are so loaded with different textures, keeping them fresh for holiday gifting or just having snacks ready is key. The absolute best way to store them is in a single layer in a truly airtight container at room temperature. If you must stack them, make sure you put parchment paper squares between the layers so the chips and candies don’t glue everything together! They stay wonderfully fresh for about four or five days this way. If you want to keep dough ready ahead of time, check out my guide on freezing jam—the dough freezing technique is very similar and works like a charm for these amazing cookies!
Serving Suggestions for These Festive Dessert Ideas
Now that you’ve made the most impressive dessert on the block, we have to talk about how to serve them! These are the ideal treats for a cookie exchange because they provide that satisfying crunch and sweetness all in one bite. Honestly, they are delicious all on their own, maybe with a napkin and a glass of cold milk—that’s my favorite way to sample the first batch, just to make sure everything tastes right!

But since we are in the holiday spirit, they pair wonderfully with warm drinks. If you are hosting, set up a coffee station, or better yet, make a big batch of my creamy Puerto Rican Coquito. The rich coconut and spice cut right through the saltiness of the pretzels beautifully! For a different kind of gathering, these loaded beauties are fantastic when served alongside something lighter, maybe some fresh fruit, or even just a simple shortbread. They truly complete any dessert table. If you’re looking for inspiration on plating, take a peek at how others style their holiday dishes!
Frequently Asked Questions About Kitchen Sink Cookies Recipe
I get so many questions about these loaded cookies, and honestly, that’s how you know they are a hit! If you’re making your first batch of Kitchen Sink Cookies, you probably have a few thoughts bubbling up.
What exactly makes these Kitchen Sink Cookies?
It’s all about throwing in literally everything but the kitchen sink! It means combining sweet elements—like various chips and candies—with salty, crunchy things like pretzels and potato chips. The beauty of this Kitchen Sink Cookies Recipe is that it allows for total customization. If you hate white chocolate, don’t use it! Just make sure you keep a good balance between the sweet stuff and the salty components for that signature flavor explosion.
Can I make these cookies ahead of time for my party?
Yes, you absolutely can! That’s why they are such fantastic Crowd Pleasing Desserts for the holidays. You can bake them fully, store them airtight, and they stay chewy for days. Alternatively, you can scoop the dough balls and freeze them on a tray. When you’re ready to bake, pop them straight from the freezer onto the baking sheet and add just 2-3 extra minutes to the baking time. Easy peasy!
Do I really need the potato chips in the recipe?
I know it sounds wild, but please trust me on the potato chips! They are key to those amazing Sweet Salty Cookies you’re after. They give a different kind of subtle salty crunch than the pretzels do. If you’re truly against them, you could perhaps use salty toasted nuts as a substitute, but the light, airy crunch of a regular, plain chip is hard to beat in these Loaded Chocolate Chip Cookies.
If you decide to experiment, you might even try making your own mix-ins, like these homemade marshmallows, to add to the fun!
Estimated Nutrition for These Crowd Pleasing Desserts
We know you want to have all the details, even though these Crowd Pleasing Desserts are definitely meant to be enjoyed without too much counting! When you’re sharing these fantastic Christmas Kitchen Sink Cookies, it’s good to have a general idea of what everyone is diving into. Based on the ingredients listed in the recipe, here is the estimated nutritional breakdown per cookie.
- Serving Size: 1 cookie
- Calories: 180
- Fat: 10g
- Carbohydrates: 22g
- Protein: 2g
Now, a little note from my kitchen to yours: because these are the ultimate mix-in treats, your final numbers might swing a bit based on what you choose to put in! If you decide to swap out some semi-sweet chips for peanut butter chips, or if you use more toffee bits than pretzels, those numbers change. This is just a baseline estimate to help you plan your holiday baking spread. If you’re looking for slightly more protein in your snacks, you might want to check out my easy homemade protein bars recipe for a different kind of satisfying bite!
Share Your Christmas Kitchen Sink Cookies Creations
I truly hope these Christmas Kitchen Sink Cookies bring as much laughter and connection to your holidays as they do to mine here in Ohio. Once you try them, I really want to know what you thought! Please leave a rating below and drop a comment telling me which mix-ins you chose—I absolutely love hearing about your creative swaps.
If you managed to snap a photo of your spectacular, loaded plate, please share it on social media and tag me! That’s what this is all about: celebrating the moments made around good food. We are honored to be a part of your culinary journey here at HearthBite. You can learn more about our story anytime!
PrintChristmas Kitchen Sink Cookies: The Ultimate Sweet and Salty Holiday Treat

Make these impressive Christmas Kitchen Sink Cookies for your holiday gatherings. This recipe combines pretzels, chips, candies, and chocolate for a unique, crowd-pleasing dessert.
- Prep Time: 20 min
- Cook Time: 11 min
- Total Time: 31 min
- Yield: About 3 dozen 1x
- Category: Dessert
- Method: Baking
- Cuisine: American
- Diet: Vegetarian
Ingredients
- 1 cup (2 sticks) unsalted butter, softened
- ¾ cup granulated sugar
- ¾ cup packed light brown sugar
- 2 large eggs
- 1 tablespoon vanilla extract
- 2 ¼ cups all-purpose flour
- 1 teaspoon baking soda
- 1 teaspoon salt
- ½ teaspoon baking powder
- 1 cup semi-sweet chocolate chips
- 1 cup white chocolate chips
- 1 cup festive M&M’s or holiday candies
- 1 cup crushed pretzels
- ½ cup crushed potato chips
- ½ cup holiday sprinkles or jimmies
Instructions
- Preheat your oven to 375 degrees Fahrenheit. Line baking sheets with parchment paper.
- In a large bowl, cream together the softened butter, granulated sugar, and brown sugar until light and fluffy.
- Beat in the eggs one at a time, then mix in the vanilla extract.
- In a separate bowl, whisk together the flour, baking soda, salt, and baking powder.
- Gradually add the dry ingredients to the wet ingredients, mixing on low speed until just combined. Do not overmix.
- Fold in all the mix-ins: semi-sweet chocolate chips, white chocolate chips, festive M&M’s, crushed pretzels, crushed potato chips, and sprinkles.
- Drop rounded tablespoons of dough onto the prepared baking sheets, spacing them about 2 inches apart. You can press a few extra candies or sprinkles on top of each dough ball for decoration.
- Bake for 9 to 11 minutes, or until the edges are set and lightly golden brown. The centers should still look slightly soft for a chewy texture.
- Let the cookies cool on the baking sheet for 5 minutes before transferring them to a wire rack to cool completely.
Notes
- For the best sweet and salty balance, use plain, lightly salted pretzels and plain potato chips.
- To achieve chewy centers and crispy edges, slightly underbake the cookies. They will firm up as they cool.
- This is a customizable cookie recipe; substitute any mix-in you prefer, such as toffee bits or different colored chocolate chips.
- Chill the dough for 30 minutes before scooping if your dough seems too soft, which helps prevent spreading.
Nutrition
- Serving Size: 1 cookie
- Calories: 180
- Sugar: 15
- Sodium: 110
- Fat: 10
- Saturated Fat: 6
- Unsaturated Fat: 4
- Trans Fat: 0
- Carbohydrates: 22
- Fiber: 1
- Protein: 2
- Cholesterol: 25