

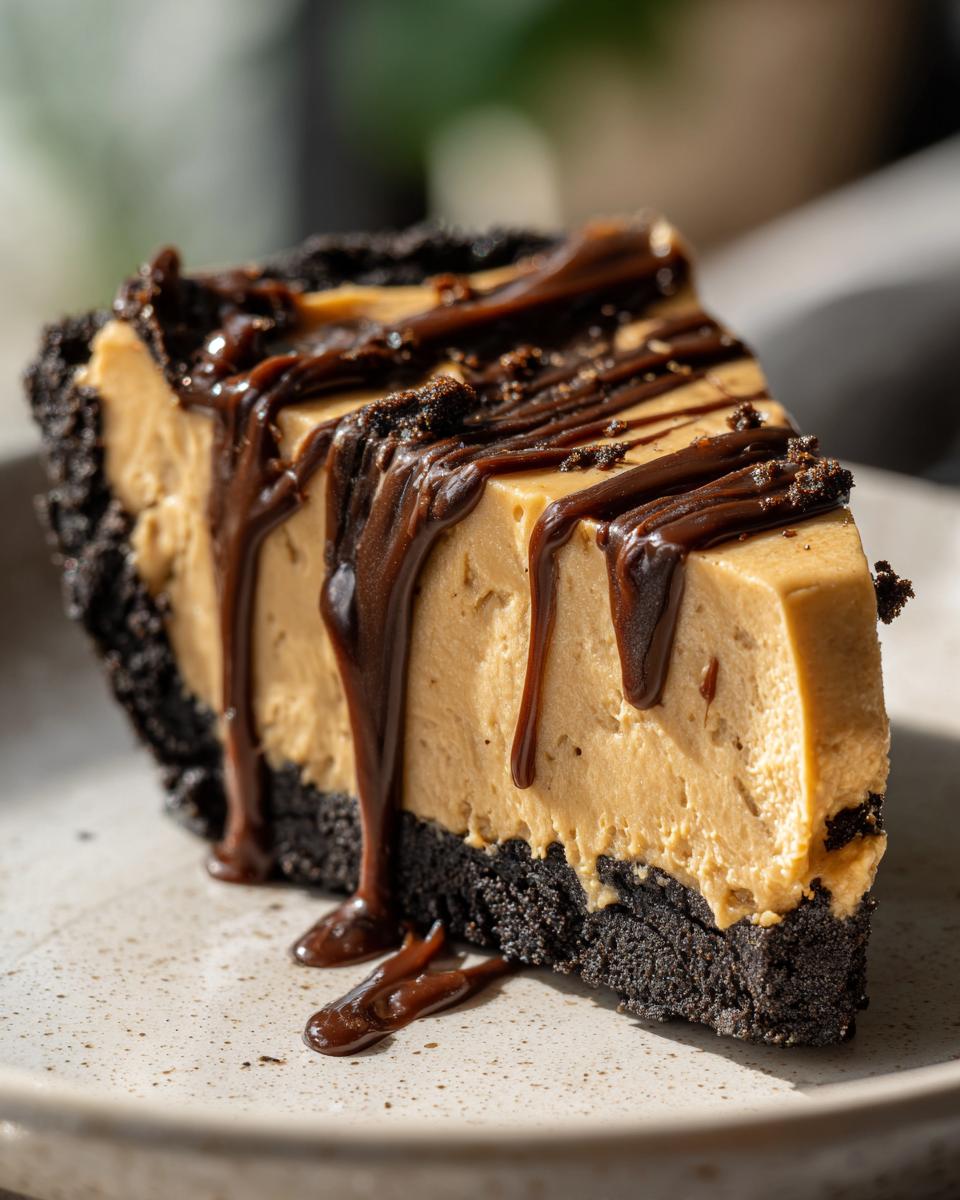
Oh, when that deep, unmistakable craving for peanut butter hits, you need something powerful, right? Forget waiting around for dough to chill or praying your crust doesn’t burn. This right here is my go-to, completely reliable **Easy No-Bake Peanut Butter Pie**. We’re talking about maximum peanut butter payoff with absolutely zero oven time required. It’s the kind of dessert that shows up at all the best gatherings, especially when the holiday rush hits and you need quick Thanksgiving Dessert Ideas. Here at HearthBite, founder Sarah Miller grew up on classic American comfort desserts, and this recipe is her totally foolproof, updated take on the ultimate, decadent **peanut butter pie**. If you love dishes that warm the soul, you must check out our collection of comfort food recipes. Trust me, you are going to scoop this up with a spoon!
- Why This Easy No-Bake Peanut Butter Pie is a Crowd Pleaser
- Gathering Ingredients for Your Creamy Peanut Butter Dessert
- Step-by-Step Instructions for the Best Peanut Butter Pie
- Tips for Success Making Your Simple Peanut Butter Pie
- Storage and Make-Ahead Instructions for this Peanut Butter Pie Recipe
- Variations on the Classic Peanut Butter Pie Dessert
- Frequently Asked Questions About Your No Bake Peanut Butter Pie
- Estimated Nutritional Data for This Decadent Peanut Butter Pie
- Share Your Experience Making This Peanut Butter Pie
Why This Easy No-Bake Peanut Butter Pie is a Crowd Pleaser
Honestly, sometimes you just don’t have time for a fussy, baked dessert, and that’s okay! This recipe is guaranteed to make everyone happy, which is why it’s one of our favorite Crowd Pleasing Pies. It manages to taste incredibly rich without any of the effort.
- It delivers that intense, salty-sweet peanut butter flavor everyone craves.
- The texture is unbelievable—smooth, creamy, and utterly dreamy.
- It uses an Oreo crust! Who doesn’t love that?
- The entire thing sets up beautifully in the fridge, meaning no last-minute oven worries.
Quick Prep Time for Your Simple Peanut Butter Pie
You read that right—the active prep time here is only about 20 minutes. That’s faster than most takeout appetizers! Because it’s a No Oven Dessert, you just mix, press, and chill. It’s the ultimate Quick Peanut Butter Dessert when you need something spectacular fast. Before moving on, if you need quick breakfast ideas, pop over and check out my easy breakfast recipes for inspiration!
Gathering Ingredients for Your Creamy Peanut Butter Dessert
Okay, let’s talk about what you need to make this amazing Peanut Butter Pie! The best news is that everything here is super standard; you probably have most of it in your pantry already. Remember, for this to turn out perfectly smooth, we need to be specific about consistency.
When you look at the list, pay close attention to the cream cheese. It absolutely must be softened—not melted, just nice and pliable. Also, I insist on using creamy peanut butter for the filling because we want that unbelievably velvety texture. Crunchy little bits just don’t belong in this specific Creamy Peanut Butter Dessert recipe, you know?
If you’re looking for other simple, fast recipes that come together beautifully, you should definitely check out my recipe for easy 30-minute one-pot creamy mushroom pasta!
Ingredients for the Oreo Crust Peanut Butter Pie Base
This foundation is what makes this pie so easy—no rolling out dough needed!
- 1 3/4 cups crushed Oreo cookies (about 24 cookies is what you’re aiming for!)
- 6 tablespoons unsalted butter, melted
Ingredients for the Decadent Peanut Butter Pie Filling
This is the magical part where the flavor really concentrates. Make sure your whipped topping is completely thawed before you start mixing it in, or you’ll end up with a lumpy mess!
- 1 (8 ounce) package cream cheese, softened
- 1 cup creamy peanut butter
- 1 1/2 cups powdered sugar
- 1 teaspoon vanilla extract
- 1 (12 ounce) container frozen whipped topping, thawed
Ingredients for the Simple Peanut Butter Pie Topping/Glaze
This little drizzle takes it over the top without adding more bake time. It’s optional, but seriously recommended!
- 1/2 cup creamy peanut butter (for topping)
- 1/4 cup powdered sugar (for topping)
- 2 tablespoons milk (for topping)
- 1/2 cup chocolate chips (for garnish, if you’re feeling fancy!)
Step-by-Step Instructions for the Best Peanut Butter Pie
Alright, let’s get this wonderful Peanut Butter Pie assembled! Since this is a no-bake recipe, precision matters a little more in the assembly stage than in actual cooking. Just follow the steps below, and you’ll get that perfect, sliceable result we are aiming for, especially since we want this ready for the table fast. If you need a quick reference for other no-bake treats, my recipe for easy no-bake chocolate coconut balls is always a winner too!
Preparing and Chilling the Oreo Crust Peanut Butter Pie Shell
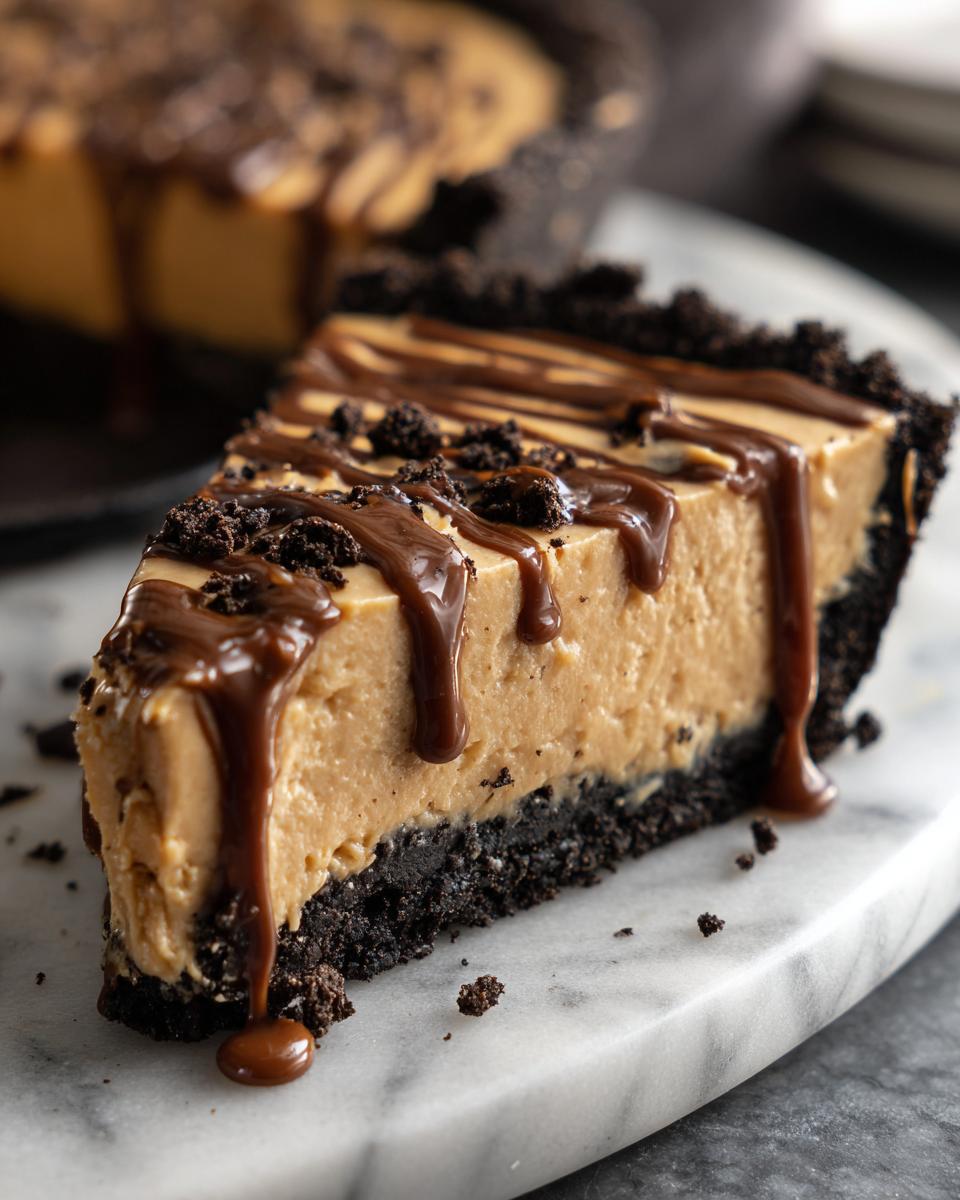
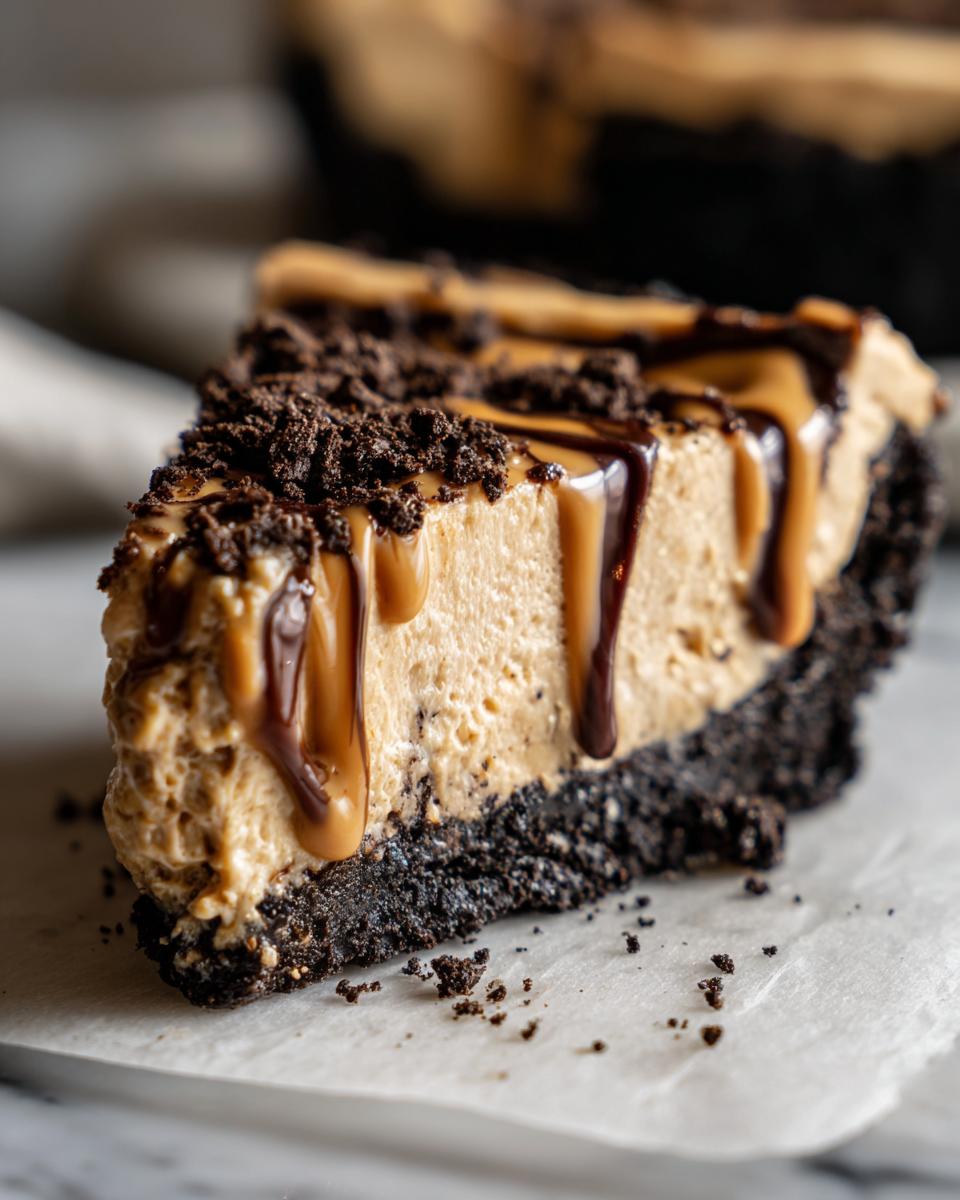
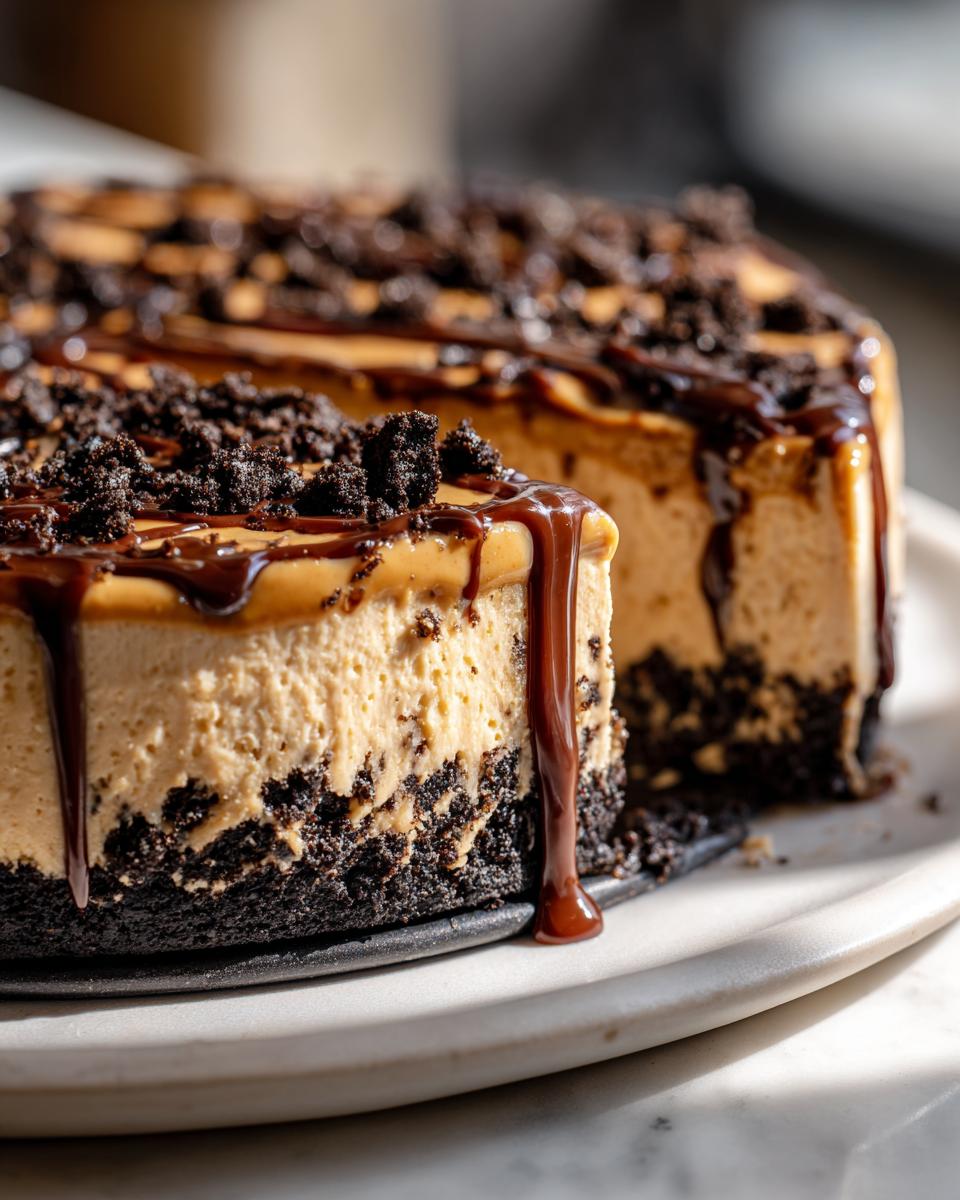
First things first: the crust! Just mix those crushed Oreos with the melted butter. Don’t be shy—press that mixture down hard into the bottom and all the way up the sides of your 9-inch pie plate. You want it compacted like pavement so it holds all that creamy filling. Once it’s packed tight, slide it straight into the freezer. It needs to get nice and cold while we work on the star of the show.
Creating the Smooth Creamy Peanut Butter Pie Filling
Here is where we build that luxurious texture. Grab a big bowl and beat that softened cream cheese until it is perfectly, utterly smooth. Seriously, don’t move on until there are absolutely no lumps left. That’s my one big tip to ensure your peanut butter pie isn’t gritty! Once the cream cheese looks like whipped silk, you can beat in the main cup of peanut butter, the powdered sugar, and the vanilla. Finally, take your thawed whipped topping and gently, gently fold it in. We don’t want to deflate all that air, so use a spatula and keep the motions light until you see no more white streaks.
Assembling and Setting the No Bake Peanut Butter Pie
Now we bring it all together. Take the firm crust out of the freezer and gently spoon the entire filling in there. Smooth the top with your spatula—use those little dips and swirls if you want a rustic look! This is the hardest part: you have to wait. Cover the whole pie loosely with plastic wrap and let it chill in the fridge for a minimum of four hours. This step is vital for structure in this No Bake Peanut Butter Pie; if you cut it too soon, it will just weep everywhere!
Finishing Touches for Your Homemade Peanut Butter Pie
Once it’s fully set, it’s time for the drizzle! For the glaze topping, whisk the extra peanut butter, the remaining powdered sugar, and milk together until you have a thin, pourable consistency. It shouldn’t be thick like frosting, just a smooth glaze. Drizzle this decadence all over the top surface of your firm pie. If you feel like going all out, throw some chocolate chips on top for garnish. Slice it up and serve it cold. Wow, is that good!
Tips for Success Making Your Simple Peanut Butter Pie
You know, even though this is a super easy Peanut Butter Pie Recipe—the no-bake kind!—a few little tricks can elevate it from great to absolutely legendary. We learn these things over time, often by making a mistake or two along the way. I’ve spent a lot of time perfecting these methods so you don’t have to stress!
One thing I always tell people when they ask for my secrets is about the peanut butter itself. If you are making the filling and you only have crunchy peanut butter on hand, go ahead and use it! It will change the texture, yes, but it adds a marvelous little surprise crunch—just be prepared that it won’t be quite as smooth as the recipe intends. It turns into a sort of Old Fashioned Peanut Butter Pie vibe when you use crunchy!
Sarah Miller’s absolute favorite, non-negotiable tip for the creamiest possible Peanut Butter Pie filling? Make sure your cream cheese is truly at room temperature. If you try to beat cold cream cheese, you’re going to get little hard chunks floating around in your filling, and nobody wants that disappointment. Take it out an hour early! Also, if you want to check out one of my favorite recipes that also benefits from perfectly softened ingredients, take a look at my pudding cookies recipe.
If you are worried about the pie sinking or not setting up right, that usually comes down to the amount of whipped topping you fold in. It’s tempting to add more to make it taller, but resist! Over-mixing or over-stuffing with the topping will make the filling too airy, and it won’t firm up properly in the fridge. You want it firm enough to slice without falling apart, which is why sticking to the measurement is key for this Simple Peanut Butter Pie.
For even more inspiration on rich, decadent desserts that use easy techniques, pop over and look at the stunning peanut butter pie recipe they have featured! They have some great pointers on presentation, too.
Storage and Make-Ahead Instructions for this Peanut Butter Pie Recipe
This is the part I truly love about this **No Bake Peanut Butter Pie**: it’s a champion make-ahead dessert! If you are planning for big gatherings, like hosting for Thanksgiving, this pie practically makes your prep day easier. Since there’s no baking involved, the “cooking” is really just setting time, and that’s perfect for busy schedules.
You absolutely have to chill this pie, remember? The minimum time is four hours, but honestly, it tastes so much better—and cuts so much cleaner—if you let it hang out in the fridge overnight. Overnight chilling lets that creamy filling firm up from just ‘pliable’ to perfectly sliceable. This means you can totally whip this up the day before your big event!
Once it’s set and sliced, it holds up wonderfully. If you have leftovers of your glorious **peanut butter pie**, just cover the slices tightly with plastic wrap or pop them into airtight containers. It keeps beautifully in the refrigerator for about three to four days. That’s usually long enough for my family to find every single last serving!
If you are prepping even further ahead, you might wonder about freezing. Yes, you can freeze this! I usually prefer freezing leftovers right in the container. If you freeze the whole thing before slicing, just make sure you cover it really well. When you pull it out, let it thaw slowly in the fridge for a full day. It comes back to life perfectly! If you’re looking for other make-ahead wonders that stay fresh in the fridge, you have to try my refrigerator pickles—they are amazing for quick additions to crunch!
Variations on the Classic Peanut Butter Pie Dessert
Part of the fun of mastering a really great recipe is knowing you can tinker with it later, right? This Easy Peanut Butter Pie base is so solid, but if you want to switch things up next time, I have a few ideas that keep the spirit of simplicity alive. These little tweaks can turn it into a whole new experience without adding any complicated steps.
First off, let’s talk crust. If you run out of Oreos, or maybe you just prefer that warm, slightly spiced flavor, swapping in a graham cracker crust is so simple. You just use about a cup and a half of crumbs and about a third cup of melted butter instead of the cookies and butter listed above. It totally still works and gives you a classic crumbly base for your Peanut Butter Cream Pie.
Now, if you really want to lean into decadence, we have to talk about making this a Chocolate Peanut Butter Pie. You have two easy ways to do this. You can substitute the regular whipped topping in the filling with a chocolate-flavored whipped topping—it’s usually right next to the plain kind in the freezer aisle. That instantly gives the whole filling a slightly richer, marbled look!
Or, and this is my favorite way for birthdays or big events, keep the filling the same, but go wild with the topping. Instead of just a simple glaze drizzle, melt down some quality chocolate chips with just a tiny splash of oil (that keeps it smooth!) and pour that over the top of the chilled pie. Then, before that chocolate sets, scatter chopped-up Reese’s Peanut Butter Cups all over the top. It’s utterly over the top, but what a stunning centerpiece that makes!
If you enjoy experimenting with other delicious, easy-to-make bars and pies, you absolutely have to see my recipe for Butterfinger Pie. It’s another no-bake winner that uses similar techniques but delivers a completely different, crunchy satisfaction!
Frequently Asked Questions About Your No Bake Peanut Butter Pie
I know you probably have a few last-minute mental notes running around, especially if you’re rushing to get this Easy Peanut Butter Pie assembled for guests! That’s totally normal. I’ve collected the questions I get asked most often about making sure this **Peanut Butter Cream Pie** sets up perfectly and tastes amazing every single time.
Can I use crunchy peanut butter instead of creamy?
Of course, you can! If you look back in my tips section, I mentioned that using crunchy changes the texture, but honestly, it works just fine. You won’t get that ultra-smooth, almost cloud-like texture that the standard recipe gives you, but you will gain some great little pockets of peanut flavor. It turns it into a slightly heartier, more rustic pie, giving you a bit of an Old Fashioned Peanut Butter Pie feel. Just make sure you mix it really well so the crunchy bits are evenly distributed!
What if I don’t have Oreos? Can I use graham crackers?
Yes, absolutely! That’s the beauty of a No Bake Peanut Butter Pie—you can swap the crust easily. If you don’t have Oreos, you can easily substitute with a standard graham cracker crust. You’ll need about 1 1/2 cups of graham cracker crumbs and you should use a little more melted butter—around 1/3 cup usually does the trick to hold it together well. Press that into the plate just the same way and chill it!
How many hours does this pie actually need to chill?
This is key, my friend! While the recipe says a minimum of four hours, I am begging you: try to chill it for at least six hours, or better yet, overnight! Since there is no baking helping to set the structure, the chilling time is doing all the heavy lifting here. If you try to cut it earlier, it’s much more likely to collapse when you try to serve it. Patience makes this Peanut Butter Pie Recipe incredible.
Can I freeze this pie before adding the final topping?
You totally can freeze this! A huge plus for planning ahead is knowing this **Quick Peanut Butter Dessert** freezes well. Assemble the pie completely—crust, filling, everything—but skip the final chocolate drizzle topping for now. Wrap it super tightly in plastic wrap, then maybe foil, and freeze it. When you are ready to serve it, just pull it out of the deep freeze and let it thaw slowly in the refrigerator for about 24 hours. When thawed, it’s just as creamy as made fresh!
If you need another easy make-ahead appetizer for your party spread, check out my recipe for easy Rotel dip!
Estimated Nutritional Data for This Decadent Peanut Butter Pie
Now, listen up, because this is important: this Decadent Peanut Butter Pie is a treat, not exactly a salad! When we talk about nutrition, especially in something this rich, we have to remember that these numbers are just estimates. They are based on the specific ingredients and amounts listed above, using standard versions of Oreo cookies and peanut butter. Brands can change things up, right?
So, while I totally encourage you to eat every last bite because it tastes like heaven, just consider this guide for planning your meal. If you are looking for lighter fare during the week, pop over and check out my healthy lunch recipes!
This data is broken down per single slice, assuming you get 8 perfect slices out of the whole pie:
- Calories: Around 450 per slice. Yep, that’s a rich one!
- Fat: About 30 grams total fat. That includes the healthy fats from the peanut butter, but it is still decadent.
- Saturated Fat: Roughly 12 grams. That’s coming mostly from the cream cheese and butter in the crust, so be mindful!
- Carbohydrates: Around 40 grams.
- Sugar: This one clocks in high, about 35 grams. It’s dessert, after all!
- Protein: You still get a nice little boost, around 9 grams, thanks to all that peanut butter and cream cheese.
We are skipping over the sodium and cholesterol for the daily tally, but just know that enjoying this truly wonderful Peanut Butter Pie now and then is part of a happy life in the kitchen! Don’t stress over the numbers when you’re serving up homemade comfort!
Share Your Experience Making This Peanut Butter Pie
Wow, we made it! You now have everything you need to whip up hands-down the *best* peanut butter pie your family has ever tasted. Seriously, this simple, no-bake recipe always feels like a huge win, especially when you pull it out of the fridge looking perfectly set and cold. I genuinely hope this becomes a staple in your rotation, whether you need an impressive dish for Thanksgiving or just a much-needed sweet fix mid-week.
Now, here is where you come in! I put my heart into making these recipes reliable for you, and knowing what works in *your* kitchen is everything to me. Once you’ve had a chance to chill it, slice it, and taste that creamy goodness, I would be so thrilled if you could come back here and leave a quick rating below!
Did you rate this Peanut Butter Pie Recipe 5 stars? Did you try swapping the Oreos for Nilla Wafers? Did you add peanut butter cups to the top like I suggested? I want to hear about every success and every little change you made! Your feedback helps everyone else who comes looking for the perfect, easy dessert. Don’t forget to snap a picture and share it around!
If you have any questions at all while you’re assembling or chilling, please don’t hesitate to reach out on my contact page. Happy baking—or should I say, happy *chilling*!
PrintEasy No-Bake Peanut Butter Pie with Oreo Crust
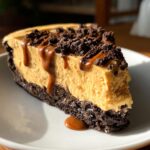
Make this rich, creamy peanut butter pie without turning on the oven. It features a simple Oreo crust and a decadent filling, perfect for any gathering.
- Prep Time: 20 min
- Cook Time: 0 min
- Total Time: 4 hr 20 min
- Yield: 8 servings 1x
- Category: Dessert
- Method: No-Bake
- Cuisine: American
- Diet: Vegetarian
Ingredients
- 1 3/4 cups crushed Oreo cookies (about 24 cookies)
- 6 tablespoons unsalted butter, melted
- 1 (8 ounce) package cream cheese, softened
- 1 cup creamy peanut butter
- 1 1/2 cups powdered sugar
- 1 teaspoon vanilla extract
- 1 (12 ounce) container frozen whipped topping, thawed
- 1/2 cup creamy peanut butter (for topping)
- 1/4 cup powdered sugar (for topping)
- 2 tablespoons milk (for topping)
- 1/2 cup chocolate chips (for garnish)
Instructions
- Prepare the crust: Combine the crushed Oreo cookies and melted butter in a medium bowl. Press the mixture firmly into the bottom and up the sides of a 9-inch pie plate. Place the crust in the freezer while you prepare the filling.
- Make the filling: In a large bowl, beat the softened cream cheese until smooth. Add 1 cup of peanut butter, 1 1/2 cups of powdered sugar, and vanilla extract. Beat until fully combined and creamy.
- Fold in the whipped topping: Gently fold the thawed whipped topping into the peanut butter mixture until no streaks remain. Do not overmix.
- Fill the crust: Spoon the peanut butter filling evenly into the chilled Oreo crust. Smooth the top with a spatula.
- Chill the pie: Cover the pie loosely with plastic wrap and refrigerate for at least 4 hours, or until firm.
- Prepare the topping: In a small bowl, whisk together the remaining 1/2 cup of peanut butter, 1/4 cup of powdered sugar, and milk until smooth. This creates a thin glaze.
- Garnish and serve: Drizzle the peanut butter glaze over the chilled pie. Sprinkle with chocolate chips or top with whipped cream if desired. Slice and serve cold.
Notes
- For a richer chocolate flavor, use a chocolate whipped topping instead of plain whipped topping.
- If you do not have Oreos, you can substitute with a graham cracker crust made from 1 1/2 cups graham cracker crumbs and 1/3 cup melted butter.
- This pie sets best when chilled for a minimum of 6 hours.
Nutrition
- Serving Size: 1 slice
- Calories: 450
- Sugar: 35g
- Sodium: 310mg
- Fat: 30g
- Saturated Fat: 12g
- Unsaturated Fat: 18g
- Trans Fat: 0g
- Carbohydrates: 40g
- Fiber: 2g
- Protein: 9g
- Cholesterol: 45mg