
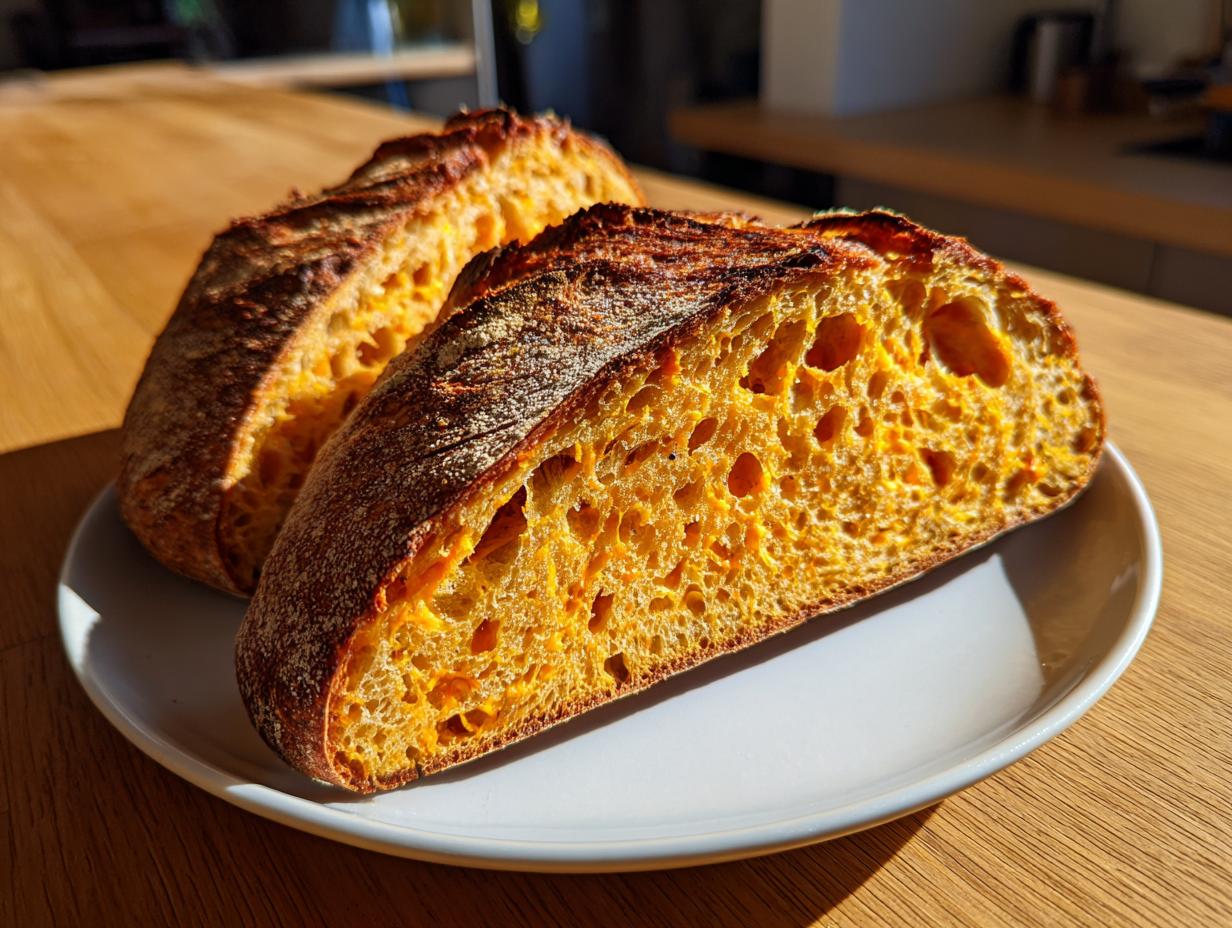
There’s nothing quite like the scent of fresh bread warming up your whole house, right? It just signals comfort and home. But let’s be honest, sometimes that traditional kneading feels like trying to wrestle a stubborn pet! That’s why when I first discovered the no-knead method, I was totally hooked. Here at HearthBite, Sarah Miller and I are all about bringing that artisan quality into your everyday kitchen without the heavy lifting. This no knead cheddar bread is the perfect example of that philosophy: simple ingredients, a long, slow rest, and you get an incredible, crusty loaf studded with sharp cheese. It’s the ultimate in no-effort bread making, giving you maximum reward for minimal hands-on time. Trust me, your busy schedule just got a whole lot tastier!
- Why This No Knead Cheddar Bread Recipe Works for Beginners
- Gathering Ingredients for Your Rustic Cheese Loaf
- Step-by-Step Instructions for No Knead Cheddar Bread
- Baking the Best Cheddar Bread: Oven Setup
- Tips for Success with Your No Knead Cheddar Bread
- Serving Suggestions for This Cheesy Loaf
- Storing and Reheating Leftover No Knead Cheddar Bread
- Frequently Asked Questions About No Knead Bread
- Share Your HearthBite Creations
Why This No Knead Cheddar Bread Recipe Works for Beginners
If you’ve ever felt intimidated by bread making, stop right there! This method is designed for total ease. Seriously, this is the gold standard for beginner bread baking because we let chemistry do all the tough work. There’s no complex folding or kneading required; this is true no effort bread making.
What makes it foolproof is the long, slow fermentation time. Instead of forcing gluten development with your hands, we just leave the dough alone overnight. It develops structure and amazing flavor all on its own. It’s honestly miraculous how much better a dough tastes when you just let it chill and think for a while. I’ve even linked some of my favorite caramel recipes—like easy homemade soft chewy sea salt caramels—here if you need something sweet to balance out your savory loaf once it comes out of the oven!
The Magic of Slow Rise Bread Instructions
The secret sauce for any successful overnight no knead bread is time. That 12 to 18 hour rest is crucial. During that wait, the yeast eats slowly and creates those wonderful air pockets you associate with fancy bakery loaves. Time replaces effort—that’s the mantra I live by! You just mix the ingredients, cover the bowl, and walk away until the next day.
Gathering Ingredients for Your Rustic Cheese Loaf
Alright, time to get our humble ingredients ready for this amazing rustic cheese loaf. Don’t let the long rise time fool you; the actual active prep time here is just minutes! We’re building flavor from the ground up, and quality matters, especially when it comes to the cheese. Remember, everything is in the details here.
- 3 cups all-purpose flour
- 1 1/2 teaspoons salt
- 1/4 teaspoon instant yeast
- 1 1/2 cups cold water
- 1 1/2 cups shredded sharp cheddar cheese, divided
- 1 tablespoon cornmeal for dusting
Ingredient Notes and Cheddar Clarity
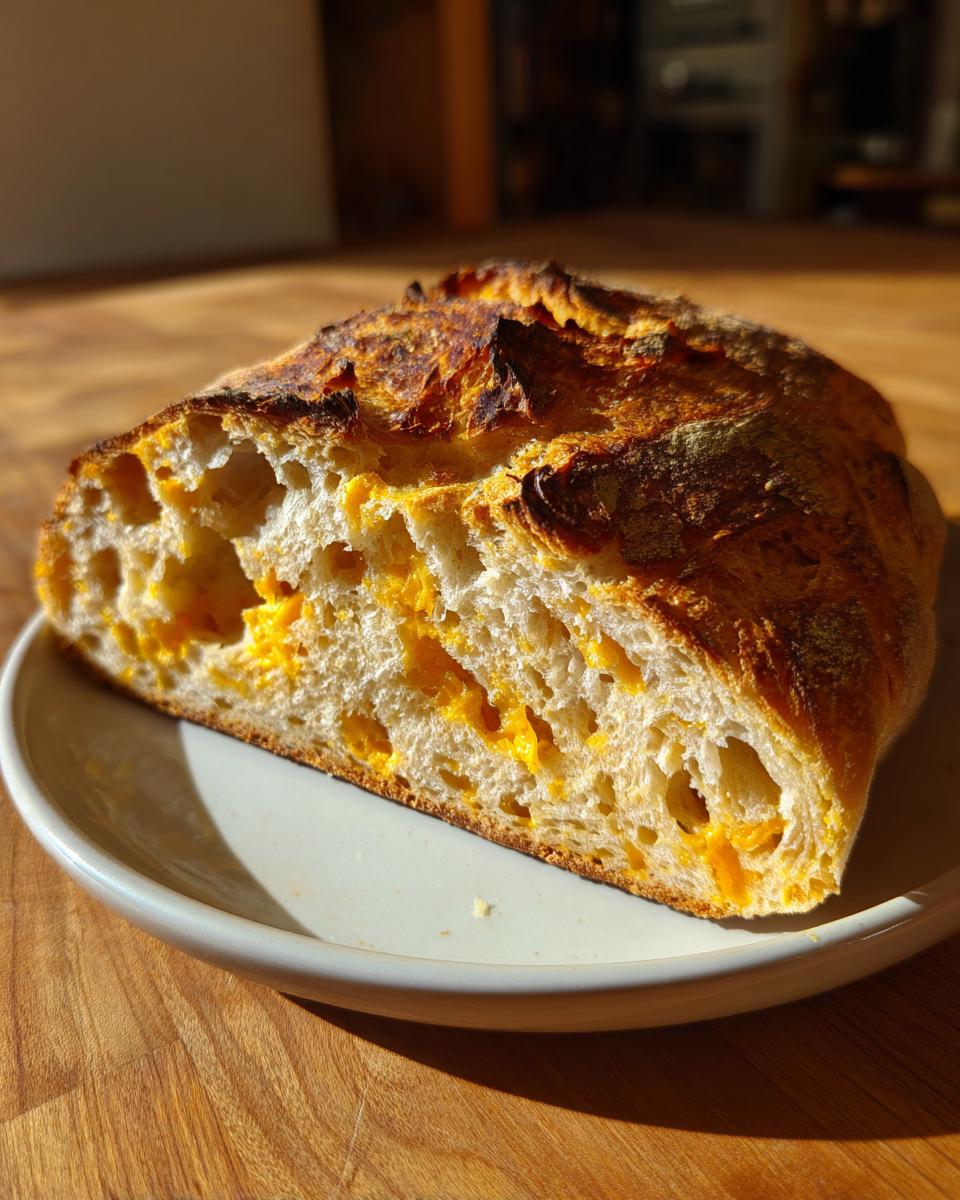
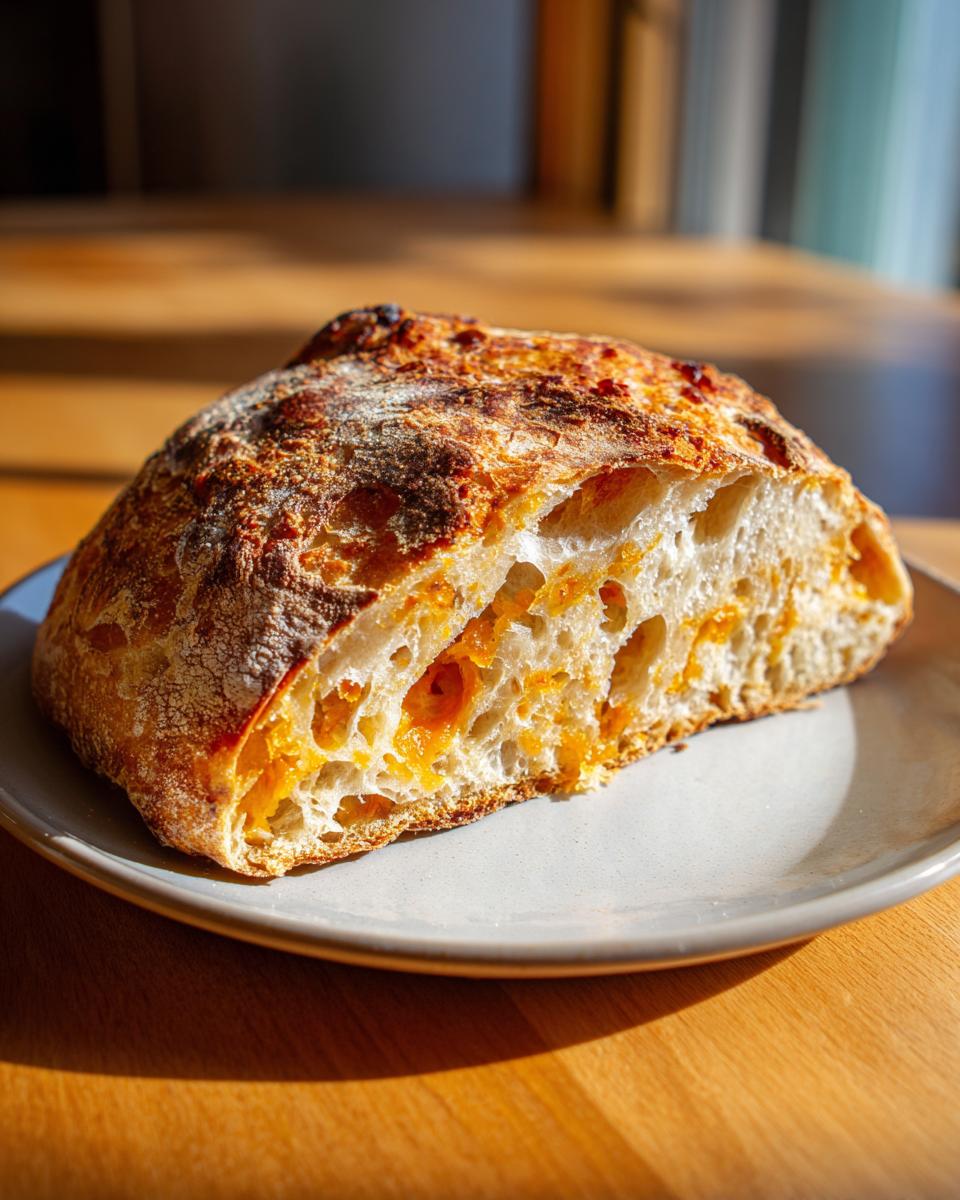
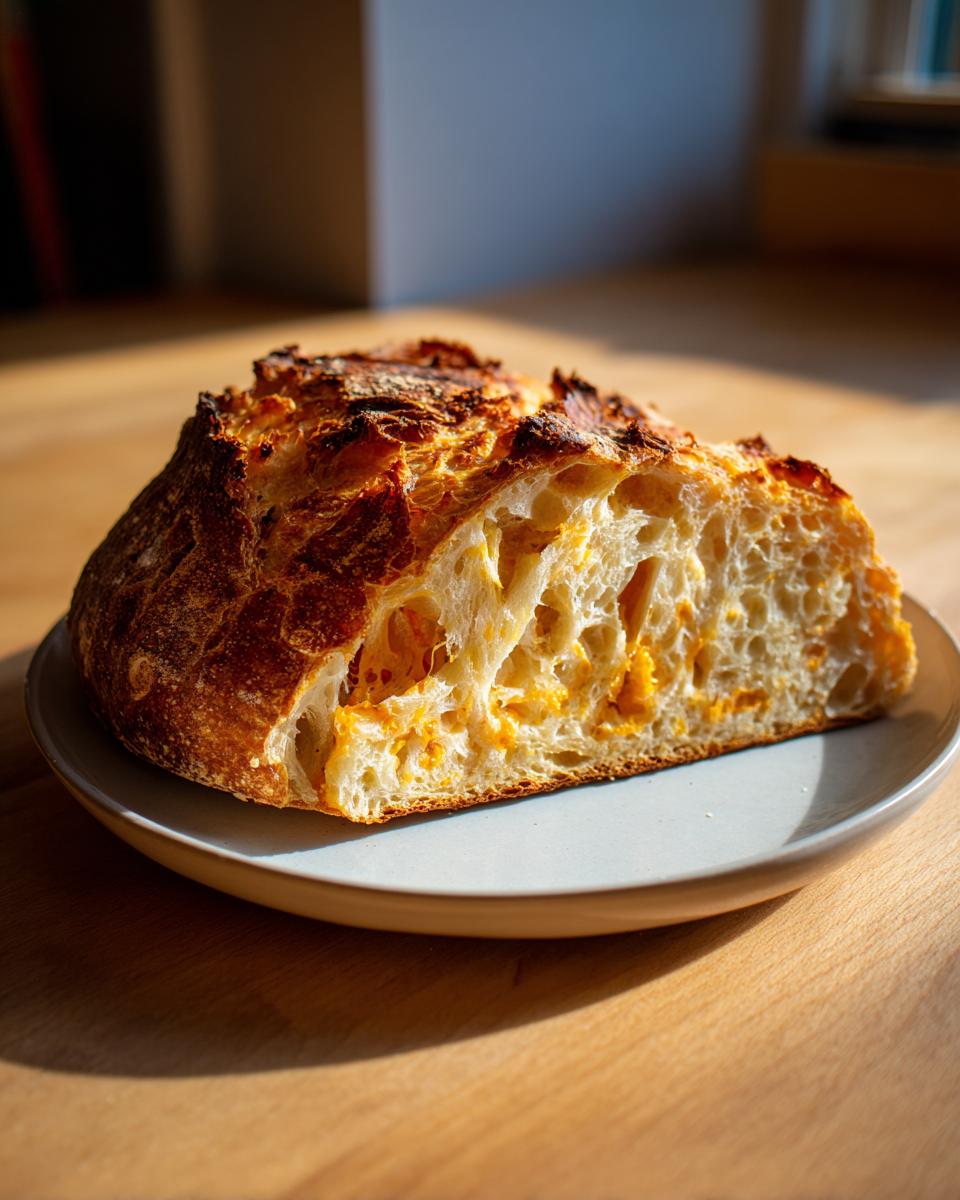
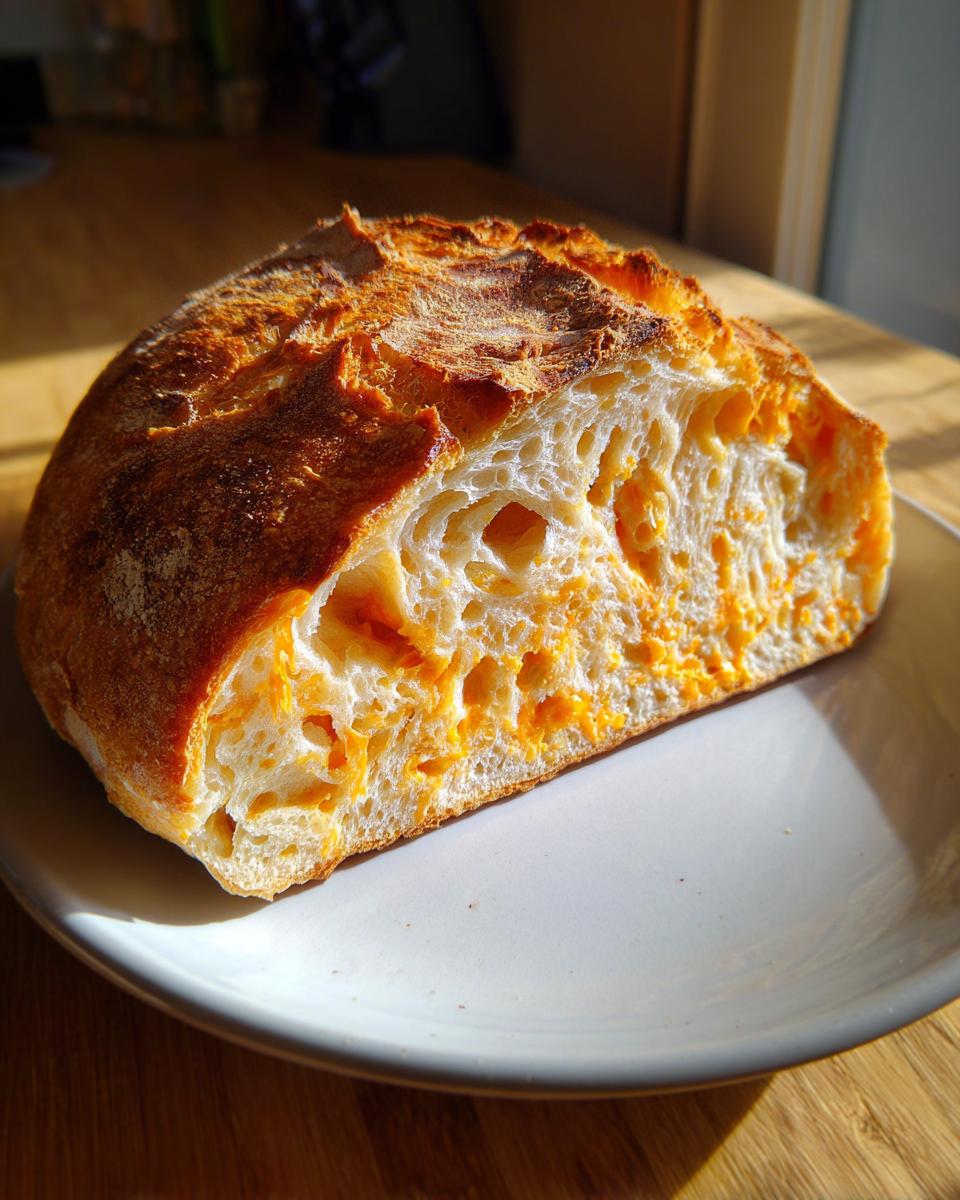
Using cold water is actually a necessary trick for the no-knead method. It slows down that initial yeast activity so the dough doesn’t over-proof before you even go to bed! When it comes to the cheddar, I highly recommend grating it yourself, especially if you are leaning towards a robust sharp cheddar bread recipe option. Pre-shredded cheese has anti-caking agents that just don’t melt as beautifully when they hit that hot Dutch oven.
My trick is to shred about 1 cup of cheese for the first fold, saving the final 1/2 cup to be sprinkled right on top before the final short rest. This ensures you get a gooey layer inside and a beautiful, slightly crispy, cheesy crust outside. It’s worth the extra minute of grating, I promise!
Step-by-Step Instructions for No Knead Cheddar Bread
This is where the magic happens, and I promise it’s so much simpler than it looks on paper. We are moving from messy ingredients to structured dough in just a few quiet minutes before you leave it for the day. Just follow these steps carefully, and you’ll be rewarded tomorrow with the easiest pizza sauce recipe you’ve ever made, or, well, your glorious bread!
Mixing and the Long Rest for No Knead Bread Dough Tips
First, whisk your flour, salt, and yeast together really well in a big bowl. Then pour in that cold water. You only want to mix this with a sturdy spoon until *just* combined—I mean shaggy, messy, nothing pretty. If you see dry streaks, stir once or twice more, but seriously, stop mixing! If you work it too much now, you’ll deflate the whole point of this system. Then, gently fold in that first cup of cheddar cheese. Cover it TIGHTLY with plastic wrap now. If your kitchen is warm, maybe check it in 12 hours instead of waiting the full 18. Sarah always says, “The dough will tell you when it’s ready by filling up the bowl, even if it’s a little early!”
Shaping and Preheating for Crusty Dutch Oven Bread
Once that dough is bubbly and massive the next day, flour your surface lightly. Scrape the dough out gently—no punching down! You’re just going to fold it over itself three or four times to create a rough ball. This little bit of shaping tightens things up nicely. Now, sprinkle that remaining half-cup of cheese right on top and softly fold that cheese in just once or twice. You want pockets, not a completely uniform dough. Place the new dough ball on parchment paper and let it chill out for 30 minutes while your oven does the heavy lifting. Remember, great crusty dutch oven bread relies on a scorching hot vessel, so don’t rush that preheat!
Baking the Best Cheddar Bread: Oven Setup
Okay, the dough has rested, you’ve shaped it, and now we bake! This part is slightly nerve-wracking, but trust me, if you follow the heat rule, your efforts will pay off with the best cheddar bread you’ve ever made. The most critical setup step is that scorching hot Dutch oven. You need to get that pot screaming hot!
Pop your Dutch oven—lid and all—into the oven and let it preheat for a full half-hour once the oven hits 450 degrees Fahrenheit (or 232 degrees Celsius). When it’s time to bake, pull the rack out just slightly. Use the parchment paper sling you left under the dough ball to gently lower your cheesy masterpiece right into that hot metal pot. Cover it up immediately. The lid traps the steam released by the dough, which is what allows the loaf to get that beautiful, dramatic oven spring we aim for.
Bake covered for 30 minutes. After that, carefully take the lid off. This is when the crust darkens and gets really crunchy. Keep an eye on it for the last 10 to 15 minutes. If you want to see how I get that perfect crisp edge on my skillet cornbread, check out my Skillet Cornbread Recipe Cast Iron Crispy Edge! It’s the same concept: preheat, protect, and bake!
Tips for Success with Your No Knead Cheddar Bread
You’ve done the waiting, the preheating, and the baking—don’t rush the grand finale! The most common mistake people make with these easy artisan bread recipes is slicing into that gorgeous loaf while it’s still screaming hot. Seriously, let it rest on a wire rack for at least an hour, but honestly, two hours is better. Cutting it too early releases steam that is still setting the crumb structure, and you end up with a doughy section right in the center. I know it’s hard, but trust me on this one!
If you’re looking for other great ways to use up that amazing homemade bread, check out my guide on how to make homemade bread bowls—perfect for using up leftover loaves that might not be quite as picture-perfect!
Achieving Perfect Texture in Your Simple Homemade Bread
If your loaf comes out looking deflated or gummy on the inside, 99% of the time that means it cooled too quickly or wasn’t baked quite long enough. Remember, we are baking a very wet dough here. Don’t panic if the top looks done; the internal temperature needs to set the starches! For the ultimate flavor punch in this simple homemade bread, that sharp cheddar really makes a difference in cutting through the richness of the crust.
Serving Suggestions for This Cheesy Loaf
So, you’ve managed the patient wait and pulled out that golden, crackly loaf—now what? Honestly, this bread needs almost nothing to shine, but I love using it as the ultimate vessel for comfort food. A thick slice dipped into my creamy roasted cauliflower soup recipe is just heavenly. It’s also perfect alongside a hearty chili or just slathered with a little salted butter and homemade fig jam.
If you have leftovers (which is rare!), try making croutons or tearing pieces off to add to a savory bread pudding. This bread sings loudest when it’s paired with something warm and comforting!
Storing and Reheating Leftover No Knead Cheddar Bread
This bread is so good I rarely have leftovers, but when I do, I have a strict reheating protocol to keep that crust alive! Forget the microwave; it just makes everything soft and sad, especially crusty artisan loaves. If you want that crackly exterior back, slice what you need and pop those pieces directly onto a baking sheet.
Pop those slices back into a 350°F oven for about 5 to 7 minutes. That low, dry heat wakes up the crust perfectly. Store the main loaf loosely wrapped in a clean kitchen towel at room temperature for two days max. Never put it in plastic wrap; that’s a guaranteed way to sweat the crust!
Frequently Asked Questions About No Knead Bread
I get so many wonderful emails asking about fine-tuning this recipe, and honestly, that’s the best part of sharing! Since this relies on a chemical reaction rather than muscular kneading, we sometimes have to tweak things based on our kitchen environment or what we have on hand. Here are the most common questions I get regarding our no knead cheddar bread!
Can I use active dry yeast instead of instant yeast in this no knead cheddar bread?
Yes, you absolutely can! Instant yeast is my go-to because you can just dump it right in with the flour, but active dry yeast works just fine for these slow rise bread instructions—you just need one extra teeny step. With active dry yeast, you need to ‘wake it up’ before you mix it in. Take about a half cup of your measured cold water and warm it until it’s slightly warm to the touch (not hot!). Stir the yeast into that warm water and let it sit for about 5 to 10 minutes until it gets foamy. Once it’s foamy, use that water mixture instead of plain cold water in step two. Because you activated it first, your rise time might be slightly shorter, so keep an eye on that bowl!
What is the best cheese to use besides sharp cheddar for this recipe?
While I adore the tang of sharp cheddar in my loaves, this recipe is really adaptable! You want a cheese, obviously, that melts well, because nobody wants hard little cheese rocks in their tender bread. If you want something milder but still creamy, Gruyère is phenomenal here—it adds a slightly nutty note that pairs beautifully with the crust. Monterey Jack is another fantastic choice, especially if you’re baking for picky eaters, since it melts incredibly smoothly. Any good melting block cheese that you shred yourself works wonders for these easy artisan bread recipes!
If you’re looking for breakfast ideas that use up any leftover delicious bread, I’ve gathered some of my favorite easy breakfast recipes for you right here!
Share Your HearthBite Creations
Well, that’s it! I’ve shared my secrets, and now this no knead cheddar bread is officially in your hands. It’s my sincere hope that this loaf brings a little bit of that HearthBite comfort into your own home. Baking should always feel like a beautiful reward at the end of a journey, not a stressful obligation.
When you pull that gorgeous, cheesy loaf out of the oven, I want to see it! Please snap a picture of your rustic cheese loaf and share it with us on social media—don’t forget to tag me. And if you found this recipe truly helpful for your busy weeks, leaving a star rating right below really helps other home cooks find confidence in baking their first batch.
If you want to learn more about the philosophy behind HearthBite and why Sarah Miller is so passionate about simple, connecting food, you can always hop over to the About Page. Happy baking, my friends. May your crust be crisp and your cheese be plentiful!
PrintNo Knead Cheddar Bread: Easy Artisan Loaf

Make a flavorful, crusty loaf of cheddar cheese bread using a simple no-knead method. This recipe requires minimal effort and yields a satisfying, rustic cheese loaf perfect for any meal.
- Prep Time: 10 min
- Cook Time: 45 min
- Total Time: 13 hours 55 min
- Yield: 1 loaf 1x
- Category: Baking
- Method: Baking
- Cuisine: American
- Diet: Vegetarian
Ingredients
- 3 cups all-purpose flour
- 1 1/2 teaspoons salt
- 1/4 teaspoon instant yeast
- 1 1/2 cups cold water
- 1 1/2 cups shredded sharp cheddar cheese, divided
- 1 tablespoon cornmeal for dusting
Instructions
- In a large bowl, whisk together the flour, salt, and instant yeast.
- Add the cold water to the dry ingredients. Mix with a wooden spoon until just combined into a shaggy dough. Do not overmix.
- Fold in 1 cup of the shredded cheddar cheese until evenly distributed.
- Cover the bowl tightly with plastic wrap. Let the dough rest at room temperature for 12 to 18 hours. This is your slow rise bread instructions period.
- After the long rise, lightly flour a work surface. Gently scrape the dough out of the bowl. Fold the dough over itself a few times to form a rough ball. Sprinkle the remaining 1/2 cup of cheddar over the top and gently fold it in once or twice.
- Place a piece of parchment paper over the dough ball. Let it rest for 30 minutes.
- About 30 minutes before baking, place a Dutch oven with its lid inside your oven. Preheat the oven to 450 degrees Fahrenheit (232 degrees Celsius).
- Carefully remove the hot Dutch oven from the oven. Lift the dough using the parchment paper and gently lower it into the hot pot.
- Cover the Dutch oven with the lid and bake for 30 minutes.
- Remove the lid and continue baking for another 10 to 15 minutes, until the crust is deep golden brown.
- Carefully remove the bread from the Dutch oven and let it cool completely on a wire rack before slicing.
Notes
- For the best crusty dutch oven bread, ensure your Dutch oven is fully preheated before adding the dough.
- If your kitchen is very warm, reduce the initial room temperature rise time slightly.
- This recipe works well with mild or sharp cheddar cheese recipe variations.
Nutrition
- Serving Size: 1 slice
- Calories: 220
- Sugar: 1
- Sodium: 350
- Fat: 7
- Saturated Fat: 4
- Unsaturated Fat: 3
- Trans Fat: 0
- Carbohydrates: 35
- Fiber: 1
- Protein: 8
- Cholesterol: 15