
There is just nothing quite as comforting as pulling a bubbling, hot dessert out of the oven, especially when it smells like summer itself. Forget fiddly pies; for me, the ultimate go-to comfort food dessert is a gorgeous, rustic mixed berry cobbler. This recipe is my absolute favorite to share with neighbors or just pull out for a cozy night in here at HearthBite. I’m Sarah Miller, and believe me when I say I’ve tested this mixed berry cobbler recipe until it was absolutely foolproof. It’s reliable for every home cook, whether you’re serving it at a big summer gathering or just craving something warm and sweet after dinner. Trust me, this rustic beauty is going straight into your family favorites collection.
If you love recipes that connect you to that wonderful feeling of home cooking without keeping you stuck in the kitchen all day, you’ll want to check out our full collection of classic comfort food recipes next!
- Why This Easy Mixed Berry Cobbler Recipe Works
- Gather Your Ingredients for Mixed Berry Cobbler
- How to Prepare the Best Berry Cobbler Dessert
- Tips for the Perfect Mixed Berry Cobbler
- Variations on the Classic Mixed Berry Cobbler Recipe
- Serving Suggestions for a Warm Berry Dessert
- Storage and Reheating for Your Homemade Fruit Cobbler
- Frequently Asked Questions About Mixed Berry Cobbler
- Nutritional Estimates for This Simple Berry Dessert
- Share Your Homemade Fruit Cobbler Experience
Why This Easy Mixed Berry Cobbler Recipe Works
When I developed this Easy Berry Cobbler, I focused on one thing: delivering maximum rustic dessert flavor with minimal fuss. This isn’t some delicate pie that requires hours of rolling dough. It’s designed for real life, which means it has to be reliable whether you’re using beautiful summer berries or the ones you pulled from the deep freeze.
I know so many of you wonder about using different fruit sources, so I’m thrilled this recipe is truly exceptional with a Cobbler with Frozen Berries—just check out the specific tips later on! It’s a consistent winner on our family table, and I think you’ll find it quickly becomes your go-to summer dessert.
The Perfect Juicy Berry Filling
The secret weapon in the filling, besides all those gorgeous berries, is a little bit of cornstarch. That tiny bit of thickening agent is what turns simple fruit into a glorious, jammy pool. When it bakes, that starch activates and gives you the most perfect, thick, and juicy berry filling that you just scoop right up with your spoon. No soupy mess here, I promise!
Classic Buttermilk Biscuit Topping
This is where we really diverge from complicated techniques. Forget that intimidating pie crust! We are using a simple, drop-style Buttermilk Biscuit Topping. It bakes up beautifully tender, golden brown, and wonderfully buttery right on top of the fruit. It’s so much faster than rolling out pastry, which is why I love calling this an *easy mixed berry cobbler*.
Gather Your Ingredients for Mixed Berry Cobbler
Okay, gathering supplies is my favorite part—it means the baking is just around the corner! I always lay everything out on the counter before I even think about turning the oven on. It helps me remember all the little things. Remember that since this is a mixed berry cobbler, we are tossing multiple fruits together, so we need just enough sugar and starch to balance that tartness.
For the best results, make sure your butter for the topping is straight out of the fridge, super cold! For a deeper flavor in our biscuits, you can always check out how I make my famous sweet potato biscuits for inspiration, though this recipe uses classic buttermilk.
For the Juicy Berry Filling
Here’s what goes into making that wonderfully sweet and thick base:
- 6 cups mixed berries (fresh or frozen: blueberries, raspberries, blackberries, strawberries)
- 3/4 cup granulated sugar
- 2 tablespoons cornstarch
- 1 tablespoon lemon juice
- 1/4 teaspoon ground cinnamon
For the Buttermilk Biscuit Topping
These ingredients will create that signature tender, golden cap for our dessert:
- 1 1/2 cups all-purpose flour
- 2 tablespoons granulated sugar (for topping)
- 1 tablespoon baking powder
- 1/2 teaspoon salt
- 1/2 cup (1 stick) cold unsalted butter, cut into small pieces
- 1/2 cup buttermilk
- 1 large egg, beaten (for egg wash)
- 1 teaspoon coarse sugar (for sprinkling)
How to Prepare the Best Berry Cobbler Dessert
Alright, let’s get messy! This is where the magic happens in making the best Berry Cobbler Dessert. Following these steps ensures that your kitchen fills with that incredible smell of warm, spiced fruit. My goal here at HearthBite is to make sure you nail this part every single time so you get that perfect combination of sweet filling and tender topping.
Oven Setup and Preparing the Mixed Berry Cobbler Filling
First things first, you absolutely must preheat that oven to 375 degrees F. Don’t even put the berries in the bowl until it’s ready! While it heats up, take a moment to lightly grease whatever 9-inch pie dish or 8×8 inch casserole dish you’re using. We don’t want to lose any of that precious fruit later!
Now for the filling! In a large bowl—and I mean large, because we’re using 6 cups of fruit—gently toss everything together: your mixed berries, the 3/4 cup of sugar, the cornstarch, the lemon juice for brightness, and just a hint of cinnamon. Toss it carefully so you don’t crush all those beautiful berries; we want them to hold their shape a little. Once they look evenly coated and glossy, pour that whole beautiful base right into your prepared dish. This is the heart of your mixed berry cobbler.
Making the Buttermilk Biscuit Topping
This topping is quick, but you have to work fast here, especially with the butter. In a separate, medium bowl, go ahead and whisk together the flour, the two tablespoons of topping sugar, baking powder, and salt. Get those dry ingredients happy together.
Next, bring in that cold butter you cut into little cubes. You need to cut this butter into the dry mix. I prefer using my fingertips when I make this because I can really *feel* when it’s right, but a pastry blender works great too. Go until the mixture looks like coarse, sandy crumbs, but you must leave some pea-sized chunks of butter scattered throughout! Those chunks melt into pockets of flaky goodness while baking. When you stir in the buttermilk, mix it only until the dough just barely comes together. Seriously, stop mixing the second it looks shaggy. Overmixing makes tough biscuits, and we want tender tops!
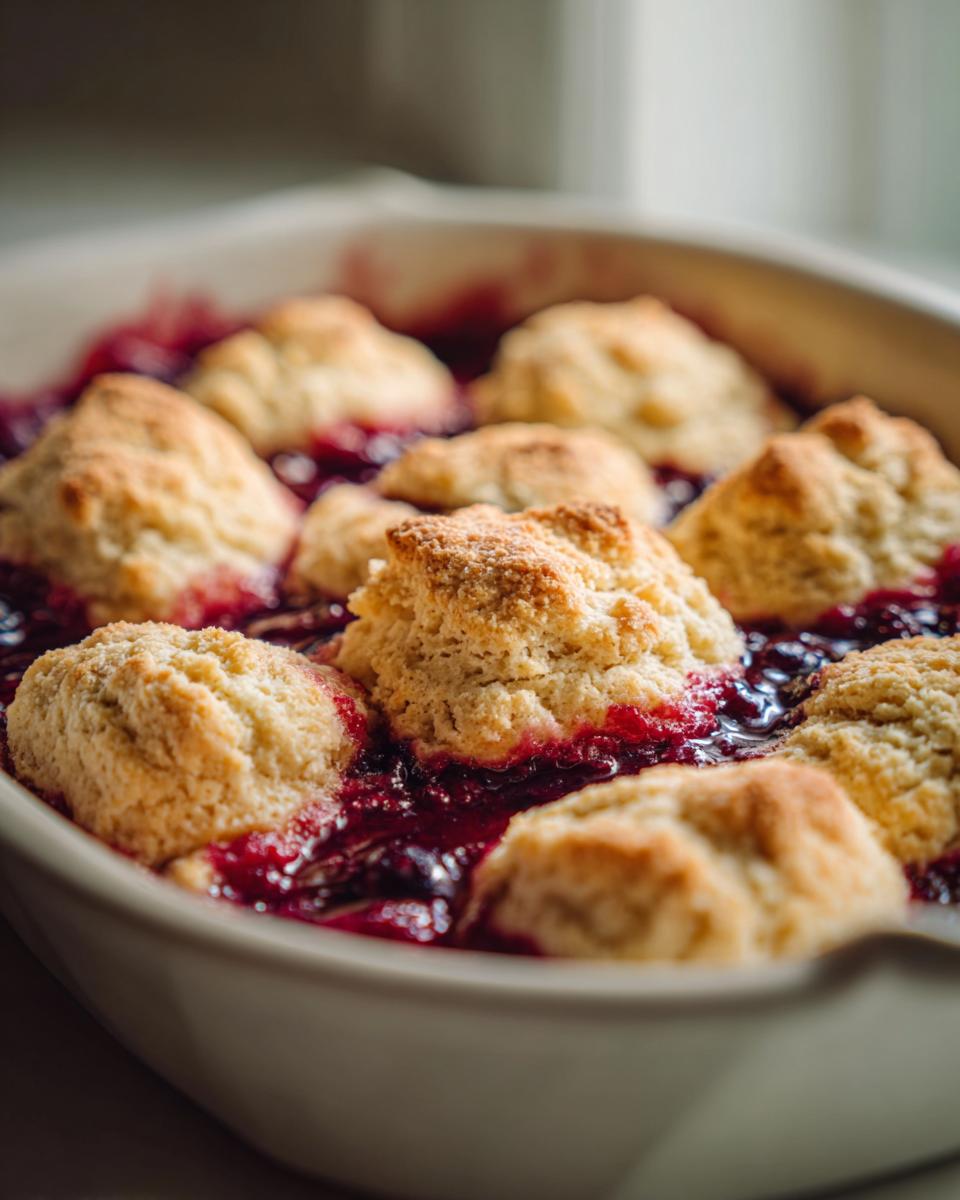
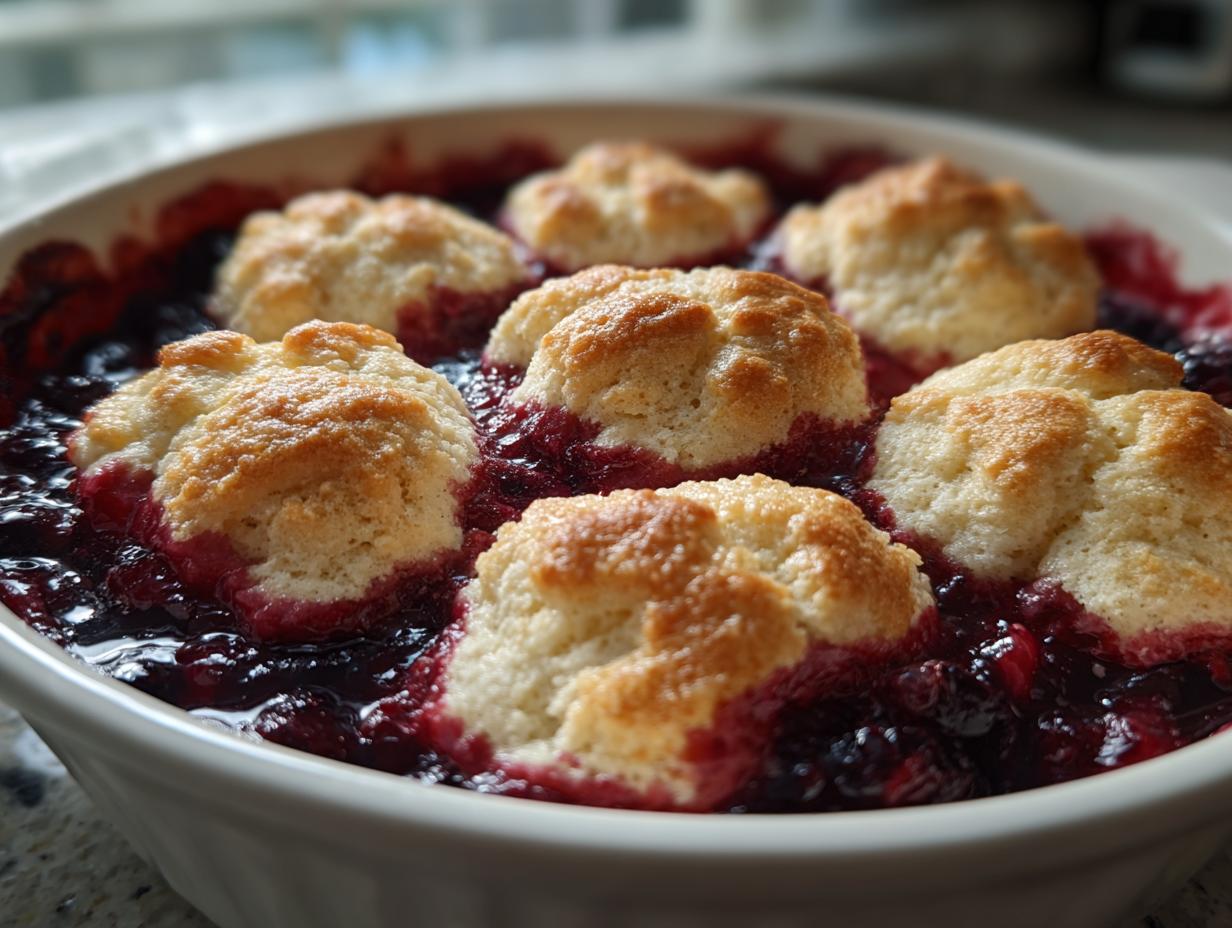
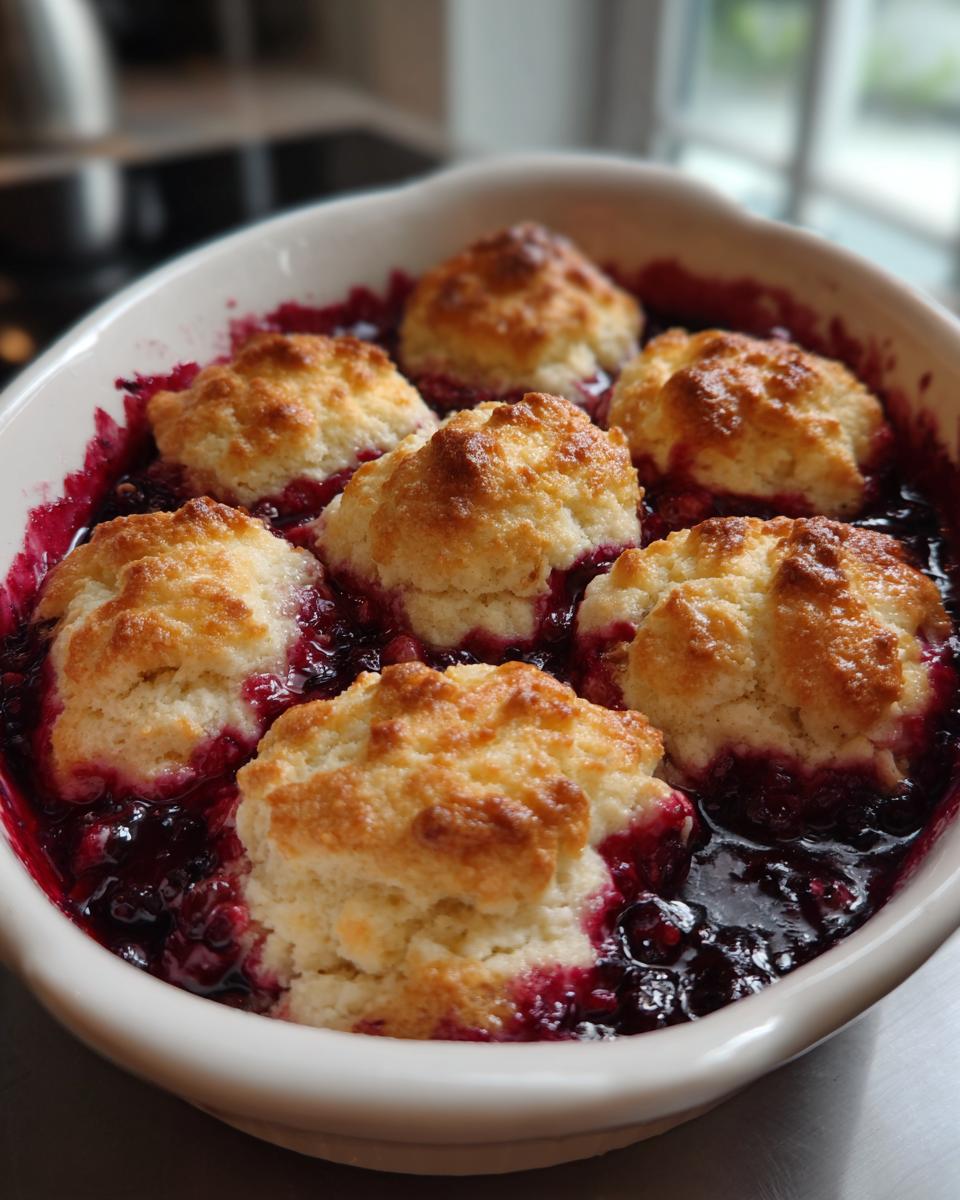
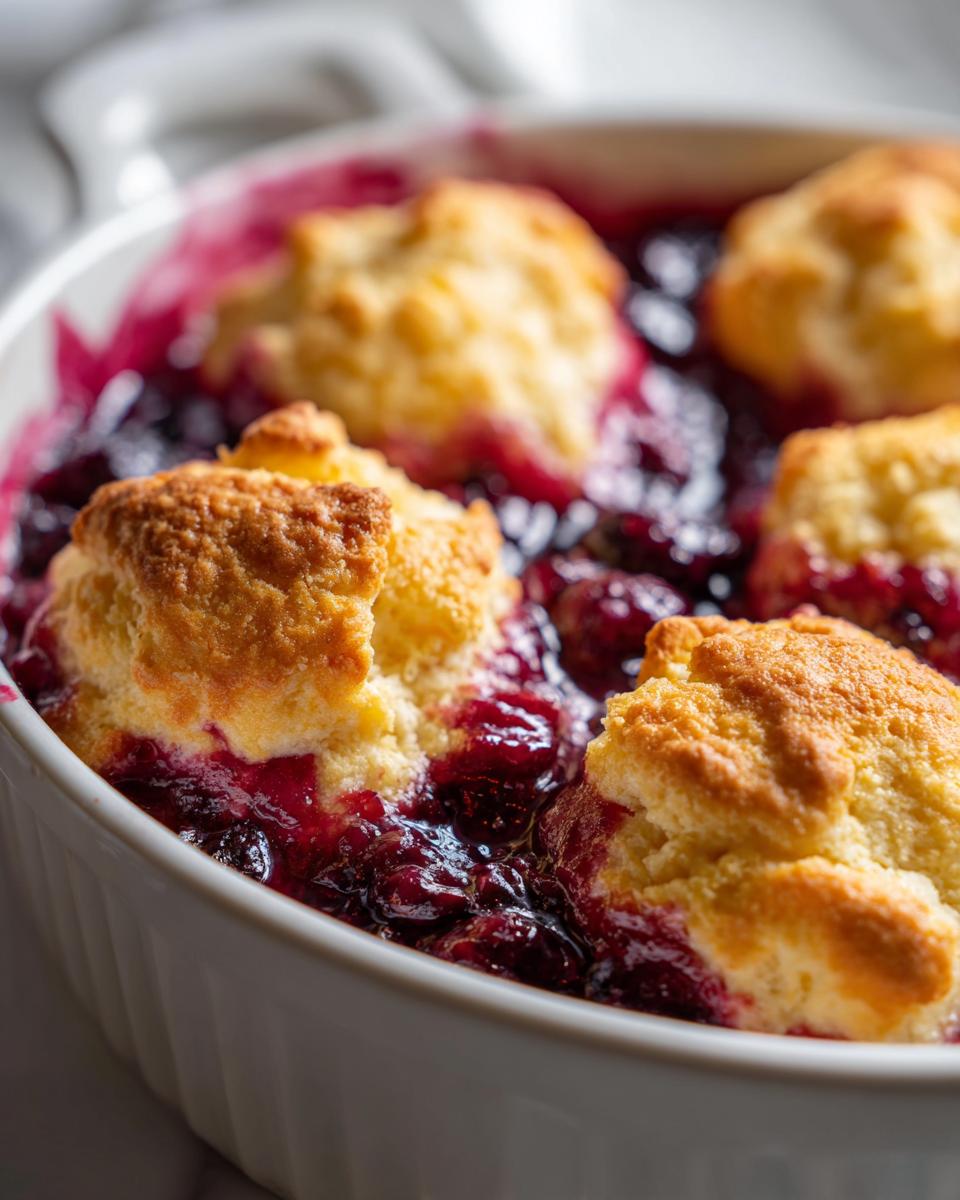
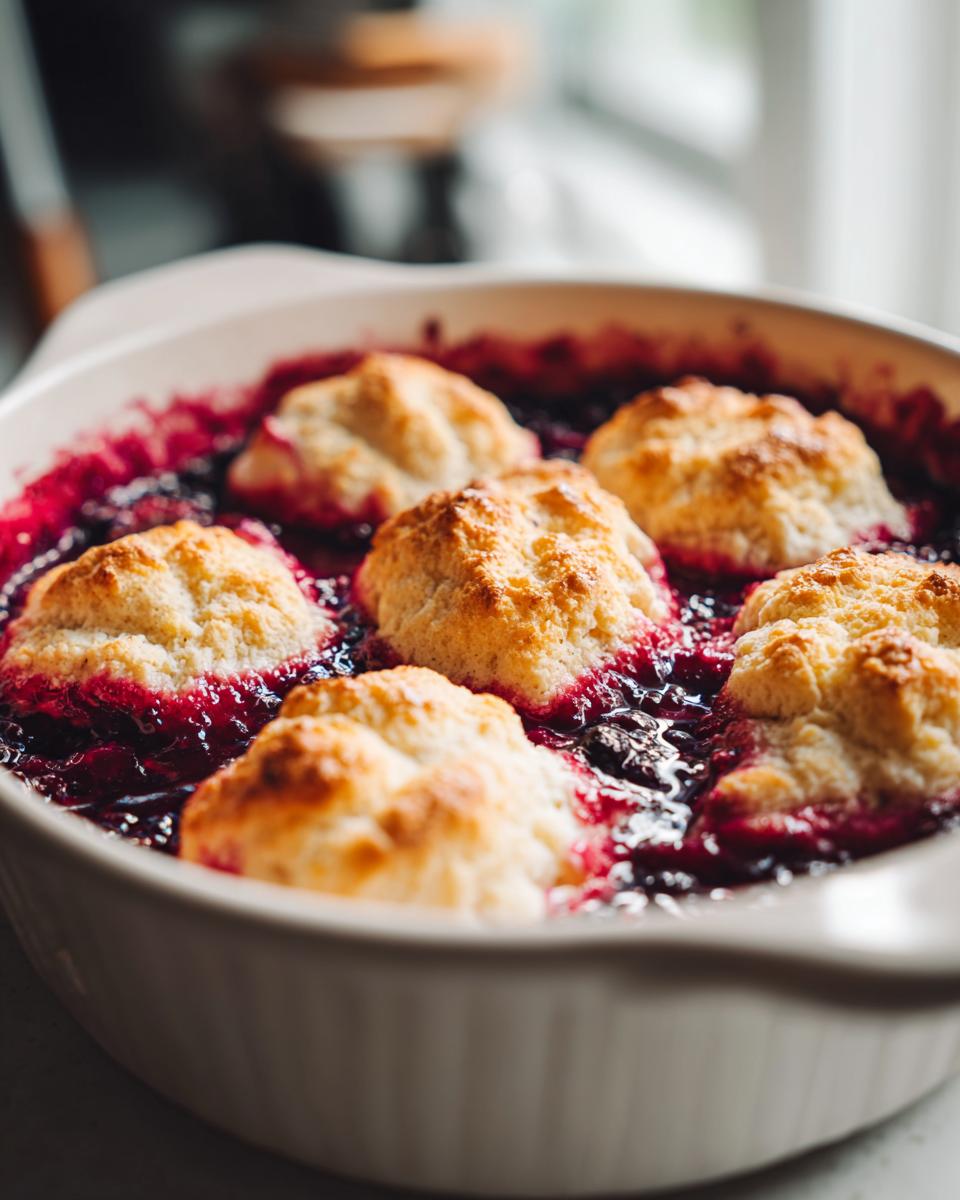
Assembly and Baking Instructions for Your Classic Cobbler Recipe
This is called ‘dropping’ the dough for a reason! Take spoonfuls of that slightly messy biscuit dough and drop them evenly over the warm berry filling. Don’t try to make them perfect or cover every inch—you need small gaps so the steam from the fruit can escape. That venting stops the topping from getting soggy underneath.
For that gorgeous, golden look, brush the tops of the biscuits lightly with your beaten egg wash. Then, sprinkle them with that coarse sugar for a nice crunch—it really adds something special to this Classic Cobbler Recipe. Pop this into your 375°F oven and bake for 35 to 45 minutes. You’re looking for two things: the berry filling underneath must look thick and actively bubbling, and the topping should be deep golden brown. If you notice the topping getting dark too fast (sometimes my oven runs hot), just lightly tent a piece of aluminum foil over it for the last 10 minutes. Once it’s done, you have to, have to let it rest on a wire rack for at least 15 minutes before serving. This lets the juices settle a bit. If you try to scoop it right away, it’ll run everywhere! While you wait, you can go grab your spoons and maybe check out my recipe for amazing apple brownies for next time.
Tips for the Perfect Mixed Berry Cobbler
Even the easiest recipes can have little snags if you don’t know the tricks! I gathered these pointers from years of watching my own creations go from ‘good’ to ‘oh my gosh, make that again!’ These tips are all about ensuring your mixed berry cobbler comes out looking and tasting like the best summer dessert possible.
If you’re looking for other incredibly reliable baking projects, you should definitely try my guide for making fluffy bakery-style scones next week.
Handling Frozen Berries in Your Simple Berry Dessert
This is my biggest tip for year-round success with this recipe. If you are using frozen fruit for your Simple Berry Dessert, please do not thaw them first! Trust me on this one—thawed berries release moisture too early and you end up with soup instead of a thick filling. Just toss them straight from the freezer into your mixing bowl with the sugar and cornstarch. Because they start out colder, your baking time might need a little stretch. I usually pop mine in for an extra 5 to 10 minutes until I see that satisfying, thick bubbling. You can also peek at one of the amazing takes on berry baking over at this wonderful recipe for inspiration!
Flavor Boosters for the Juicy Berry Filling
While the recipe stands perfectly on its own, sometimes you just want to amp up that fruit flavor, right? I always add about one teaspoon of good vanilla extract right along with the lemon juice when I’m mixing up the filling. It just rounds out the sweetness beautifully. My authoritative tip? If you have a fresh lemon or orange kicking around, grating just a tiny bit of the zest into the filling adds this incredible, bright perfume that makes people swear you worked on this dessert all day long!
Variations on the Classic Mixed Berry Cobbler Recipe
The beauty of a great mixed berry cobbler is that it adapts so well! While my heart belongs to that tender, classic buttermilk biscuit, I know some of you might feel intimidated by cutting in the cold butter, or maybe you just crave a different texture altogether. That’s okay! I’ve made sure this recipe is flexible enough to pivot when you need it to.
If you’re ready to branch out from biscuits, or if you’ve finished all your buttermilk, you can easily substitute the topping section for something totally different. You should definitely check out my recipe for a slightly different take on the warm fruit dessert, my Pecan Pie Cobbler, for another idea!
Trying an Oat Crumble Topping
If you saw mention of a Cinnamon Oat Topping—and I know you did—that substitution is incredibly simple. Instead of making the biscuit dough (Steps 3, 4, and 5), you just whip up a quick crumble. You need oats, a bit of flour, some brown sugar for that rich molasses flavor, and some melted butter. Toss those together until they form small, buttery crumbles. You just sprinkle that over your juicy berry filling instead of dropping the biscuits. It bakes up nutty, crunchy, and golden, giving you a lovely textural contrast when paired with the soft berries underneath. It’s a fantastic detour when you want a homemade fruit cobbler that leans slightly more toward a fruit crisp!
Serving Suggestions for a Warm Berry Dessert
Listen, you’ve done the work. You’ve created a gorgeous, bubbling Warm Berry Dessert, and now might be the most crucial moment: serving it! We never, ever serve this cobbler just plain. It needs a partner, something cool and creamy to contrast with that hot, tart fruit and slightly crisp topping. That’s the whole point of a comforting, classic dessert like this, right?
My number one favorite, the way my family always insists on having it, is with a giant scoop of good quality vanilla ice cream. The way the ice cream starts to melt immediately into the hot berry juices—it’s pure heaven! It creates its own little vanilla-berry sauce right there in your bowl. Don’t forget to serve it right away while it’s steaming!
If you’re serving a crowd or if you want something just a little lighter than ice cream, freshly whipped cream is absolutely divine. I sometimes add a tiny bit of powdered sugar and vanilla to my heavy cream before whipping it until soft peaks form. It’s light enough not to overpower the fruit but still gives you that necessary creamy element. If you’re feeling adventurous and have time later in the week, you could even top it with my recipe for homemade marshmallows; that’s sticky, gooey comfort food!
For an extra layer of sophisticated texture, I saw one baker online, who clearly knows their stuff, suggest a sprinkle of toasted sliced almonds right over the whipped cream. It adds a lovely little crunch! Honestly, whatever you choose, just make sure you have a spoon ready the second it comes out of its 15-minute rest!
Storage and Reheating for Your Homemade Fruit Cobbler
Oh boy, if by some miracle you have leftovers of this mixed berry cobbler, we need to make sure it tastes just as good the next day. The topping is the tricky part, right? We want to keep that lovely biscuit texture, not turn it into a sad, soggy layer.
Generally, I leave leftovers on the counter for just a short time, maybe covering them loosely with some plastic wrap or foil, but if it’s warm out or if you made a truly huge cobbler, tuck it into the fridge. Don’t seal the container tightly—that traps condensation and speeds up sogginess, which is the enemy of a good Homemade Fruit Cobbler.
When you’re ready for round two, the microwave isn’t your friend for reheating the topping; it makes the biscuit tough. My absolute favorite trick is to use a low oven or toaster oven. Pop a single serving onto a small, oven-safe plate or dish and heat it at 325 degrees F until it’s warmed through and the top is crisp again—usually about 10 minutes works wonders! This brings back that warm, comforting feeling that makes this dessert so special.
If you’re looking for other ways to preserve the harvest, you might want to check out my method for making quick dill pickles; sometimes you just need savory storage solutions after all that sweetness!
Frequently Asked Questions About Mixed Berry Cobbler
I get so many sweet emails asking for little tweaks and clarifications on this mixed berry cobbler recipe, and I love that you all are diving in to bake it! If you’re making this for the first time, it’s normal to have questions about fruit ratios or topping texture. I tried to design this recipe to be super straightforward, but sometimes the little details make all the difference between a good dessert and a truly memorable one. If you happen to have some leftover sugar and don’t know what to do with it, you can always use it in my recipe for mini cheesecake bites!
Can I use only one type of berry for this recipe?
Absolutely, you totally can! People often ask about making a pure blueberry or pure raspberry version. The reason I call it a mixed berry cobbler is that the combination gives you this incredible depth of flavor—some are sweet, some are tart. If you decide to stick to just one type of fruit, you might need to do a tiny taste test of your filling before topping it. For instance, if you use all sweet blueberries, maybe reduce the sugar by a tablespoon or two. If you use very tart raspberries, you might want to bump it up slightly. But yes, keeping it simple with one fruit works just fine!
How do I prevent the biscuit topping from getting soggy?
This is the biggest concern when making any kind of Homemade Fruit Cobbler! Texture is everything. You have to, have to make sure that butter is ice cold when you cut it into that flour. Those cold pieces melt slowly in the oven, creating steam that lifts the dough and keeps the underside from getting that heavy, wet texture. The second crucial thing is that the berry filling needs to be actively hot and bubbling when you drop the raw biscuit dough on top. That initial blast of heat sets the structure of the dough right away, creating a barrier against the steam rising from below. If you follow those two rules, you’ll have a crisp, golden top every time.
What is the difference between a cobbler and a crisp?
That’s a great question for anyone exploring Summer Berry Desserts! It all comes down to the lid. For this mixed berry cobbler, we are using a biscuit or batter topping that we drop right onto the fruit. It bakes up tender, flaky, and biscuit-like. A crisp, on the other hand, always has a streusel topping mixed with oats. The streusel contains butter, flour, sugar, and the oats, which bake up crunchy and nutty. So, if you want a soft, pillow-like topping, stick with the cobbler; if you want crunch, go for the crisp!
Nutritional Estimates for This Simple Berry Dessert
I always get asked about the healthier side of things, even when we are talking about something as wonderfully comforting as a mixed berry cobbler. Since we are baking with fruit, it’s certainly better than some alternatives, but baking almost always means we are using real butter and sugar, so nothing here is exactly health food!
I’ve pulled the general estimates together for you below based on the ingredients listed in the recipe. But please, please remember that these are just general guidelines. If you swap out the sugar for a sugar substitute, or if your berries are naturally sweeter than mine were, these numbers will change! Think of this as a general guide for one serving before you absolutely drench it in vanilla ice cream—though I highly recommend you do!
If you’re looking for other treats that fit better into a balanced weekly plan, you might want to browse my section of healthy lunch recipes for some lighter ideas during the week.
- Serving Size: 1 serving
- Calories: 380
- Sugar: 35g
- Fat: 16g
- Carbohydrates: 58g
- Protein: 5g
Share Your Homemade Fruit Cobbler Experience
Well, friend, that’s it! We’ve transformed a bag of frozen fruit and some pantry staples into a truly stunning, cozy mixed berry cobbler. I hope the scent that has filled your kitchen is as wonderful as the cloud that’s currently hanging over mine here at HearthBite. That’s the smell of connection, of making something wonderful with your own two hands!
Now that you’ve tasted your masterpiece, I truly want to know how it turned out for you! When you make a Homemade Fruit Cobbler, the experience is always a little different depending on your oven or the fruit you picked up at the market. Did you use an oat crumble this time around? Did you manage to wait the full 15 minutes before digging in?
Please, take a minute and leave a comment below. Rate this recipe five stars if it helped bring a smile to your family’s faces! Even better, if you snapped a picture of your bubbling cobbler, I’d love to see it! You can always send photos or ask me any lingering recipe questions over on my contact page—I read every single message.
Until next time you need a little sweet comfort, happy baking!
PrintEasy Mixed Berry Cobbler with Buttery Biscuit Topping

Make this easy mixed berry cobbler featuring a sweet, juicy filling of mixed berries and a tender, golden buttermilk biscuit topping. It is a classic American comfort food dessert perfect for summer gatherings or any time you want a warm, satisfying treat.
- Prep Time: 15 min
- Cook Time: 40 min
- Total Time: 55 min
- Yield: 6 servings 1x
- Category: Dessert
- Method: Baking
- Cuisine: American
- Diet: Vegetarian
Ingredients
- 6 cups mixed berries (fresh or frozen: blueberries, raspberries, blackberries, strawberries)
- 3/4 cup granulated sugar
- 2 tablespoons cornstarch
- 1 tablespoon lemon juice
- 1/4 teaspoon ground cinnamon
- 1 1/2 cups all-purpose flour
- 2 tablespoons granulated sugar (for topping)
- 1 tablespoon baking powder
- 1/2 teaspoon salt
- 1/2 cup (1 stick) cold unsalted butter, cut into small pieces
- 1/2 cup buttermilk
- 1 large egg, beaten (for egg wash)
- 1 teaspoon coarse sugar (for sprinkling)
Instructions
- Preheat your oven to 375 degrees F. Lightly grease a 9-inch pie dish or an 8×8 inch baking dish.
- Prepare the berry filling: In a large bowl, gently combine the mixed berries, 3/4 cup sugar, cornstarch, lemon juice, and cinnamon. Toss until the berries are evenly coated. Pour the berry mixture into your prepared baking dish.
- Make the biscuit topping: In a separate medium bowl, whisk together the flour, 2 tablespoons sugar, baking powder, and salt.
- Cut in the cold butter using a pastry blender or your fingertips until the mixture resembles coarse crumbs with some pea-sized pieces of butter remaining.
- Pour in the buttermilk and stir just until the dough comes together. Do not overmix; the dough will be slightly shaggy.
- Drop spoonfuls of the biscuit dough evenly over the berry filling, leaving small gaps between the biscuits to allow steam to escape.
- Brush the tops of the biscuits lightly with the beaten egg wash and sprinkle with coarse sugar.
- Bake for 35 to 45 minutes, or until the topping is golden brown and the berry filling is bubbly and thick. If the topping browns too quickly, loosely cover it with foil for the last 10 minutes.
- Let the cobbler cool on a wire rack for at least 15 minutes before serving. Serve warm, often with vanilla ice cream.
Notes
- If you use frozen berries, do not thaw them first. You may need to increase the baking time by 5 to 10 minutes to ensure the filling is fully cooked and bubbly.
- For extra flavor in the filling, add 1 teaspoon of vanilla extract along with the lemon juice.
- If you prefer a different topping, you can substitute the biscuit dough with a simple oat crumble topping made from oats, flour, brown sugar, and melted butter.
Nutrition
- Serving Size: 1 serving
- Calories: 380
- Sugar: 35
- Sodium: 250
- Fat: 16
- Saturated Fat: 9
- Unsaturated Fat: 7
- Trans Fat: 0
- Carbohydrates: 58
- Fiber: 4
- Protein: 5
- Cholesterol: 45