
If you think making those gorgeous, crackly, artisanal loaves you see in fancy bakeries is only for folks with strong forearms or perfect technique, I have wonderful news for you! The secret isn’t elbow grease; it’s time and steam. That’s why I’m sharing what I consider the definitive, foolproof dutch oven no knead crusty bread recipe. Here at HearthBite, we believe the best memories are made around simple, deeply comforting food. Trust me, this loaf is pure comfort—it rises beautifully and develops incredible flavor over its long rest, giving you that bakery-quality crumb with almost zero effort. Welcome this easy method into your kitchen; it truly changes how you think about homemade bread. If you enjoy this kind of simple satisfaction, check out all my best comfort food recipes!
- Why This is the Best Dutch Oven No Knead Crusty Bread Recipe
- Ingredients for Your Foolproof Dutch Oven No Knead Crusty Bread
- Essential Equipment for Your Dutch Oven No Knead Crusty Bread
- The No Knead Bread Technique: Step-by-Step Instructions
- Hot Oven Bread Baking Method for Perfect Crusty Bread in Dutch Oven
- Tips for Success with Your Dutch Oven No Knead Crusty Bread
- No Knead Bread Troubleshooting
- Storing and Reheating Your Crusty Loaf
- Nutritional Information Estimate
Why This is the Best Dutch Oven No Knead Crusty Bread Recipe
I know so many people are intimidated by bread, but this recipe unlocks true bakery results without being on your feet kneading for twenty minutes. It’s all about letting time do the heavy lifting for you. This formula creates the **best crusty bread in dutch oven** because of two key elements we control.
- The Dutch oven acts like a miniature professional steam oven, trapping all the moisture released by the dough during the first phase of baking. This is non-negotiable for that shatteringly crisp crust!
- The incredibly long room-temperature rest builds complex flavor compounds you just can’t achieve with commercial yeast in an hour.
Achieving Artisan Bread Without Kneading
It sounds like magic, doesn’t it? But here’s the simple truth: manual kneading develops gluten structure through mechanical action. In this **artisan bread without kneading** method, we achieve the same strength by doing nothing for 18 hours! The yeast and enzymes slowly work the flour and water mixture, organizing the gluten network naturally. The dough becomes strong, elastic, and bubbly all on its own. You literally just mix it and walk away!
Ingredients for Your Foolproof Dutch Oven No Knead Crusty Bread
The beauty of this **easy no knead bread recipe** is how few things you actually need. Seriously, look at this list—it’s crazy simple! But every single ingredient matters because we aren’t doing a lot of work after the mixing. Make sure your yeast is fresh, because that’s our entire engine for lifting this dough.
- 3 cups All-Purpose Flour (I stick with standard unbleached AP)
- 1 1/2 teaspoons Salt (Kosher is my favorite here)
- 1/4 teaspoon Instant Yeast (Yes, that tiny amount is all you need!)
- 1 1/2 cups Cool Water
Ingredient Notes and Substitutions
We need to be specific about the yeast, folks. You absolutely must use Instant Yeast here. Active Dry yeast needs to be bloomed in water first, and that extra step throws off the timing for this long, cool proof. Also, while you *can* use bread flour, I find standard all-purpose flour gives that slightly softer interior crumb that pairs perfectly with the super hard crust we are aiming for.
Essential Equipment for Your Dutch Oven No Knead Crusty Bread
Okay, since we aren’t kneading, we need the right tools to trap that crucial steam! If you’re looking for the ultimate **beginner dutch oven bread** setup, focus on these three things. Honestly, if you have the first item, you’re 90% of the way there.
- A 5-to-6-Quart Dutch Oven or Combo Cooker: This is the MVP. Cast iron is best because it holds and radiates heat so consistently. Don’t worry if yours is enamel or plain cast iron—it will work beautifully, but it must have a lid that seals well to trap the steam.
- A Large Mixing Bowl: Needs to be big enough to hold the dough when it triples in size over 18 hours. Don’t use a tight container; we want it airy!
- Parchment Paper: I cannot stress this enough! You will use the parchment paper like a sling to lift the sticky, raw dough into the screaming-hot pot. Trying to scoop the dough onto a bare metal surface? Disaster, trust me. Baking bread with steam effect is easy, but getting the dough *in* the pot is the tricky part, and parchment solves it.
- Plastic Wrap or a Lids for the Bowl: We need a tight seal during the long proof to prevent the dough from drying out on the surface.
The No Knead Bread Technique: Step-by-Step Instructions
This is where the magic happens—or rather, where you step away and let everything else happen! Getting the **no knead bread technique** right is all about patience during the long rest and being gentle when you handle the dough later. It’s so simple, but I want you to watch for those visual cues so you know you’re on the right track for that perfect loaf. Don’t forget to prep your oven and pot while the dough rests for its final proof!
Mixing the High Hydration No Knead Dough
Grab your big bowl and throw everything in: the flour, salt, and that tiny pinch of instant yeast. Now, pour in the cool water. You’re not looking for a smooth ball right now, no way! Just use a sturdy spoon or spatula and mix until all that flour is incorporated. I mean it—stop mixing the second you don’t see any dry patches left. The mixture will look weirdly wet and shaggy—almost like a thick batter. If you feel the urge to knead it smooth, trust me, you have to resist! This **high hydration no knead dough** needs to stay loose right now.
The Slow Rise Bread Recipe Proofing Stage
Once you have that sticky mess in the bowl, cover it up really tightly with plastic wrap. Keep it somewhere out of the way at room temperature—maybe on the counter away from the window—for a full 12 to 18 hours. This is the actual work time for the yeast. When you come back, you’ll be amazed! The dough should have visibly increased in volume, and you’ll see tons of tiny bubbles on the surface. That means the flavor is developing beautifully, just like in a great **slow rise bread recipe**!
Shaping and Preparing for Baking
When it’s time to bake, lightly flour a clean counter. Gently scrape that sticky dough out—it’s going to be slack. Now, this next part is important: don’t punch it down! We want to preserve those gases. Just gently fold the edges of the dough in toward the center a few times to create a rough round ball. Think of it as giving it a little hug. Place that dough ball onto a piece of parchment paper, cover it loosely with a towel, and let it rest for 30 minutes while you get the oven roaring hot. This short rest lets the dough relax before its big bake. We’ll be diving into those final baking steps soon, which is where we’ll get that incredible crust for dinner. Check out these quick and easy dinner recipes while you wait for your dough to relax!
Hot Oven Bread Baking Method for Perfect Crusty Bread in Dutch Oven
This final phase is honestly the most dramatic part of baking this **Dutch oven no knead crusty bread**. It’s all about extreme heat and trapping that precious steam! Remember Step 6? While your dough is enjoying its 30-minute rest, you need to get your Dutch oven scorching hot inside the oven at 450 degrees Fahrenheit. This preheating step is crucial for that immediate oven spring and perfect crust development. We need that pot to be almost glowing when the dough lands inside!
We bake in two stages to nail that **baking bread with steam effect**. First, you carefully drop the dough (using the parchment sling—don’t forget it!) into the screaming hot pot, cover it, and bake for 30 minutes. That lid traps the moisture released by the dough, essentially mimicking 100% humidity. This keeps the crust soft initially so the bread can fully expand without setting too soon. Then, we uncover it for the grand finale!
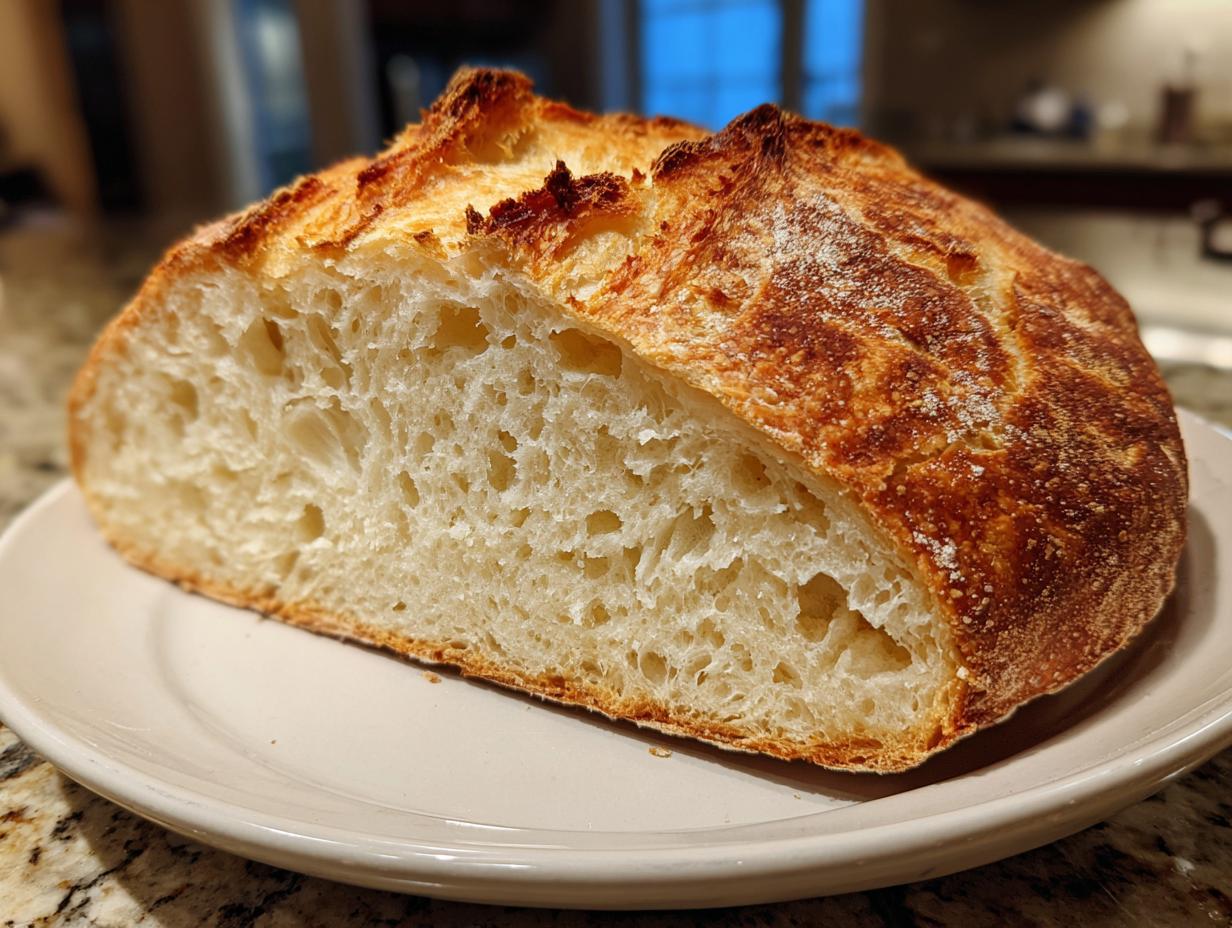
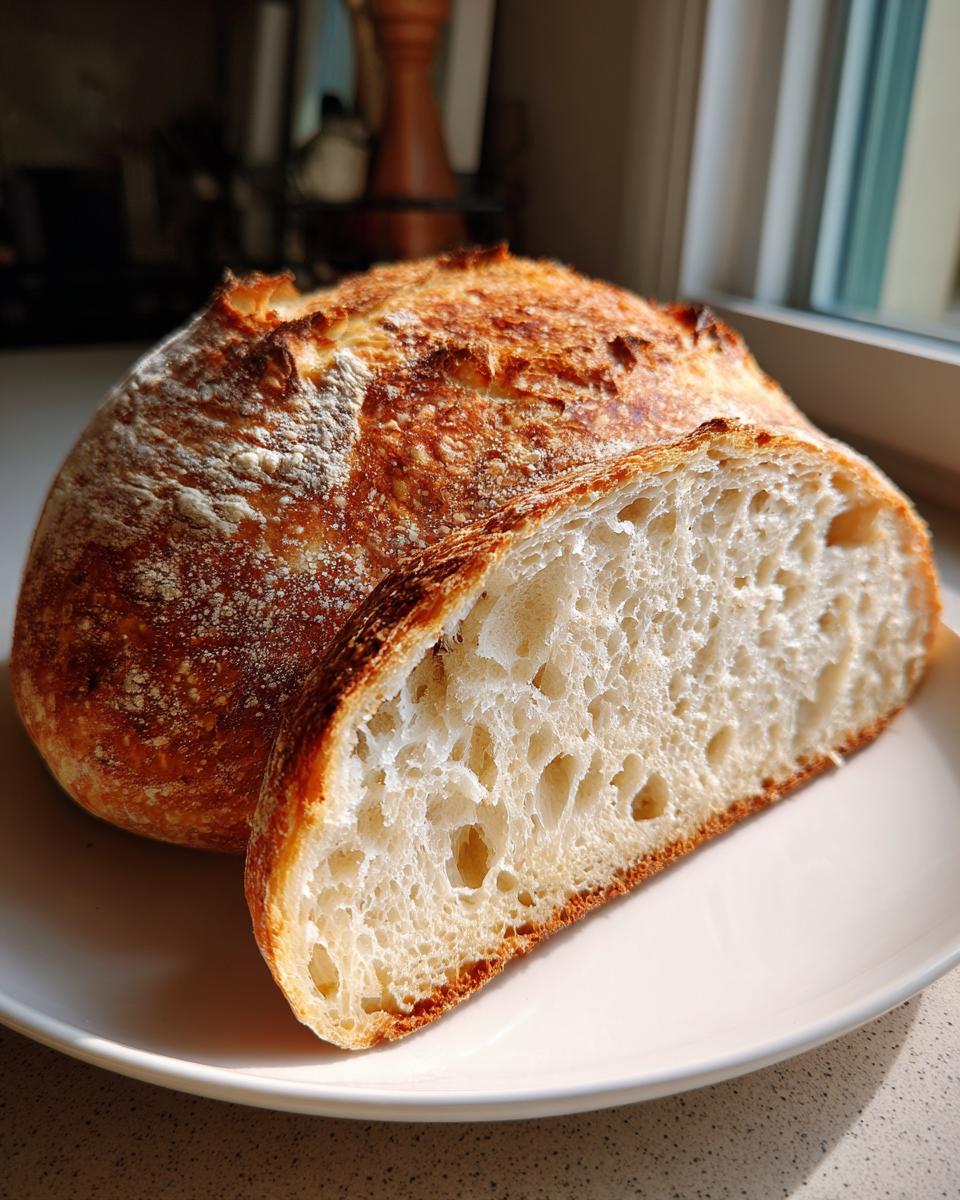
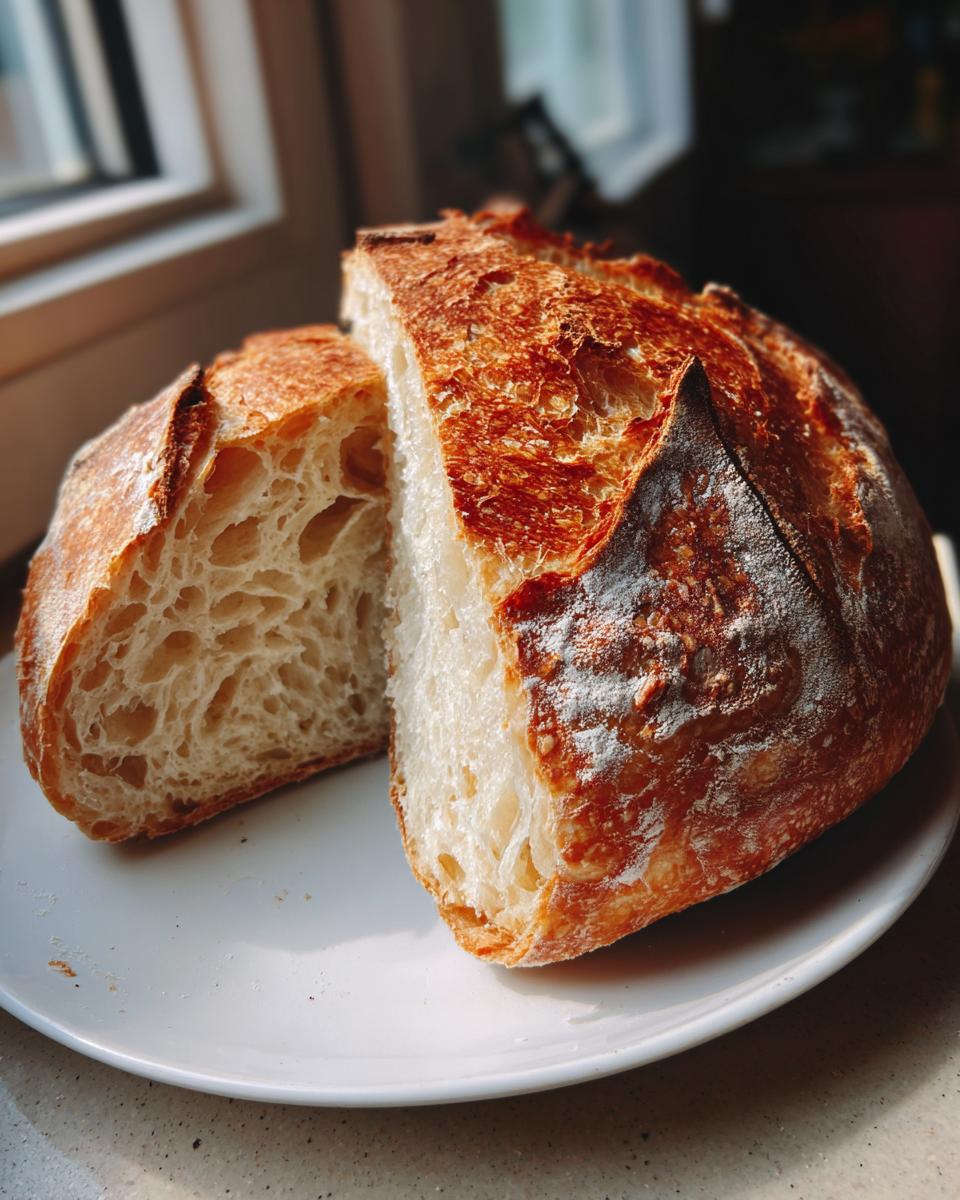
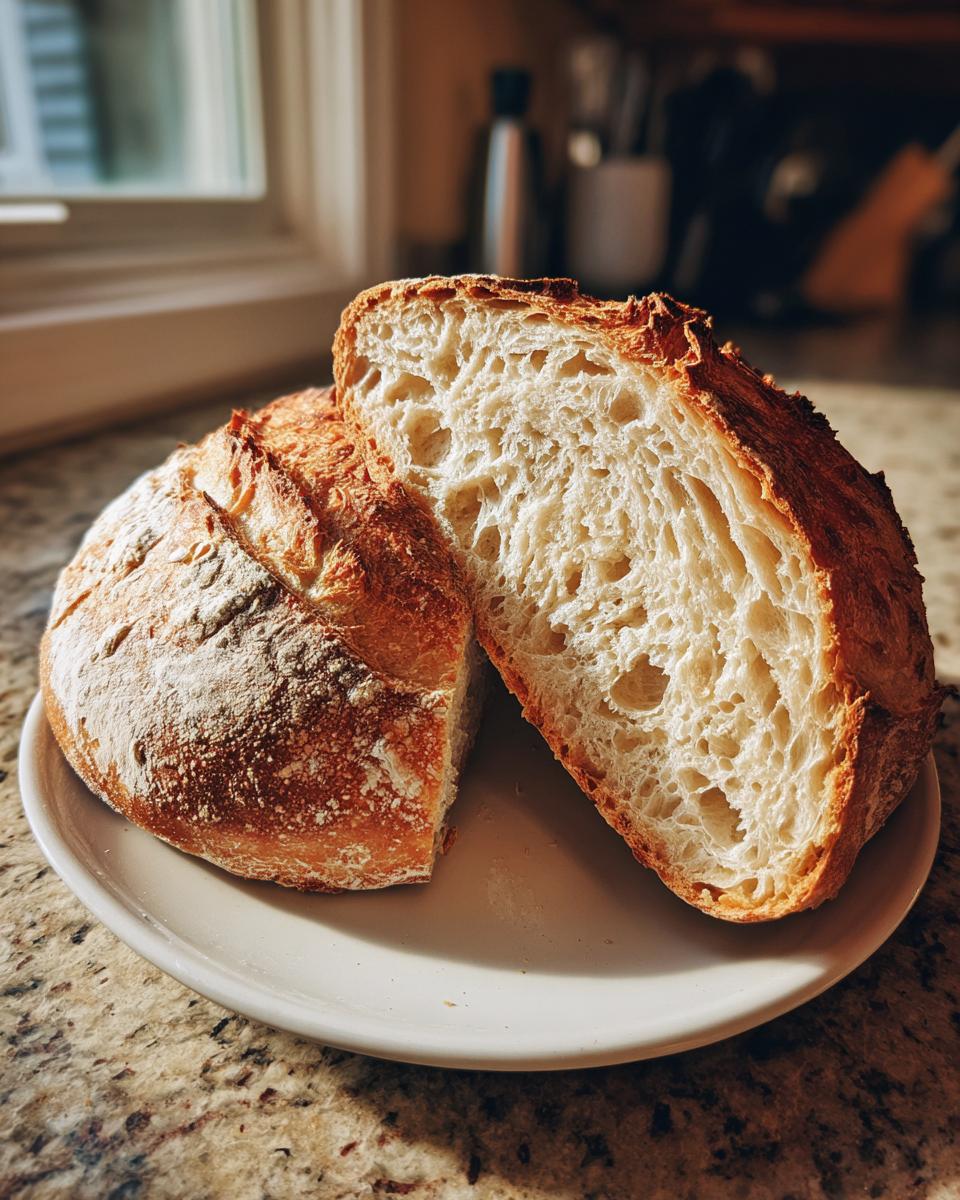
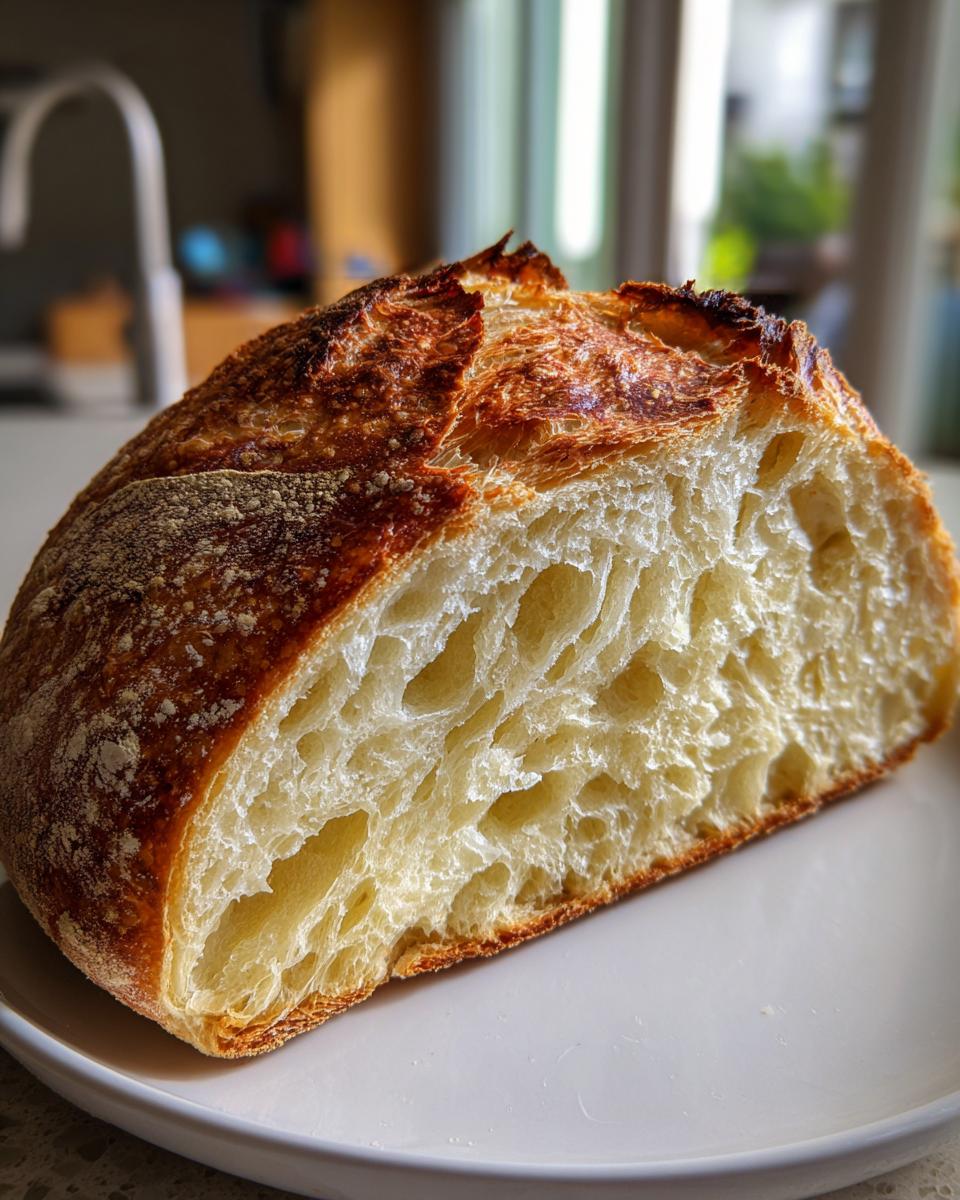
Creating the Best Crusty Bread in Dutch Oven Texture
Once the lid comes off, all that trapped steam escapes, and BAM! The heat hits that exposed surface, and that beautiful crust starts forming. You’ll keep baking for another 15 to 20 minutes until it hits that deep, gorgeous golden brown color. If you want it darker, you know what to do—leave the lid off a little longer! Once it’s out, the most important word is patience. You absolutely must let this loaf cool completely on a wire rack. Slicing it too early releases internal steam, guaranteeing a gummy texture. Resist the urge! Slicing into this perfect, crunchy loaf is worth the wait. Speaking of waiting, if you’re ever looking for a fun way to use a truly crusty loaf, check out my recipe for homemade bread bowls for soup!
Tips for Success with Your Dutch Oven No Knead Crusty Bread
Even with a rock-solid recipe like this, a few habits from my own HearthBite kitchen can take your loaf from great to truly show-stopping. Remember, building confidence comes from reliability, and reliability comes from these small, deliberate checks.
First, let’s talk temperature. Since we are relying on that intense preheat, make sure your oven is actually ready. I seriously recommend using an oven thermometer. It’s one of the best investments you can make for baking, because most home ovens lie about what temperature they are actually running at. If you set it to 450°F but it’s only hitting 425°F, you won’t get the spring or the crust we need!
Secondly, safety first when dealing with that monsterously hot pot! When you pull that Dutch oven out to load the dough, use really heavy-duty oven mitts that come high up your arm. Lift it confidently, place it on a heat-safe surface (like a large wooden cutting board), and work quickly but calmly when lowering that parchment sling in. Rushing causes slips, and that cast iron is no joke.
Also, remember what I mentioned in the notes—we need Instant Yeast for this overnight recipe, not active dry. If you only have active dry, you must proof it separately first, or your 18-hour rise will end up being 24 hours, and the dough structure can suffer. Finally, when that loaf comes out golden brown, don’t let it cool on a counter where it traps steam underneath; use a wire rack, always. This allows air to circulate and keeps the bottom crust from getting soft and sad! Once cooled, grab yourself a cup of coffee and check out my favorite easy breakfast recipes!
No Knead Bread Troubleshooting
Don’t let a flat loaf get you down! Every baker, even the seasoned ones, has had a loaf that just didn’t cooperate. That’s okay! Learning why something went sideways is the real key to mastering this **dutch oven no knead crusty bread**. When dealing with a recipe this reliant on time and temperature, small variances can lead to different results. Let’s tackle the most common issues right off the bat so you can feel completely confident the next time you mix up the dough.
If you’re seeing issues, remember that troubleshooting this recipe usually circles back to two main culprits: the long proofing time or the extreme heat needed for baking.
The Loaf Is Flat and Dense (No Oven Spring)
This is disheartening, but usually simple to fix! If your loaf spread out like a pancake instead of puffing up proudly, it usually means one of two things happened during that long, slow fermentation. Either your dough didn’t develop enough strength, or it relaxed too much before baking. Did you fold it gently during the 30-minute rest? If you were too rough and knocked out all the gas, it won’t spring back. Also, check your yeast! If your yeast was old or that 18-hour proof didn’t result in many visible bubbles, it wasn’t active enough to do its job. Next time, test your yeast first, or give it an extra hour on the counter during the final rest period to firm up before it goes into the pot.
The Interior Crumb is Gummy or Sticky
Nothing is worse than cutting into what looks like a beautiful loaf only to find a wet, dense middle section. This issue almost always comes down to slicing too soon or not enough heat during the second phase. Remember my rule: you must let it cool completely! If you slice into it when it’s steaming hot, the gluten structure hasn’t set, and you end up with that gummy texture. Also, did you bake it long enough without the lid? If the crust was pale when you removed it, the inside probably didn’t fully cook through. Give it those full 15-20 minutes uncovered to drive off the internal moisture.
The Crust Isn’t Crispy Enough
If you followed the recipe and still don’t have that satisfying *crack* sound when you press it, we need more steam or more heat! The steam phase (lid on) is crucial for expanding the loaf, but the dry heat phase (lid off) is crucial for the crust. If your oven runs cool—use that thermometer!—the oven may not have been hot enough to dry out the exterior aggressively enough. Make sure that Dutch oven is fully preheated for at least 30 minutes before you load the dough in. That initial blast of dry, retained heat is what guarantees you’ll have that amazing, crunchy exterior you’re looking for every single time you tackle this **no knead bread troubleshooting**!
Storing and Reheating Your Crusty Loaf
So you’ve resisted the urge, you’ve let your beautiful loaf cool completely on the wire rack, and now you have a masterpiece sitting on your counter. Fantastic! But how do you store this thing so that crust stays sharp and doesn’t turn instantly sad and chewy? That’s the eternal question with homemade artisan bread.
My biggest tip here revolves around moisture. Plastic bags are the enemy of crust integrity. Plastic traps the moisture coming off the loaf as it cools, and that moisture condenses right back onto that gorgeous, crisp exterior we worked so hard to achieve in the Dutch oven. So, rule number one: skip the plastic wrap or Ziploc bags entirely!
For a day or two, the best method for your **dutch oven no knead crusty bread** is a simple paper bag. Yes, the paper bag will soften the crust slightly overnight—that’s inevitable as the interior moisture migrates—but it traps just enough air to prevent it from getting totally tough and chewy like plastic does. If I know I won’t finish the loaf in two days, I’ll cut the loaf in half, tightly wrap the unused portion in foil (foil slows down staling better than paper), and freeze it. Foil is your friend for long-term storage!
But what happens when you want to enjoy a slice three days later? That crust needs a wake-up call! Reheating is the answer. You don’t need the Dutch oven again; a simple reheat does the trick. Place slices—or the whole loaf if it fits—directly onto the oven rack. Heat your oven to about 350 degrees Fahrenheit. Thirty minutes for a whole loaf, or maybe 5 to 7 minutes for individual slices, will revive that beautiful shatter. It toasts the exterior crisp again while warming up the interior crumb. It’s like magic! Trust me, reviving stale bread this way is way better than buying store-bought. When you’re ready for a great next meal using leftover bread, have a look at these healthy lunch recipes!
Nutritional Information Estimate
Now, I know we don’t bake this incredible loaf thinking about calories—we bake it because it tastes like pure achievement! But for those of you who track things, I’ve pulled together the estimated nutrition based on the simple ingredients we’ve used in this **easy no knead bread recipe**. Keep in mind, bread is funny stuff; the texture of your flour, the exact amount of water absorbed, even the yeast type can create tiny shifts in the final breakdown.
- **Serving Size:** 1 slice
- **Calories:** 180
- **Fat:** 0.5g (mostly heart-healthy unsaturated fats)
- **Carbohydrates:** 38g
- **Protein:** 6g
- **Sugar:** 0.2g (See? No added sugar needed!)
- **Sodium:** 380mg
- **Cholesterol:** 0mg
I always like to remind folks that these are just estimates based on standard ingredients. If you swap in, say, whole wheat flour or use a higher-sodium salt, those numbers will shift a little bit. But fundamentally, this is a simple, honest food made from just four baseline components. Enjoy that slice—you earned it!
PrintFoolproof Dutch Oven No Knead Crusty Bread
Make artisan-quality, crusty bread at home without any kneading. This simple, slow-rise recipe uses a Dutch oven to trap steam, resulting in a perfect crust and soft interior.
- Prep Time: 10 min
- Cook Time: 50 min
- Total Time: 13 hours 0 min
- Yield: 1 loaf 1x
- Category: Baking
- Method: Baking
- Cuisine: American
- Diet: Vegetarian
Ingredients
- 3 cups All-Purpose Flour
- 1 1/2 teaspoons Salt
- 1/4 teaspoon Instant Yeast
- 1 1/2 cups Cool Water
Instructions
- In a large bowl, mix the flour, salt, and yeast together.
- Add the cool water and mix with a wooden spoon until a shaggy, sticky dough forms. Do not knead.
- Cover the bowl tightly with plastic wrap and let it rest at room temperature for 12 to 18 hours. The dough will become bubbly and increase in volume.
- Lightly flour a work surface. Gently scrape the dough out of the bowl. Fold the dough over itself a few times to form a rough ball.
- Place the dough on a piece of parchment paper, cover loosely with plastic wrap or a clean kitchen towel, and let it rest for 30 minutes.
- About 30 minutes before baking, place your 5-to-6-quart Dutch oven, with the lid on, into your oven. Preheat the oven to 450 degrees Fahrenheit (232 degrees Celsius).
- Carefully remove the hot Dutch oven from the oven. Lift the dough using the parchment paper handles and gently place it into the hot pot.
- Cover the Dutch oven with the lid and place it in the preheated oven. Bake for 30 minutes.
- Remove the lid and continue baking for another 15 to 20 minutes, or until the crust is deep golden brown. This step creates the best crusty bread in dutch oven texture.
- Carefully remove the bread from the pot and let it cool completely on a wire rack before slicing.
Notes
- For a deeper crust color, you can leave the lid off for the final 20 minutes of baking.
- If you want an overnight recipe, mix the dough in the evening and let it proof on the counter until morning, then proceed with the shaping and baking steps.
- Use instant yeast for this slow rise bread recipe; active dry yeast requires proofing first.
Nutrition
- Serving Size: 1 slice
- Calories: 180
- Sugar: 0.2
- Sodium: 380
- Fat: 0.5
- Saturated Fat: 0.1
- Unsaturated Fat: 0.4
- Trans Fat: 0.0
- Carbohydrates: 38
- Fiber: 1.5
- Protein: 6
- Cholesterol: 0