
There’s something almost magical about a slice of true New York dessert. It’s not just sweet; it’s an experience—a decadent, tall slice with that signature smooth texture that just melts away. Forget those light, airy cheesecakes you find everywhere else! If you’ve ever dreamed of recreating that perfect, dense, and unbelievably creamy texture in your own kitchen, you’re in the right place. Here at HearthBite, I, Sarah Miller, have spent countless hours testing and chasing that flawless slice. Trust me, this is the ultimate new york style cheesecake recipe you’ve been searching for, capturing that rich character we all crave in classic American comfort food. You can read more about my journey creating reliable recipes like this one over on our About Page.
- Why This Is The Best NY Cheesecake Recipe You Will Ever Make
- Essential Ingredients for Your new york style cheesecake recipe
- Step-by-Step Authentic NY Style Cheesecake Baking Instructions
- Tips for Success with Your new york style cheesecake recipe
- Storage & Reheating Instructions for Decadent New York Dessert
- Serving Suggestions for Your Classic New York Cheesecake
- Frequently Asked Questions About the new york style cheesecake recipe
- Nutritional Estimate for this Rich and Creamy Cheesecake
- Share Your Experience Making This New York Dessert Recipe
Why This Is The Best NY Cheesecake Recipe You Will Ever Make
When you try to capture that iconic New York slice, you’re chasing perfection, right? It has to be heavy, rich, and hold its shape beautifully. This recipe isn’t fussy, but it demands respect for a few key rules that get you that glorious outcome every single time. I promise, you’ll be proud to serve this! You can find more of my tested and true comfort food recipes in that section.
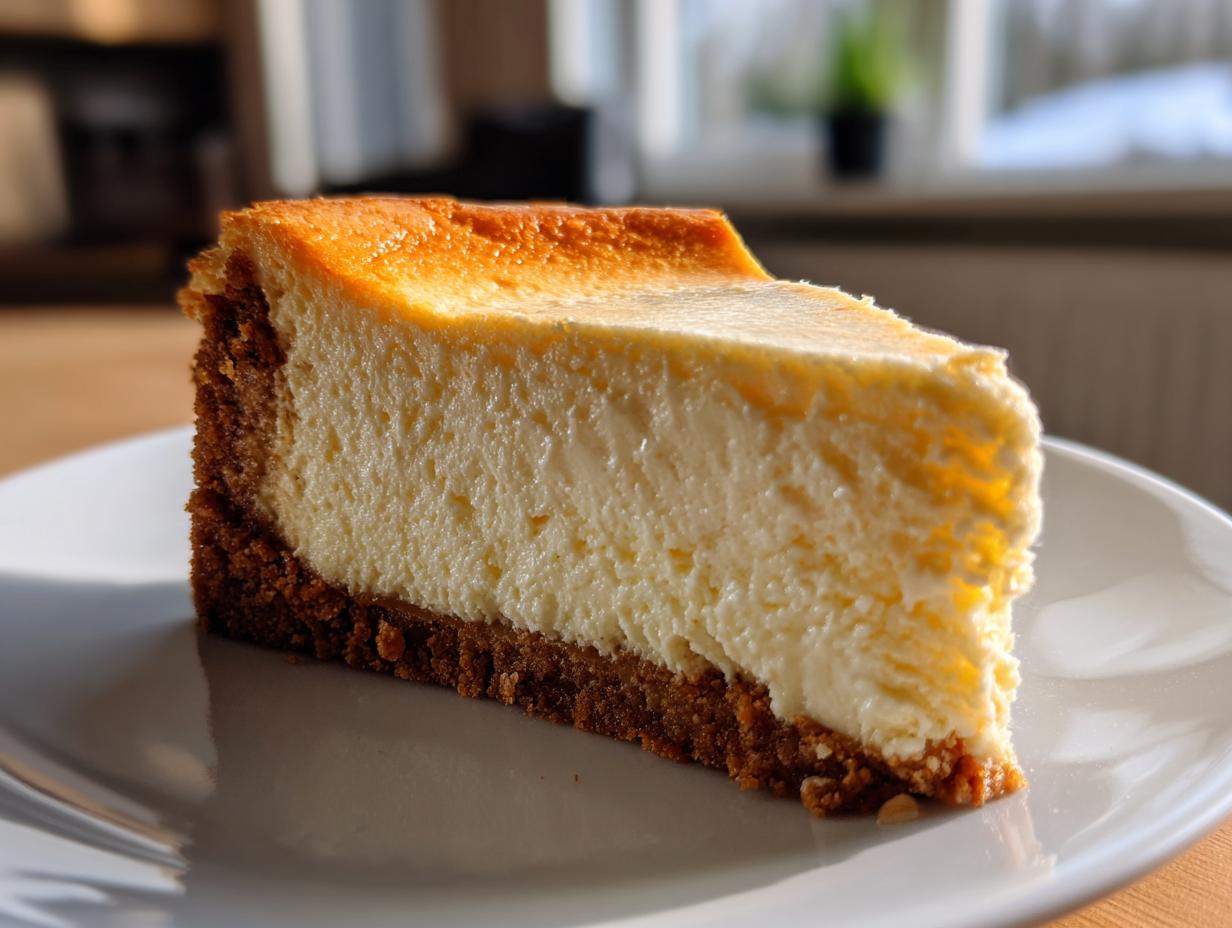
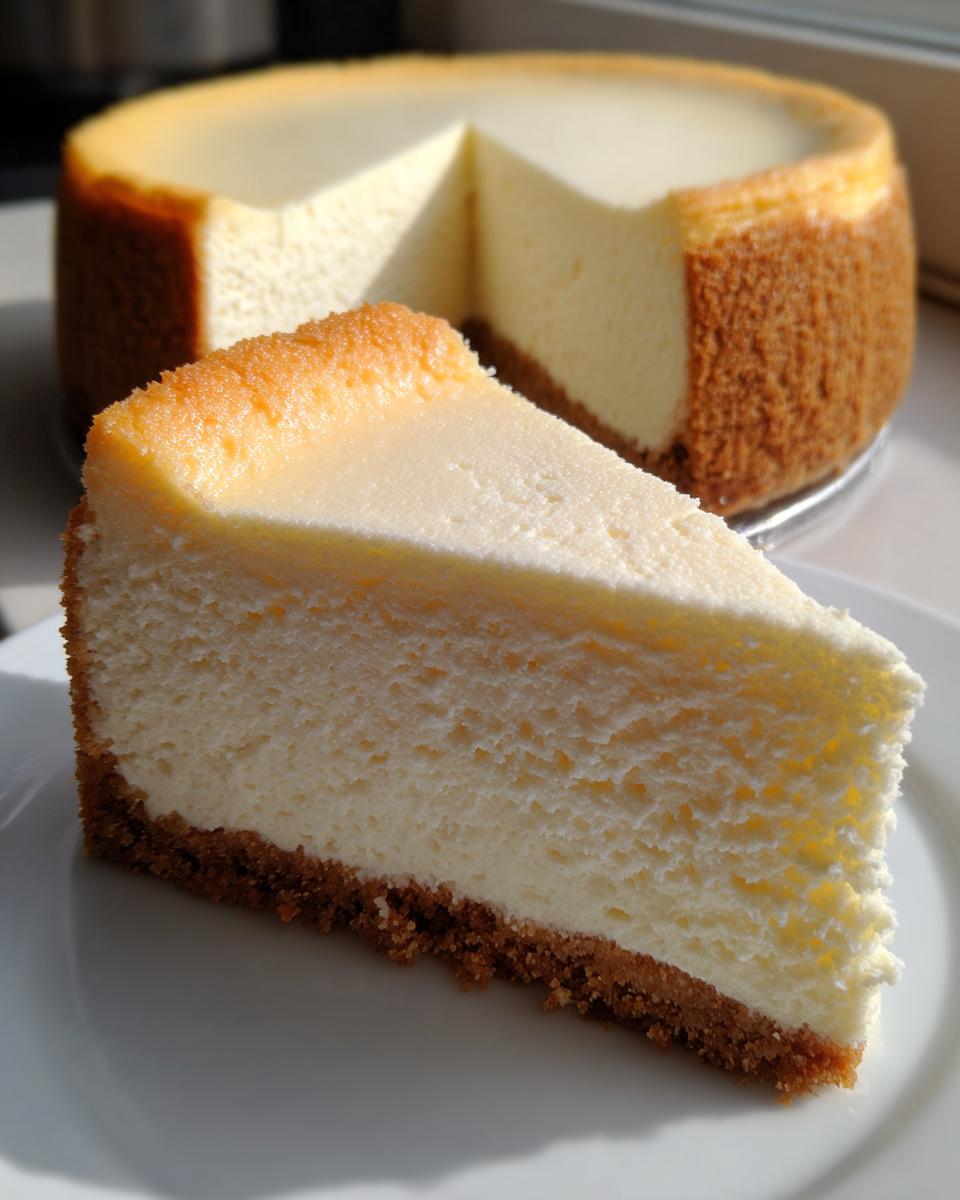
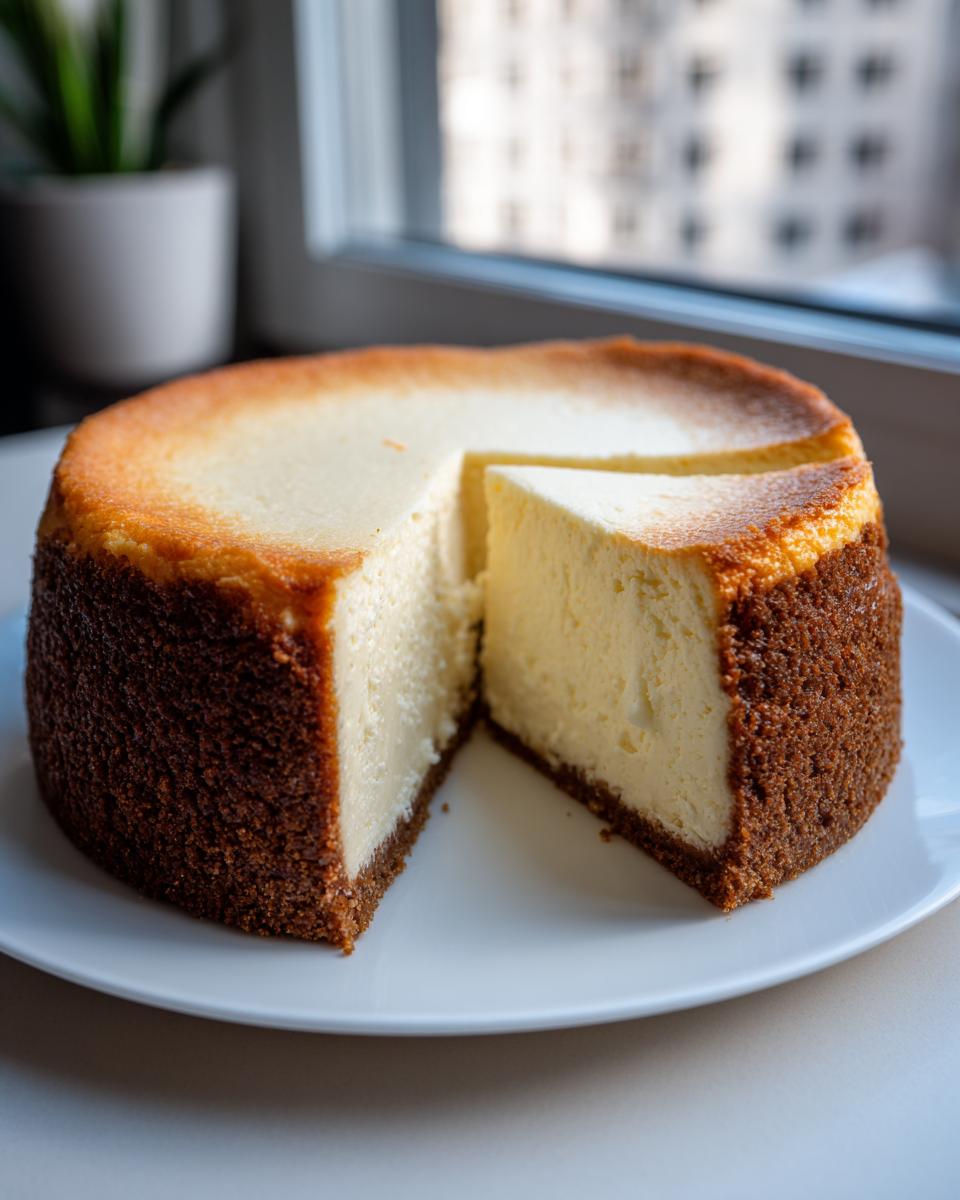
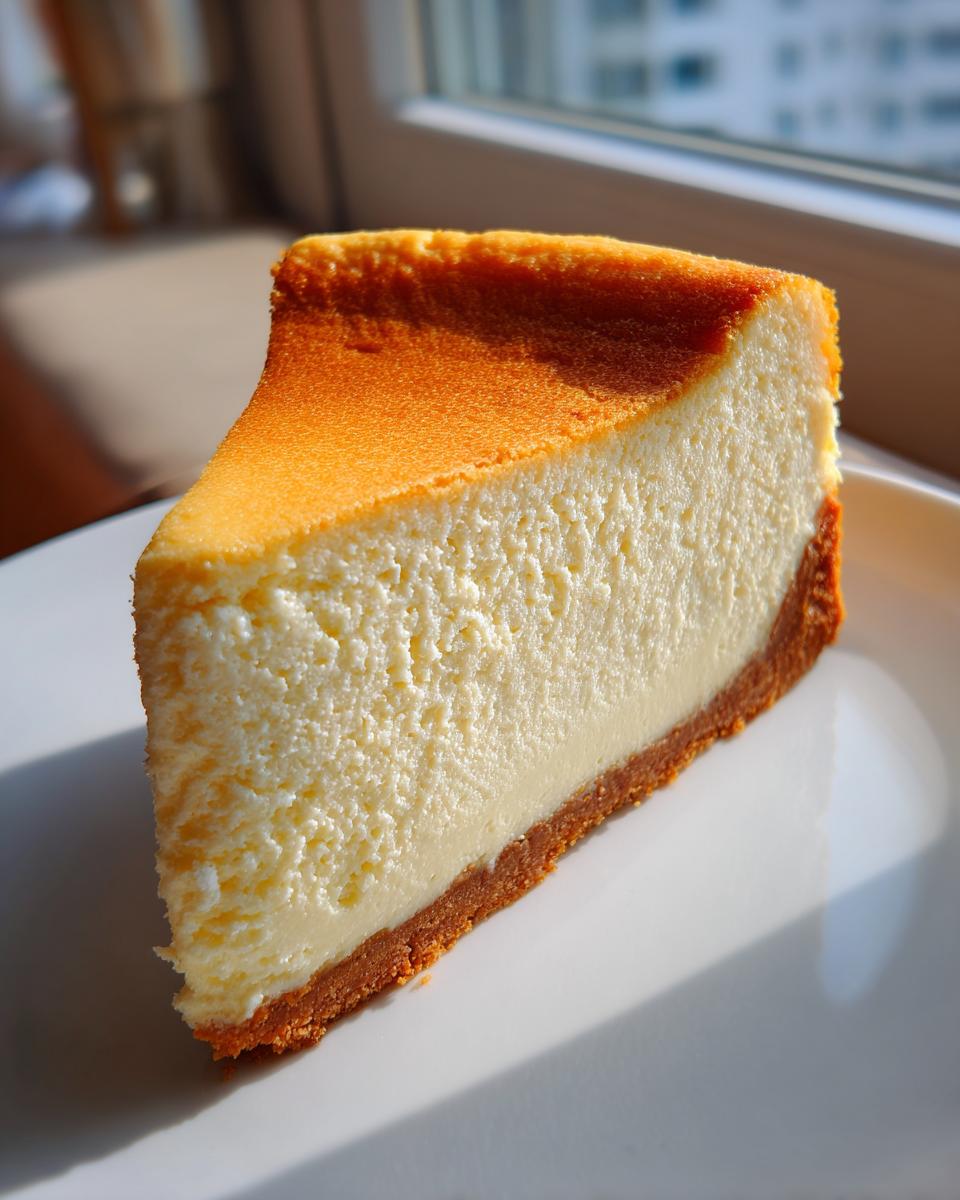
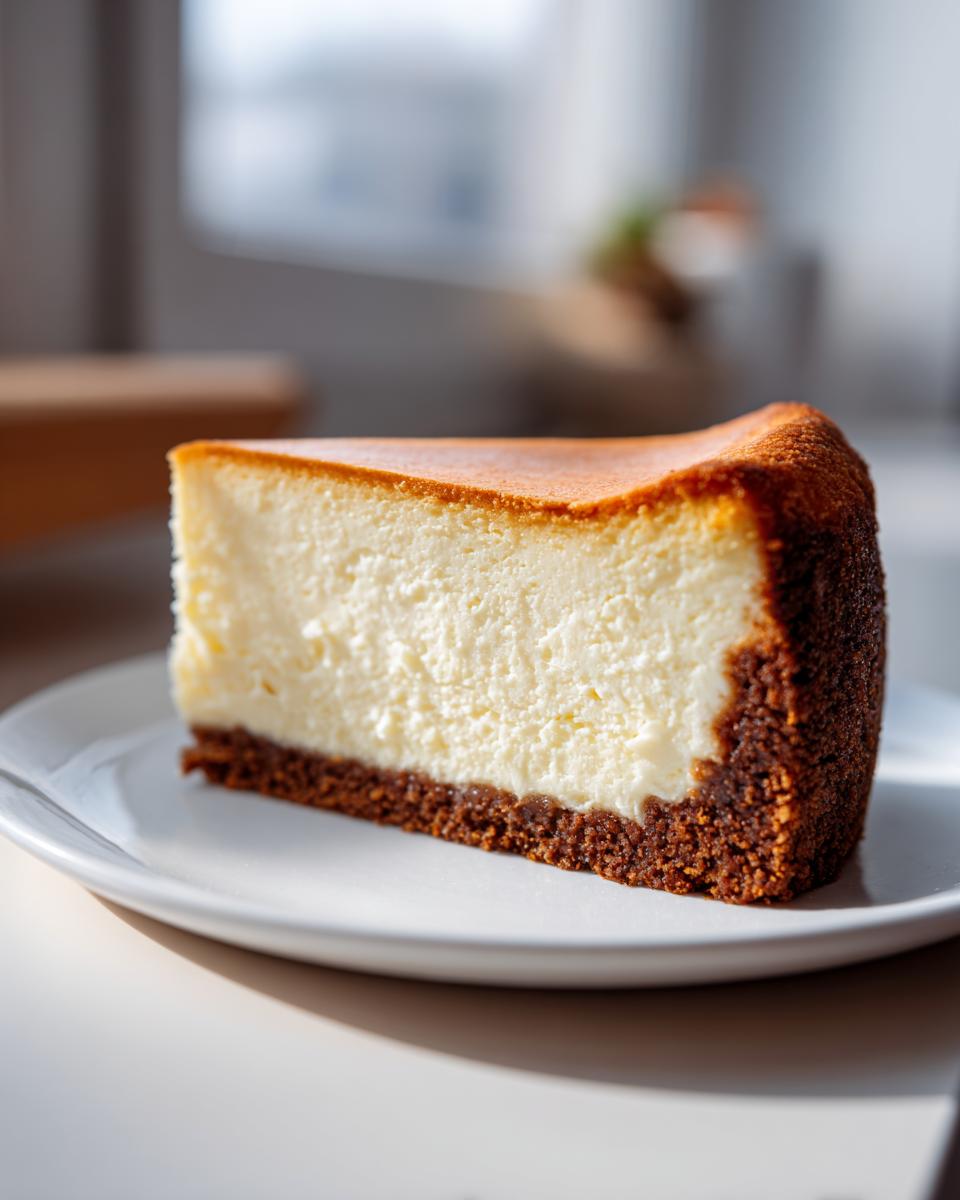
- The famous texture: Dense, incredibly creamy, and smooth—never gummy or airy.
- The foolproof finish: We are specifically using the water bath method to ensure that beautiful, unblemished top. No cracks here!
- The ideal crust: A buttery, slightly salty graham cracker base that holds up perfectly to the filling.
Achieving That Signature Dense Cream Cheese Dessert Texture
What makes the difference between a standard dessert and a genuine restaurant style cheesecake at home? It’s all about what you put in and, more importantly, what you keep out! We use a very high amount of full-fat cream cheese here, obviously. But the real trick is keeping the air bubbles to an absolute minimum. If you overmix the batter, you introduce too much air, and when it bakes, that air expands, collapses, and BAM—you get cracking and a spongy texture. We are aiming for that heavy, satisfying feel, which means slow mixing and careful attention to the eggs.
Essential Ingredients for Your new york style cheesecake recipe
Okay, let’s talk ingredients, because these aren’t suggestions—they are the building blocks of greatness! For this Classic New York Cheesecake, you can’t just throw things in a bowl and hope for the best. The absolute, most important rule I learned the hard way is that almost everything for the filling needs to be at true room temperature. I mean *hours* on the counter before you even think about turning the mixer on. When your cream cheese is cold, it won’t ever get smooth, and you’ll end up fighting lumps for half an hour. We don’t have time for that! Trust me, taking the time to let those dairy items warm up is the difference between a lumpy mess and the breathtakingly smooth dessert destined for your table. You can review my kitchen philosophy on ingredient quality right here.
For the Perfect Graham Cracker Crust
The base needs to be buttery and sturdy enough to support that gorgeous filling! We only bake this base for a quick ten minutes, so make sure your butter is melted and ready to go.
- 1 1/2 cups graham cracker crumbs
- 1/4 cup granulated sugar (for crust)
- 6 tablespoons unsalted butter, melted
For the Rich and Creamy Cheesecake Filling
Look at all that cream cheese! This is where the density comes from. Make sure you are using the full-fat blocks; low-fat or whipped varieties just won’t give you that decadent result.
- 4 (8 ounce) packages full-fat cream cheese, softened to room temperature
- 1 1/2 cups granulated sugar (for filling)
- 1/4 cup all-purpose flour
- 1 teaspoon vanilla extract
- 1/4 teaspoon salt
- 1 cup sour cream, room temperature
- 4 large eggs, room temperature
Step-by-Step Authentic NY Style Cheesecake Baking Instructions
Now we get to the fun and slightly nerve-wracking part—the actual baking! Don’t let the terms “water bath” or “springform pan” scare you. Baking this cheesecake correctly is all about managing temperature gently, which prevents those awful cracks that ruin the beautiful presentation. We follow these steps exactly as written, and I promise, you are going to end up with the most beautiful, rich dessert you’ve ever pulled from your oven. Head over to my breakfast section later to see what I’m having for brunch the next morning!
Preparing the Crust and Oven Setup
First things first, get your oven ready. Preheat it to 350 degrees F. Mix up your crust ingredients—the graham crumbs, the small amount of sugar, and that melted butter—until it looks like wet sand. Firmly press that mixture into the bottom and about an inch and a half up the sides of a 9-inch springform pan. Pop that crust in the hot oven for exactly 10 minutes to set it. Once that’s done, take it out, let it cool while you work, and then drop the oven temperature way down to 325 degrees F.
Next up is the water bath prep, which is absolutely essential for success! Take heavy-duty aluminum foil—and I mean heavy duty—and wrap the entire bottom and sides of your springform pan tightly. You want no chance of water sneaking in while it bakes. Place that wrapped pan into a large roasting pan before you do anything else.
Mixing the Creamy Baked Cheesecake Filling
Remember how I told you everything needed to be room temperature? This is where it pays off! In a large bowl, beat your softened cream cheese until it is gloriously, totally smooth. Scrape down those sides to make sure you don’t leave any cold clumps behind. Next, slowly add the main 1 1/2 cups of sugar, the flour for structure, vanilla, and salt. Mix just until it barely comes together. Please, listen to me: Do not overmix here!
Beat in the room-temperature sour cream until everything looks silky again. The air bubbles start creeping in when we add the eggs, so be super gentle now. Add those four eggs in one by one. Mix only until you see the yellow disappear after each addition. Stop the mixer the second that last egg is incorporated. Seriously, a quick blend is all you need for that perfect No Crack Cheesecake Tutorial finish.
How To Bake A Water Bath Cheesecake Perfectly
Gently pour that gorgeous filling right over your cooled crust. Now, carefully place the whole setup—the roasting pan with the foil-wrapped springform—into the oven. This is the crucial part of your new york style cheesecake recipe: Carefully pour boiling water into the outer roasting pan until that water comes about halfway up the sides of your springform pan. You’re bathing your cake in steam!
Bake this at 325 degrees F for about 60 to 75 minutes. You’ll know it’s close when the outer edges look firm and baked, but the center—maybe about two inches right in the middle—still has a slight wobble. Not a slosh, just a gentle jiggle when you nudge the pan!
The Slow Cooling Method for a Crack-Free Top
The biggest error home bakers make is pulling this beautiful dessert right out of the hot oven! That sudden change in temperature shocks the top and guarantees cracks. We are going to trick the cake into thinking nothing has changed.
Turn the oven off completely. Prop the oven door open about two inches—use a wooden spoon or a spatula so it stays put. Let the cheesecake sit inside that warm, steamy environment for a full hour. After that hour is up, take it out of the water bath and remove the foil wrapping. Let it finish cooling completely right on the counter, away from any drafts. Only once it’s totally room temperature do you move it into the fridge for the final set time—at least six hours, but honestly, overnight is best for the ultimate texture.
Tips for Success with Your new york style cheesecake recipe
I know I’ve mentioned it already, but when you are going for that picture-perfect, Bakery Style Cheesecake look, you just can’t cheat temperature! Even if you think your cream cheese is “soft enough,” if it’s still cold in the middle, it will fight you when you try to mix it. That fight is where lumps are born, and lumps mean we have to over-mix trying to eliminate them later, which leads straight back to cracks!
Ingredient Temperature is Non-Negotiable
Seriously, leave those four blocks of cream cheese and those eggs out on the counter for at least two or three hours before you even think about preheating the oven. I mean it! They should feel soft, almost pliable, when you gently press them. When they are perfectly tempered, they blend instantly into that silky smooth batter with only a few slow turns of the mixer. That’s how you get the truly Rich and Creamy Cheesecake texture without whipping in a ton of unnecessary air. If you have questions about anything during the process, feel free to reach out to us through our Contact Page!
Storage & Reheating Instructions for Decadent New York Dessert
You’ve done the hard work—the water bath, the slow cooling—and now you have this jewel of a cheesecake. Don’t ruin it by rushing the chill time! This Dense Cream Cheese Dessert really needs time to firm up completely. We talk about this a lot in the recipe steps, but I have to drive it home one more time: refrigeration for at least six hours is the bare minimum. If you can possibly manage it, letting it chill overnight is honestly the best way to guarantee those clean, beautiful slices when you cut into it.
Once it’s fully set and you’ve sliced off a piece (or maybe three!), storage is easy. Keep any leftovers tightly sealed. I usually cover the serving plate with plastic wrap, pressing the wrap gently against the top surface of the cheesecake if I can, to prevent any condensation or smells from migrating in. It keeps wonderfully in the fridge for four to five days. I’ve actually found that my cheesecake tastes even better on day two, as all those subtle vanilla and cream cheese flavors really deepen.
Now, reheating shouldn’t really be a thing with a Creamy Baked Cheesecake Filling like this, since it’s best served straight from the cold fridge. But let’s say that first slice wasn’t enough, and you want a slightly softer texture for the second helping the next day? Don’t put it in the microwave! That’s a recipe for disaster.
Instead, if you want to take the chill off just slightly, pull the cheesecake, still covered, out of the fridge about 30 minutes before you plan to serve it. That small time out is usually enough to take the harsh cold edge off without compromising the texture. If you want to check out our site rules while your cake chills, you can review our Terms of Use.
Serving Suggestions for Your Classic New York Cheesecake
Honestly, I think the pure, unadulterated pleasure of a perfect New York cheesecake is that you often don’t *need* anything on top. It’s already so rich, dense, and complex! When I pull mine out, I usually let it stand tall naked on the pedestal for a few minutes, just admiring the smooth top before slicing. The tangy hint from the sour cream really shines when it’s served plain.
But hey, if you’re bringing this beauty to a party or just want to dress it up a little, I have a few favorite ways to go that complement the heavy, creamy nature of this dessert. We want toppings that offer a little brightness or tartness to cut through all that amazing richness. You can find more of my family-favorite topping ideas over on my comfort food recipes page!
- Fresh Berry Compote: This is my go-to for summer gatherings. I just simmer some fresh raspberries and a tiny bit of sugar on the stove until they break down slightly. Don’t make this topping too sweet! The slight tartness of the berry is the perfect foil to the creamy base.
- Simple Cherry Topping: If you want that diner feel, you can use canned cherry pie filling, but please, warm it gently first. Don’t pour it cold and gloppy over your beautifully set cake. Warming it up makes it flow just a little better.
- Just a Dusting: If you don’t want to interrupt that perfect surface you worked so hard to achieve, a light, even dusting of powdered sugar does the trick. Use a fine mesh sieve and tap lightly. It looks elegant and adds just a hint of sweetness right on the surface.
- Lemon Zest Swirl: If citrus is your jam, zest an entire lemon right over the top just before serving. The smell alone is incredible, and the slight oil from the zest gives you a little burst of freshness in every bite.
No matter how you choose to top it—or if you choose nothing at all—slicing it cold from the fridge ensures that clean-cut edge that signals you’ve mastered the art of the Classic New York Cheesecake. Enjoy every single bite!
Frequently Asked Questions About the new york style cheesecake recipe
I know when you look at a recipe this detailed, questions pop up! That’s totally normal, especially when you’re aiming for something as iconic as a Restaurant Style Cheesecake At Home. I gathered the questions I get asked most often after folks try baking this. Hopefully, these quick tips help you feel 100% confident before you even turn on the mixer. If you’re looking for lighter fare after all this richness, I have tons of ideas over in my healthy lunch recipes section!
Can I skip the water bath when making this new york style cheesecake recipe?
Oh, I really wish you could, but nope! Please don’t skip it. The water bath is the secret handshake for any truly reliable Best NY Cheesecake Recipe. Think about it: we are baking something that relies on gentle, moist heat for hours. If you bake it dry, the edges cook way too fast before the center sets, and you get a dry, possibly cracked top. The boiling water creates steam in the oven, which protects the cheesecake, keeps the temperature even, and gives us that famous silky texture we are after.
What is the secret to a perfectly smooth, dense cream cheese dessert?
It boils down to two things, really, and we covered them both in detail. First, have patience with your ingredients! Everything—the cream cheese AND the eggs—must be totally, completely at room temperature before they touch the mixer bowl. This helps them emulsify beautifully without needing extra help. Second, mixing! Once the eggs go in, you are just looking to combine, not incorporate air. Less mixing equals less air, less air equals that perfect, heavy, dense cream cheese dessert texture. It’s science, but super delicious science!
Nutritional Estimate for this Rich and Creamy Cheesecake
Now, I’ll be the first to tell you that when you’re baking a truly authentic, decadent New York style dessert, you aren’t exactly aiming for a light snack! This cheesecake is pure comfort, pure indulgence, and boy, does it deliver on flavor. Because of the high ratio of full-fat dairy required for that incredible texture, the numbers are what you’d expect for a special occasion treat.
Keep in mind that these figures are just an estimate based on the ingredients listed in the recipe. If you use a different crust or add extra toppings, these numbers are bound to shift a little. But for a generous slice of this beautifully set, Rich and Creamy Cheesecake, here is what you can generally expect:
- Serving Size: 1 slice
- Calories: 450
- Fat: 30g (Saturated Fat: 18g)
- Carbohydrates: 40g (Sugar: 35g)
- Protein: 8g
It’s definitely a dessert meant to be savored! If you have any specific questions about substitutions or techniques after you’ve baked it, please don’t hesitate to reach out to us through our Contact Page. I love hearing from fellow bakers!
Share Your Experience Making This New York Dessert Recipe
Well, you’ve done it! You’ve managed the water bath, you’ve waited patiently through what felt like an eternity of cooling, and now you have a genuine, decadent New York dessert sitting (chilling!) in your kitchen. I am SO incredibly proud of you!
Now that you’ve achieved what many think is impossible—that flawlessly smooth, crack-free surface—I really want to hear about it! Did you manage to keep the air out? Did the slow cooling trick work its magic? Don’t keep that success story to yourself!
Please take a minute to come back here and leave a rating for the recipe. Five stars if you managed that perfect density, four if you had one tiny little crack but it still tasted amazing! Your feedback helps other home cooks just starting out feel more confident taking on this classic.
And please, share photos! Snap a picture of that gorgeous slice—maybe with a cup of coffee or a side of fresh berries—and tag us on social media. Seeing your baking triumphs is honestly what keeps me inspired in the kitchen every day. It proves that creating something truly special, like a restaurant style cheesecake at home, is absolutely within reach for everyone.
I hope this recipe brings the same joy and comforting, rich flavor to your table that it brings to mine. Happy baking, friends! I look forward to reading all your stories. If you need some speedy options for tomorrow’s dinner after all this richness, swing by my quick and easy dinner recipes!
Warmly,
Sarah Miller,
HearthBite Founder
PrintAuthentic New York Style Cheesecake with Perfect Graham Cracker Crust
Make a dense, rich, and creamy restaurant style cheesecake at home using this detailed tutorial, including the essential water bath technique for a crack-free top.
- Prep Time: 30 min
- Cook Time: 75 min
- Total Time: 120 min
- Yield: 12 servings 1x
- Category: Dessert
- Method: Baking
- Cuisine: American
- Diet: Vegetarian
Ingredients
- 1 1/2 cups graham cracker crumbs
- 1/4 cup granulated sugar (for crust)
- 6 tablespoons unsalted butter, melted (for crust)
- 4 (8 ounce) packages full-fat cream cheese, softened to room temperature
- 1 1/2 cups granulated sugar (for filling)
- 1/4 cup all-purpose flour
- 1 teaspoon vanilla extract
- 1/4 teaspoon salt
- 1 cup sour cream, room temperature
- 4 large eggs, room temperature
Instructions
- Prepare the crust: Preheat your oven to 350 degrees F. Mix graham cracker crumbs, 1/4 cup sugar, and melted butter. Press the mixture firmly into the bottom and 1 1/2 inches up the sides of a 9-inch springform pan. Bake for 10 minutes. Remove and let cool while you prepare the filling. Reduce oven temperature to 325 degrees F.
- Prepare the water bath: Wrap the outside bottom and sides of the springform pan tightly with heavy-duty aluminum foil to prevent water leakage. Place the wrapped pan inside a larger roasting pan.
- Make the filling: In a large bowl, beat the softened cream cheese with an electric mixer on medium speed until completely smooth. Scrape down the sides.
- Gradually beat in 1 1/2 cups sugar, flour, vanilla extract, and salt until just combined. Do not overmix.
- Beat in the sour cream until smooth. Add the eggs one at a time, beating only until each egg is incorporated. Stop mixing as soon as the last egg is blended in. Overmixing adds air, which causes cracks.
- Pour the filling over the cooled crust in the springform pan.
- Place the roasting pan with the cheesecake into the oven. Carefully pour boiling water into the roasting pan until the water reaches about halfway up the sides of the springform pan. This is the water bath.
- Bake at 325 degrees F for 60 to 75 minutes. The edges should look set, but the center 2 inches should still jiggle slightly when the pan is gently nudged.
- Turn off the oven, but leave the cheesecake inside with the oven door propped open about 2 inches for 1 hour. This slow cooling prevents sudden temperature changes that cause cracking.
- Remove the cheesecake from the water bath and foil. Let it cool completely on a wire rack at room temperature.
- Chill the cheesecake in the refrigerator for at least 6 hours, or preferably overnight, before serving. Run a thin knife around the edge before releasing the springform side.
Notes
- Use room temperature ingredients for the filling; this prevents lumps and ensures a smooth texture.
- Do not skip the water bath; it provides moist, even heat necessary for a creamy, dense texture.
- For the best flavor and texture, chill the cheesecake for a full 24 hours before slicing.
Nutrition
- Serving Size: 1 slice
- Calories: 450
- Sugar: 35g
- Sodium: 300mg
- Fat: 30g
- Saturated Fat: 18g
- Unsaturated Fat: 12g
- Trans Fat: 0g
- Carbohydrates: 40g
- Fiber: 1g
- Protein: 8g
- Cholesterol: 120mg