
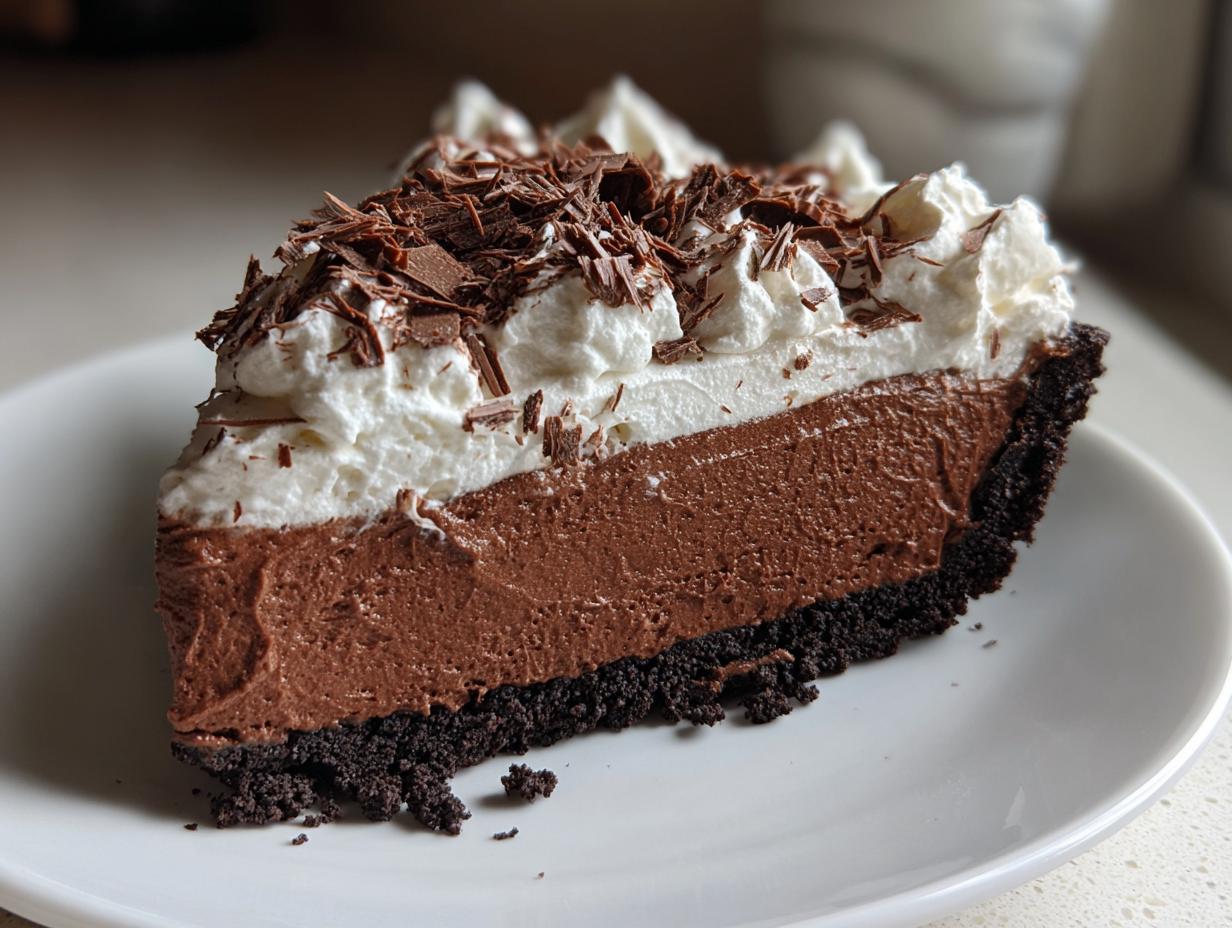
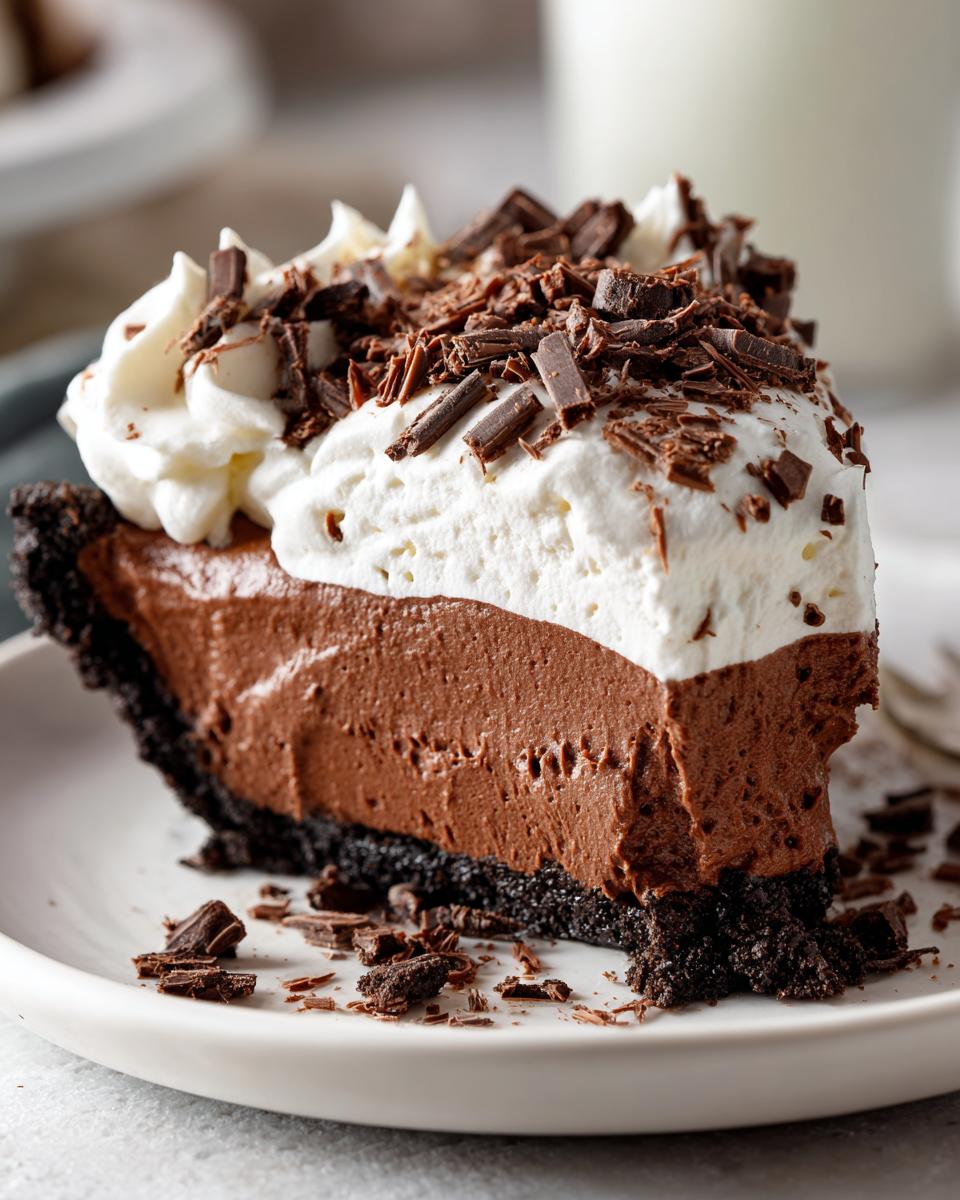
Sometimes you just need a dessert that screams ‘indulgence’ without shouting ‘I spent all day in the kitchen.’ You know the feeling—you need that deep, dark chocolate satisfaction, something truly decadent, but your oven is currently reserved for, well, nothing important. That’s why I’m so thrilled to share my go-to chocolate mousse pie recipe. Trust me when I say this version is pure magic because it’s completely no-bake and achieves that incredible, silky, rich texture we all dream about. Here at HearthBite, my goal, as Sarah Miller, is always to bring you recipes that are reliable and deeply comforting, and this pie is the ultimate comforting treat that even the busiest family can pull off! If you want to know more about the philosophy behind why I share these tried-and-true recipes, check out my HearthBite story.
- Why This Easy No-Bake Chocolate Mousse Pie is Your New Favorite Dessert
- Ingredients for the Ultimate Chocolate Mousse Pie Recipe
- How to Prepare Your Easy Chocolate Pie
- Tips for the Best Chocolate Mousse Pie Results
- Make Ahead Dessert and Storage for Chocolate Mousse Pie
- Serving Suggestions for this Decadent Chocolate Dessert
- Frequently Asked Questions About Chocolate Mousse Pie
- Estimated Nutritional Data for This Creamy Chocolate Pie
- Share Your Homemade Mousse Pie Experience
Why This Easy No-Bake Chocolate Mousse Pie is Your New Favorite Dessert
Honestly, where do I even start with how much I love this recipe? When I first developed this chocolate mousse pie, I knew I had a winner because it checks every single box for a busy weeknight hero. It’s a true quick chocolate dessert, which means less fuss, no preheating the oven, and definitely no stress!
What makes this a go-to in my own kitchen, especially when friends pop over unexpectedly, is that it delivers such luxurious flavor without any difficult techniques. We are talking about a truly creamy chocolate pie that sets up beautifully just by chilling. Since I know so many of you are juggling home life and work—just like I do—this recipe is designed to be assembled fast and then forgotten in the fridge. It’s a lifesaver, and it’s always a showstopper. If you need more fast ideas for busy days, I have a whole section of quick and easy dinner recipes!
Achieving Silky Chocolate Mousse Texture Without Baking
The secret to that melt-in-your-mouth sensation is all in the folding. We aren’t fighting with eggs or worrying about tempering anything fussy. Instead, we rely on lightly sweetened, perfectly whipped cream. When you gently fold the slightly cooled melted chocolate into that fluffy cream, you are trapping air inside. That trapped air is pure gold! It’s what gives us that beautiful, light and airy mousse that feels so delicate on the tongue.
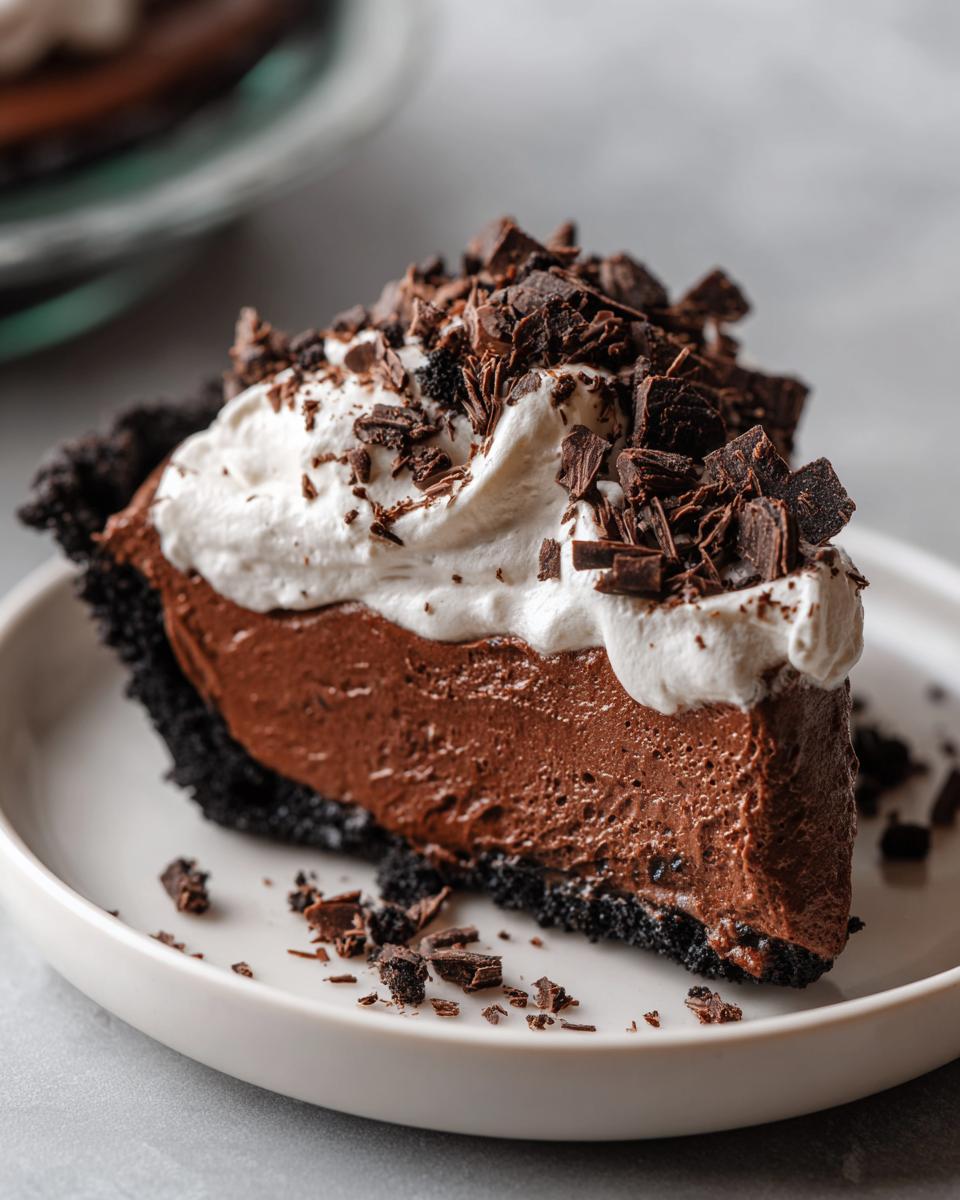
The Perfect Oreo Crust Pie Foundation
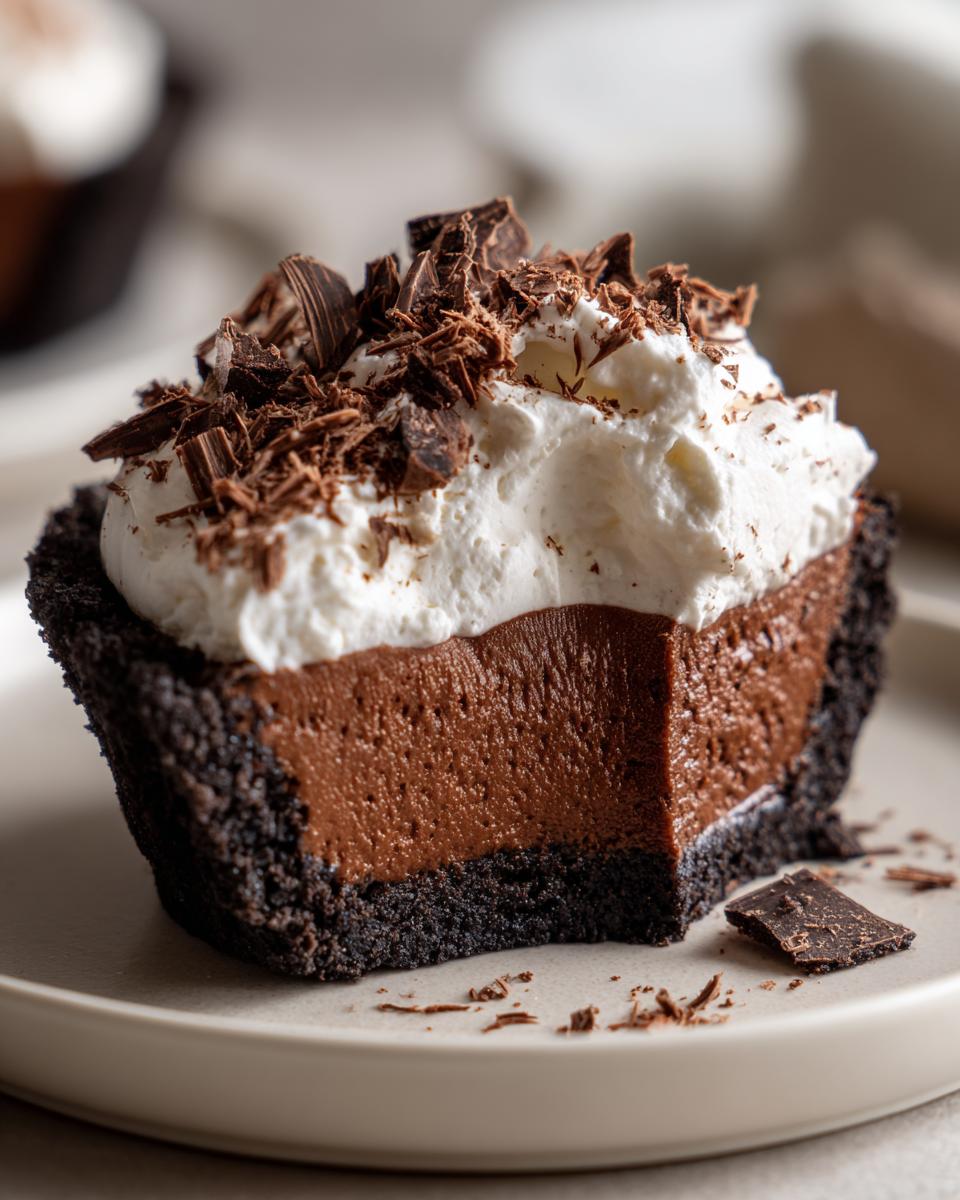
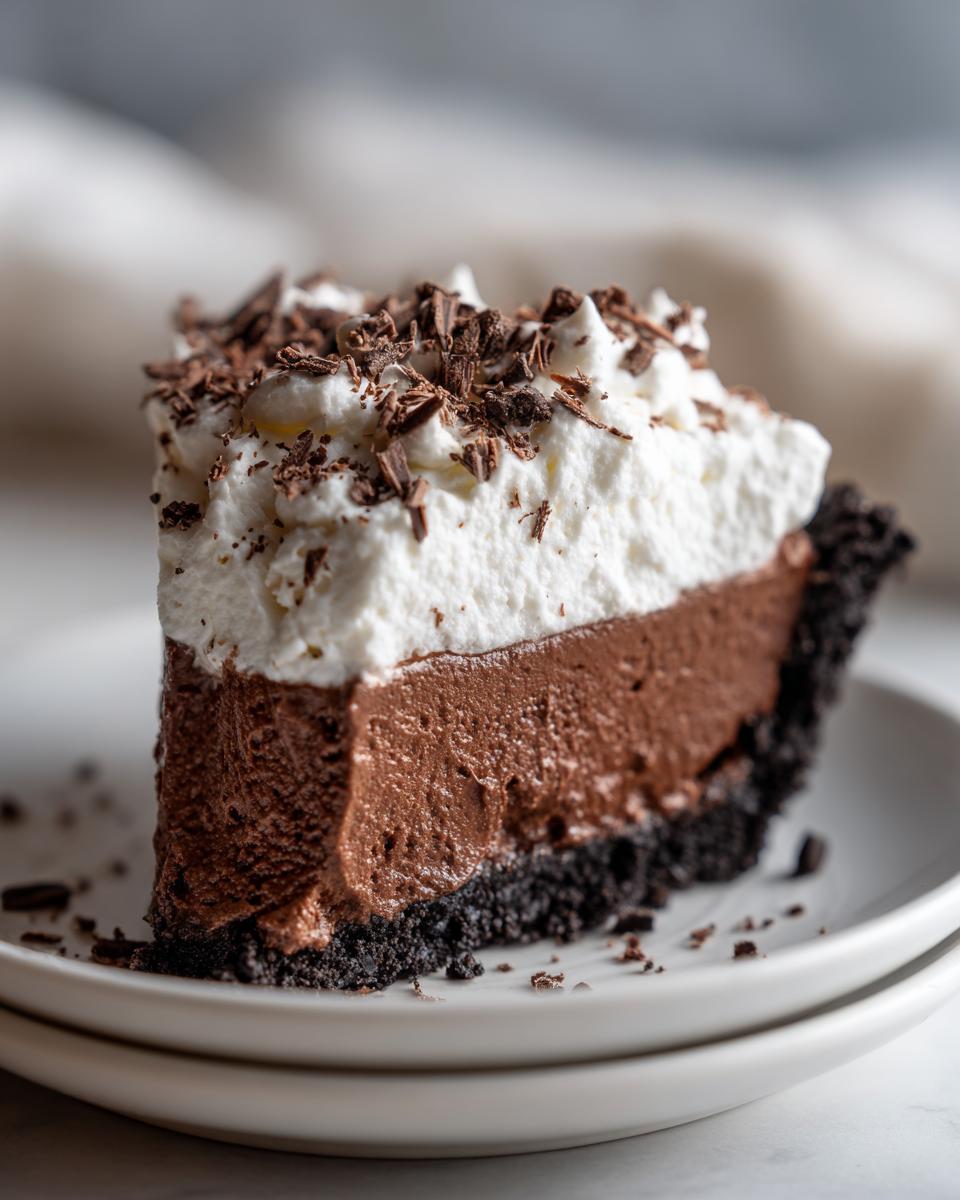
Let’s talk crust! I know some recipes call for graham crackers, and that’s fine, but for this decadent filling, you simply must go with Oreos. The dark, slightly bitter crunch of the crushed cookies is the perfect counterpoint to the sweet, airy mousse. It’s so simple—just crumbs and butter, pressed in, and chilled. Because there’s no baking involved, the crust gets wonderfully firm in the freezer, making this the ultimate make ahead dessert. You can whip this up entirely the day before your party, and it just waits patiently in the fridge for you!
Ingredients for the Ultimate Chocolate Mousse Pie Recipe
I always say that the success of any chocolate mousse pie starts right here, with the ingredients list. Since we aren’t baking this beauty, precision matters a lot, especially when we’re dealing with heavy cream that needs to whip up just right! Don’t skip the vanilla—it really helps round out that deep chocolate flavor. This recipe is simple, but every piece has a job to do to make sure we get that fantastic texture. If you’ve ever struggled with a no-bake pie setting up before, check out my guide to other no-bake wonders; I’ve learned a few tricks along the way!
For the Oreo Crust Pie
This foundation is non-negotiable if you love that classic crunch! You’ll need everything ready to go before we assemble this part.
- 1 3/4 cups Oreo cookie crumbs (This usually means about 25 of those whole sandwich cookies—crust and all!)
- 6 tablespoons unsalted butter, melted
For the Silky Chocolate Mousse Filling
This is where the magic happens! Making sure that cream and chocolate are just right before folding is key here, so pay attention to the divided quantities.
- 12 ounces semi-sweet chocolate chips (I prefer semi-sweet over milk chocolate for that deep, decadent flavor!)
- 1 cup heavy cream, divided (You’ll use 1/4 cup of this for the ganache, and the rest for whipping.)
- 1 teaspoon vanilla extract
- 1/4 cup granulated sugar
- 1/4 teaspoon salt
- 1 1/2 cups cold heavy cream, for whipping (Yes, two separate measurements of cream! Keep this batch extra, extra cold.)
For the Whipped Cream Topping Dessert
We finish this dessert with something light and pillowy to contrast that rich filling. Make sure your bowl and whisk attachments are chilled for the best results!
- 1/4 cup powdered sugar
- Chocolate shavings, for garnish (A fancy touch, but totally worth the extra thirty seconds!)
How to Prepare Your Easy Chocolate Pie
Alright, here’s where we pull it all together! If you follow these steps exactly, you’ll have the most incredible, foolproof Easy Chocolate Pie that tastes like it took hours. Since nothing goes into the oven, our timing focuses on chilling and mixing technique. Trust me, setting aside the time for chilling is just as important as mixing! If you’re looking for other desserts where the stove stays off, you might love checking out my recipe for easy creamy mini cheesecake bites!
Step 1: Setting the Oreo Crust Pie
First things first: we need a solid base! Take your Oreo crumbs and pour them into a bowl with the 6 tablespoons of melted butter. Mix it with a fork until everything looks uniformly damp, like wet sand. Press that mixture firmly into the bottom and right up the sides of your 9-inch pie plate. I use the bottom of a flat measuring cup to really pack it down tight! Once it’s firm, pop that whole plate into the freezer for just 15 minutes. That quick chill sets the butter so the crust doesn’t crumble when we add the mousse.
Step 2: Creating the Smooth Chocolate Ganache Base
While the crust is chilling, let’s deal with the chocolate. Put your 12 ounces of chocolate chips into a nice, sturdy bowl. In a small saucepan, heat up just 1/4 cup of the heavy cream until you see it just starting to perk up around the edges—don’t let it boil hard! Pour that hot cream right over those chips and then—this is important—walk away for 5 minutes. Seriously, let the heat do the work! After those five minutes pass, whisk it slowly until it’s beautifully, completely smooth. You’ve just made a quick ganache! Let this sit just long enough to cool down a bit while you work on the next step, because hot chocolate will deflate your whipped cream.
Step 3: Folding for a Light and Airy Mousse
Now for the air! In a separate, clean, chilled bowl, beat the first portion of cream (that 3/4 cup), the granulated sugar, vanilla, and salt. Keep beating until you hit soft peaks—you know, when the peaks flop over gently when you lift the whisk. Next, take your slightly cooled chocolate mixture and start folding it into the whipped cream. I mean *gently* fold, using a rubber spatula, cutting down the middle and sweeping up the side. Stop mixing the second you see no more white streaks! If you overmix this, you’ll knock all the air out, and we won’t have that light and airy mousse feel.
Step 4: Chilling the Chocolate Mousse Pie
Pour that glorious, airy filling right into your chilled Oreo crust. Use your spatula to smooth out the top nicely; you want it looking elegant for when it sets! Cover it loosely—paper towel underneath the plastic wrap helps keep condensation off the top—and slide it into the refrigerator. This doesn’t set instantly. You need a minimum of 4 long hours here, but honestly, overnight is even better for the perfect chocolate mousse pie texture.
Step 5: Finishing with the Whipped Cream Topping
Once your pie is perfectly firm, it’s time for the crown! Take the remaining 1 1/2 cups of super cold heavy cream and beat it with the powdered sugar until you get stiff peaks. This part whips up really fast, so watch it closely! Spread or pipe this luscious topping over your set pie. If you have chocolate shavings ready to go, sprinkle those on top right before you serve it. That’s it! You’re done with this easy chocolate pie!
Tips for the Best Chocolate Mousse Pie Results
Even though this is such a simple no-bake dessert, I want you to have absolutely perfect results every time! Getting that beautiful silky chocolate mousse texture comes down to just a couple of quick checks before you send the pie off to chill. We want dense, yes, but never flat or watery mousse, right? I’ve pulled these little bits of wisdom straight from my tried-and-true process.
Ingredient Temperature Check for Silky Chocolate Mousse
Okay, listen to me closely here: the number one reason a mousse deflates is heat shock! When you fold your melted chocolate base into the whipped cream, the chocolate absolutely *cannot* be hot. If it’s too warm, it melts those beautiful air bubbles right out of the cream instantly, and you’re left with a dense puddle. Let it cool down until it’s just warm to the touch, but definitely not hot. This keeps your filling light and wonderfully airy.
Crust Variations for Your Chocolate Mousse Pie
While I adore the deep, dark crunch of the Oreo crust, maybe you aren’t an Oreo fan, or perhaps you just don’t have them on hand. No worries! I mentioned this as a note because substitution is easy. You can swap the Oreo crumbs out for graham cracker crumbs. The resulting crust will be slightly sweeter and a bit less intense, which lets the chocolate filling really shine through in a different way. Both versions are delicious, but make sure the butter ratio stays the same to help that base hold up!
Make Ahead Dessert and Storage for Chocolate Mousse Pie
One of the biggest reasons I adore this chocolate mousse pie is that it truly excels as a make ahead dessert. You can take the stress right out of party planning because this pie actually tastes *better* the next day once everything has had time to fully mingle and set up in the cold. It’s ready when you are!
You can safely store this pie in the refrigerator, covered loosely with plastic wrap, for up to two full days. The Oreo crust stays wonderfully crisp underneath that creamy filling, and the mousse stays perfectly light. If you’re making it for a big gathering, I often whip the topping the night before, keep that separate in an airtight container in the fridge, and only pipe it on right before serving. That keeps the topping perfectly stiff.
Can you freeze it? That’s a tricky one for mousse pies! Because we rely on the structure created by whipped cream and the melt of the chocolate, freezing and thawing can sometimes cause the mousse to separate or weep a bit. For this reason, I’d strongly recommend sticking to refrigeration. If you absolutely must freeze it, only freeze the crust and filling *before* you add the whipped topping. Thaw it slowly overnight in the fridge, and then top it fresh before serving. For more foolproof chilled desserts, you should definitely take a peek at my recipe for the easy no-bake peanut butter pie; that one freezes like a dream!
Serving Suggestions for this Decadent Chocolate Dessert
When you pull this gorgeous chocolate mousse pie out of the fridge, everyone is going to stop and stare—it’s that stunning! But presentation is half the fun, isn’t it? We already included chocolate shavings in the instructions, but let’s talk about how to truly make this decadent chocolate dessert sing on the table.
For contrast against that dark brown filling, fresh fruit is your best friend. Think bright, tart pops! A scattering of fresh raspberries or sliced strawberries around the edge of the whipped topping looks absolutely professional. Even a few perfect blueberries can add that needed splash of color. You can even drizzle a little of some fruit reduction sauce—like a tart cherry sauce—right on the serving plate before you set the slice down. It looks fancy, but it takes two seconds!
If you are serving this pie after a big, heavy meal, you don’t want another heavy drink pairing. This is where I often turn to something light and bright to cleanse the palate after all that richness. For something refreshing, you can’t go wrong with a crisp, cold glass of water infused with mint and cucumber. Or, if you’re looking for a non-alcoholic pairing that really sings with the chocolate, try serving it alongside a glass of my favorite simple watermelon smoothie—the lightness cuts through the chocolate perfectly!
For those who enjoy an after-dinner treat, a really good espresso or a small glass of a deep red wine, like a Cabernet Sauvignon, pairs beautifully. The slight bitterness of the coffee or the tannins in the wine match the intensity of the dark chocolate so well. Whatever you choose, just remember that presentation elevates the entire experience. Even a simple fork swipe across the whipped cream topping before serving adds just a little flair! Folks often ask me about serving ideas, and you can see a few more ways I finish off delicious treats over at this recipe for the chocolate mousse pie with whipped cream.
Frequently Asked Questions About Chocolate Mousse Pie
I always get so many questions when people try this recipe for the first time, which tells me you all love your chocolate treats as much as I do! Since this is such a popular dessert, I wanted to gather the most common things people ask about making the perfect batch of this no-bake delight. Don’t worry if you have a question; nine times out of ten, someone else is wondering the same thing about their no bake mousse dessert!
Can I substitute the Oreo crust in this chocolate mousse pie?
Yes, absolutely! While I personally think the dark, cool crunch of the Oreo is the best pairing for such a rich chocolate mousse pie, substitutions work just fine. If you don’t have Oreos, you can easily swap them for graham cracker crumbs. Just remember that graham crumbs usually need an extra tablespoon or two of butter to bind properly because they aren’t quite as fatty as the Oreos. The resulting crust will be a little lighter in color and flavor, but it still holds up beautifully to the creamy filling!
How long must the No Bake Mousse Dessert chill?
Patience is truly the hardest ingredient to measure sometimes, but for this recipe, chilling time is critical! You *must* give this pie at least four hours in the refrigerator. I know it’s tempting to sneak a spoonful sooner, but rushing it means your mousse won’t fully stabilize. If you cut it too soon, it’ll slump and look more like pudding than a sliceable mousse. For the cleanest, most perfect slices that truly show off that silky texture, I always aim to let it chill overnight. It’s the best way to guarantee success for your creamy chocolate pie!
What makes this different from a traditional French Silk Pie Variation?
That’s a great question! People often confuse the two because they both involve a luxurious, creamy chocolate filling inside a crust. The big difference is structure. A traditional French Silk Pie Variation usually relies on cooked eggs and a lot of butter, which gives it a denser, almost fudgy texture that often needs to be baked or rely on those structural eggs. My chocolate mousse pie, on the other hand, is purely no-bake comfort food. We rely on the airy lift from the whipped heavy cream folded into a slightly cooled chocolate ganache. That means ours is noticeably lighter and much more ‘airy’ than a heavy silk pie. It’s heavenly!
If you’re looking for more of those comforting, straightforward recipes that just *work*, you’ll find tons of inspiration in my collection of favorite comfort food recipes!
Estimated Nutritional Data for This Creamy Chocolate Pie
Okay, let’s talk numbers for a minute. Since this is a rich, decadent chocolate dessert, I always approach the nutrition facts with a grain of salt—literally! We need to be responsible about what we share here at HearthBite. I’ve pulled the estimated data below based on the ingredients listed in the recipe. Remember, this is truly just an estimate, and it can change dramatically depending on which brand of chocolate chips or cookies you decide to use. This information helps us keep things in perspective, especially when enjoying a wonderful slice of this creamy chocolate pie.
- Serving Size: 1 slice
- Calories: 450
- Sugar: 35g
- Sodium: 210mg
- Fat: 30g
- Saturated Fat: 18g
- Carbohydrates: 40g
- Protein: 6g
When you’re whipping up this incredible chocolate mousse pie, just know that these figures are based on using the standard Oreos and semi-sweet chips. If you decide to skip the whipped cream topping or use a lighter chocolate, those numbers will shift! For all the details regarding how we handle data and privacy on the site, you can always check out my privacy policy. But honestly, when a dessert tastes this good, I try not to worry too much about the small stuff!
Share Your Homemade Mousse Pie Experience
And there you have it! We’ve gone from a pile of Oreo crumbs to the most elegant, no-bake chocolate mousse pie you could imagine. What an achievement for a dessert that required zero oven time! Making these kinds of comforting, yet impressive, treats is exactly why I started HearthBite—to help you create those simple moments of joy around your own table.
Now that you’ve gone to the effort of making this incredibly silky chocolate mousse, I genuinely want to hear all about it! Did you serve it for a birthday, a Sunday dinner, or did you just succumb to a Tuesday night chocolate craving like I sometimes do? Please, please leave a comment below and tell me how it turned out for you. Did the mousse set perfectly? Are you now convinced that no-bake is the only way to go?
I absolutely love seeing your creations! If you share photos of your beautiful pie topped with that lovely whipped cream or perhaps garnished with fresh berries, please tag me on social media. Seeing your success inspires me every single day to keep testing and perfecting these classic, family-friendly recipes for you all. Your feedback helps build this community, and I read every single note! If you ever need to reach me directly for a question or just to say hello, you can always use my contact page.
From my hearth to yours, thank you for trusting me with your baking adventures. Happy slicing!
Warmly,
Sarah Miller, Founder of HearthBite
PrintEasy No-Bake Chocolate Mousse Pie with Oreo Crust

You can make this silky, decadent chocolate mousse pie without turning on your oven. It features a crunchy Oreo crust and a light, airy chocolate filling, perfect for a make-ahead dessert.
- Prep Time: 20 min
- Cook Time: 0 min
- Total Time: 4 hr 20 min
- Yield: 8 servings 1x
- Category: Dessert
- Method: No-Bake
- Cuisine: American
- Diet: Vegetarian
Ingredients
- 1 3/4 cups Oreo cookie crumbs (about 25 cookies)
- 6 tablespoons unsalted butter, melted
- 12 ounces semi-sweet chocolate chips
- 1 cup heavy cream, divided
- 1 teaspoon vanilla extract
- 1/4 cup granulated sugar
- 1/4 teaspoon salt
- 1 1/2 cups cold heavy cream, for whipping
- 1/4 cup powdered sugar, for topping
- Chocolate shavings, for garnish
Instructions
- Prepare the crust: Combine the Oreo crumbs and melted butter in a bowl. Press the mixture firmly into the bottom and up the sides of a 9-inch pie plate. Chill the crust in the freezer for 15 minutes while you prepare the filling.
- Melt the chocolate: Place the semi-sweet chocolate chips in a medium, heat-safe bowl. Heat 1/4 cup of the heavy cream in a small saucepan until it just begins to simmer. Pour the hot cream over the chocolate chips and let it sit for 5 minutes. Whisk until the chocolate is completely smooth. Set aside to cool slightly.
- Make the mousse base: In a separate bowl, beat the remaining 3/4 cup of heavy cream, granulated sugar, vanilla extract, and salt until soft peaks form.
- Fold the mixtures: Gently fold the slightly cooled melted chocolate mixture into the whipped cream until just combined and no streaks remain. Do not overmix; you want to keep the mixture light.
- Fill and chill: Pour the chocolate mousse filling into the chilled Oreo crust. Smooth the top with a spatula. Cover the pie loosely with plastic wrap and refrigerate for at least 4 hours, or until the mousse is firm.
- Prepare the topping: Before serving, whip the 1 1/2 cups of cold heavy cream with the powdered sugar until stiff peaks form.
- Serve: Spread or pipe the whipped cream topping over the chilled pie. Garnish with chocolate shavings. Slice and serve immediately.
Notes
- For the best texture, ensure the melted chocolate mixture is not hot when you fold it into the whipped cream.
- You can substitute graham cracker crumbs for the Oreo crumbs if you prefer a different crust flavor.
- This is an excellent make-ahead dessert; it holds well in the refrigerator for up to two days.
Nutrition
- Serving Size: 1 slice
- Calories: 450
- Sugar: 35g
- Sodium: 210mg
- Fat: 30g
- Saturated Fat: 18g
- Unsaturated Fat: 12g
- Trans Fat: 0.5g
- Carbohydrates: 40g
- Fiber: 3g
- Protein: 6g
- Cholesterol: 95mg