
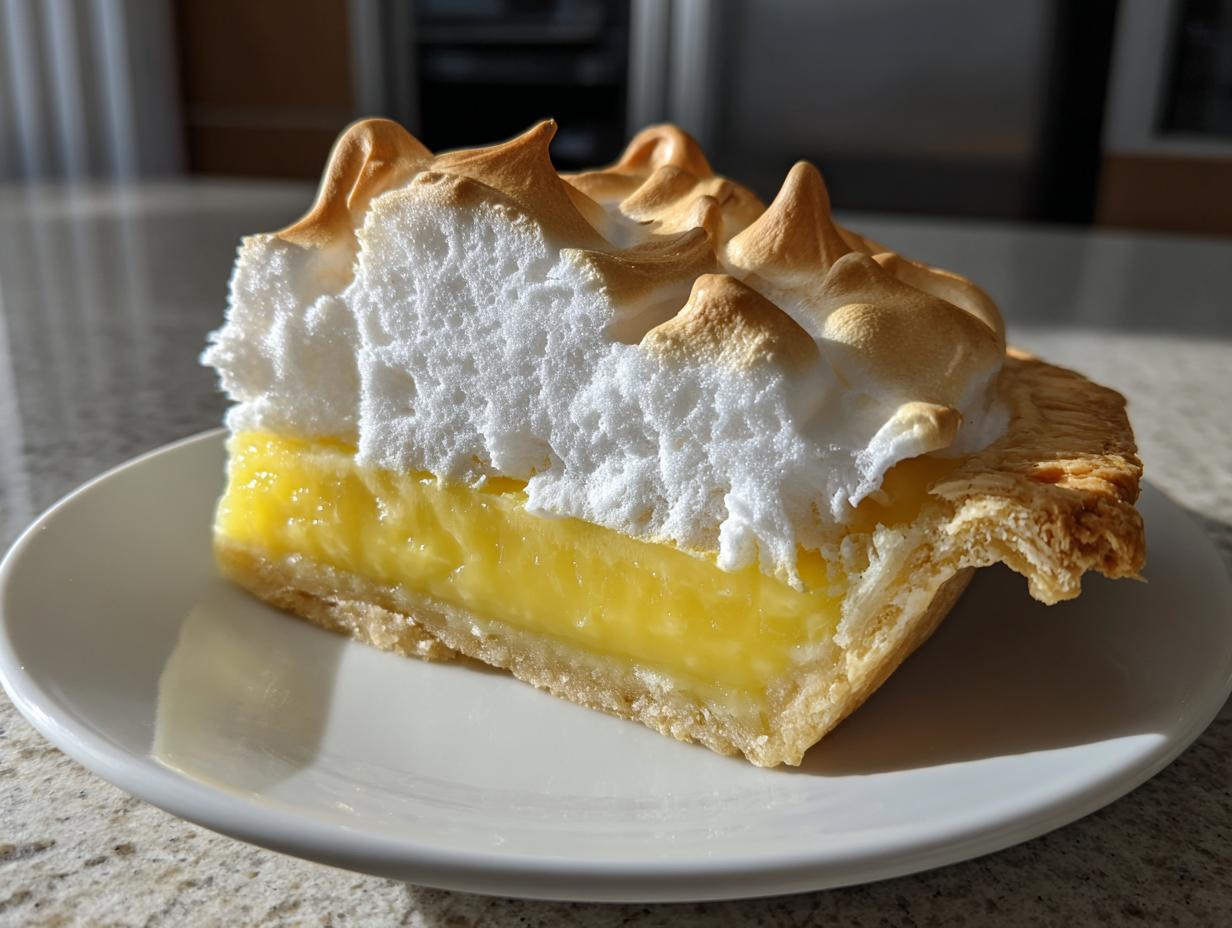
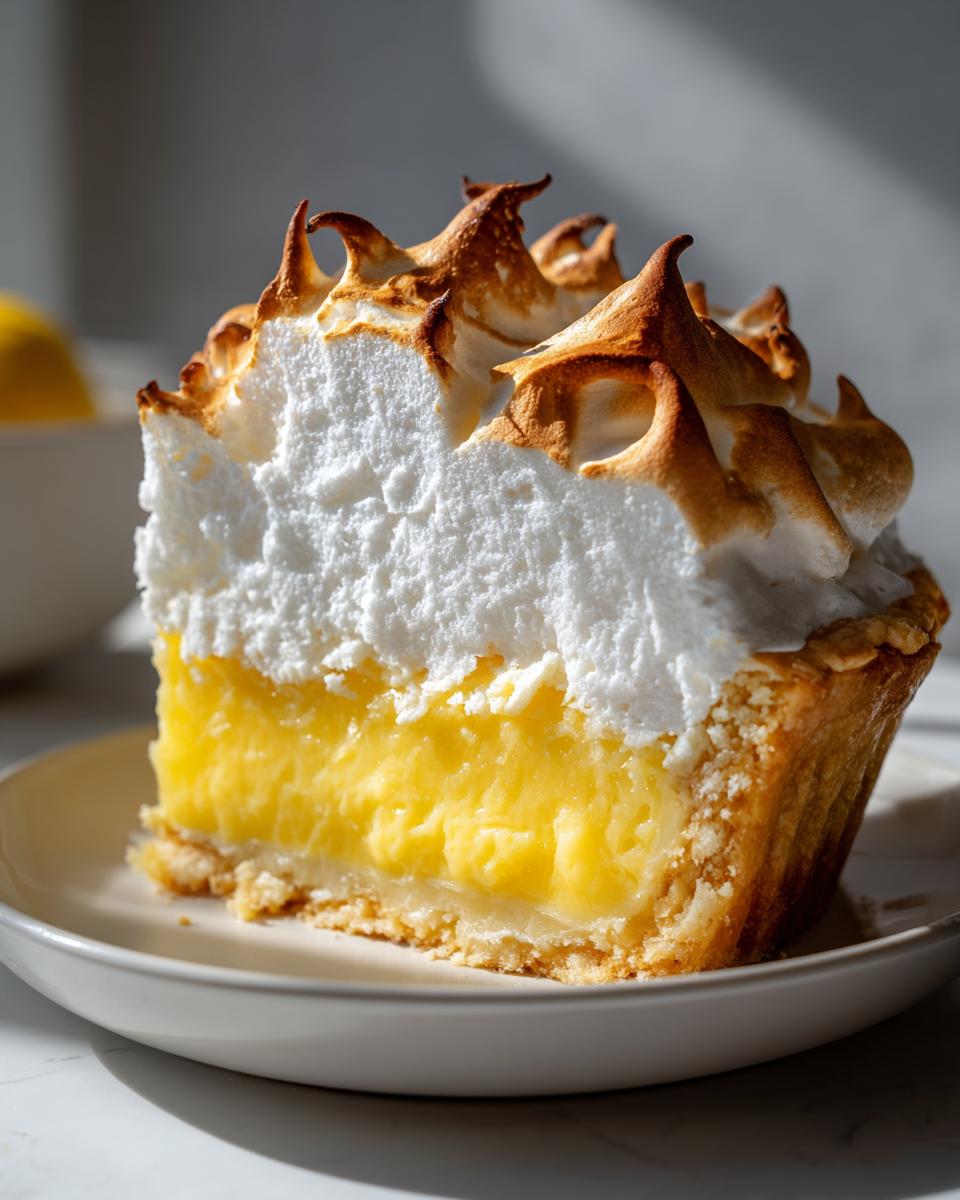
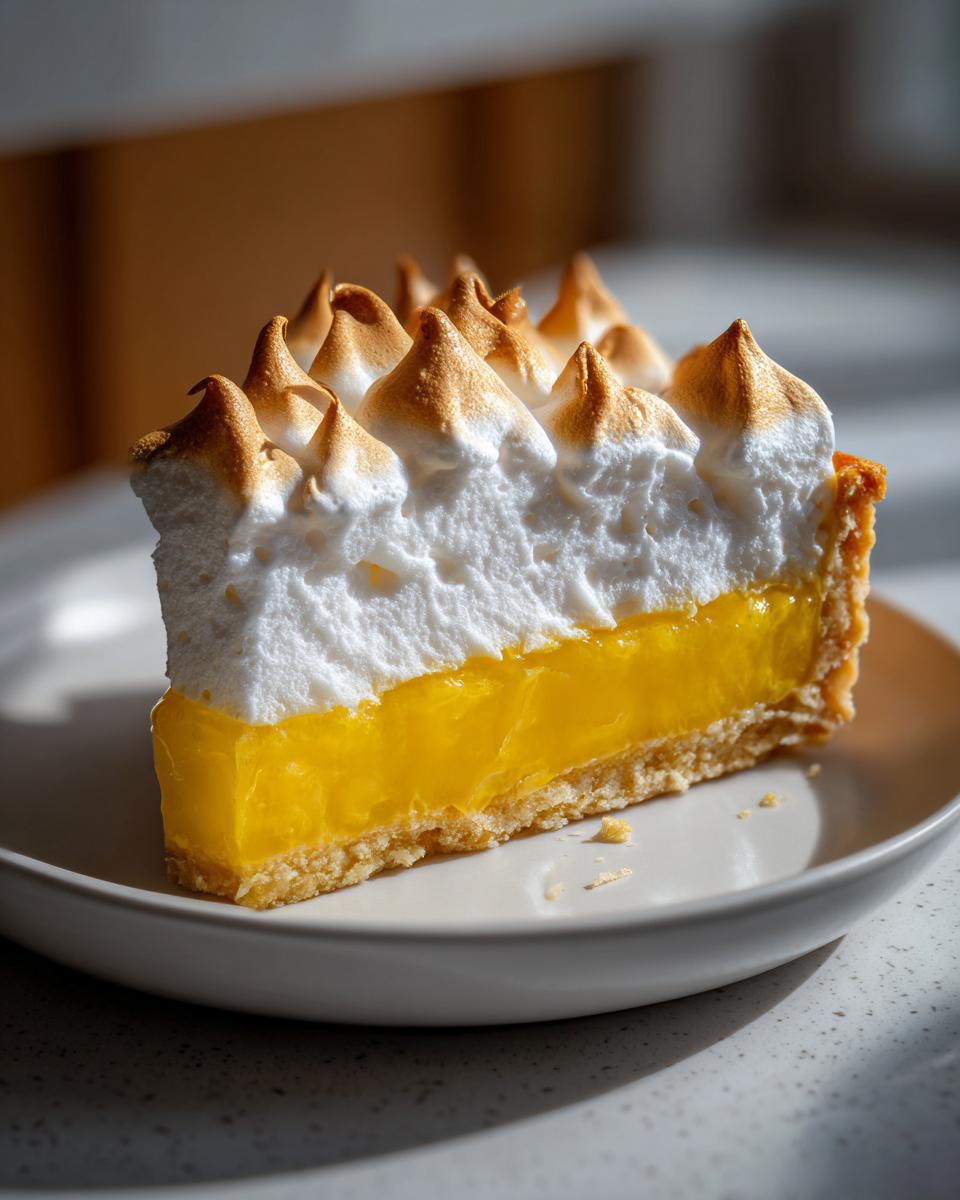
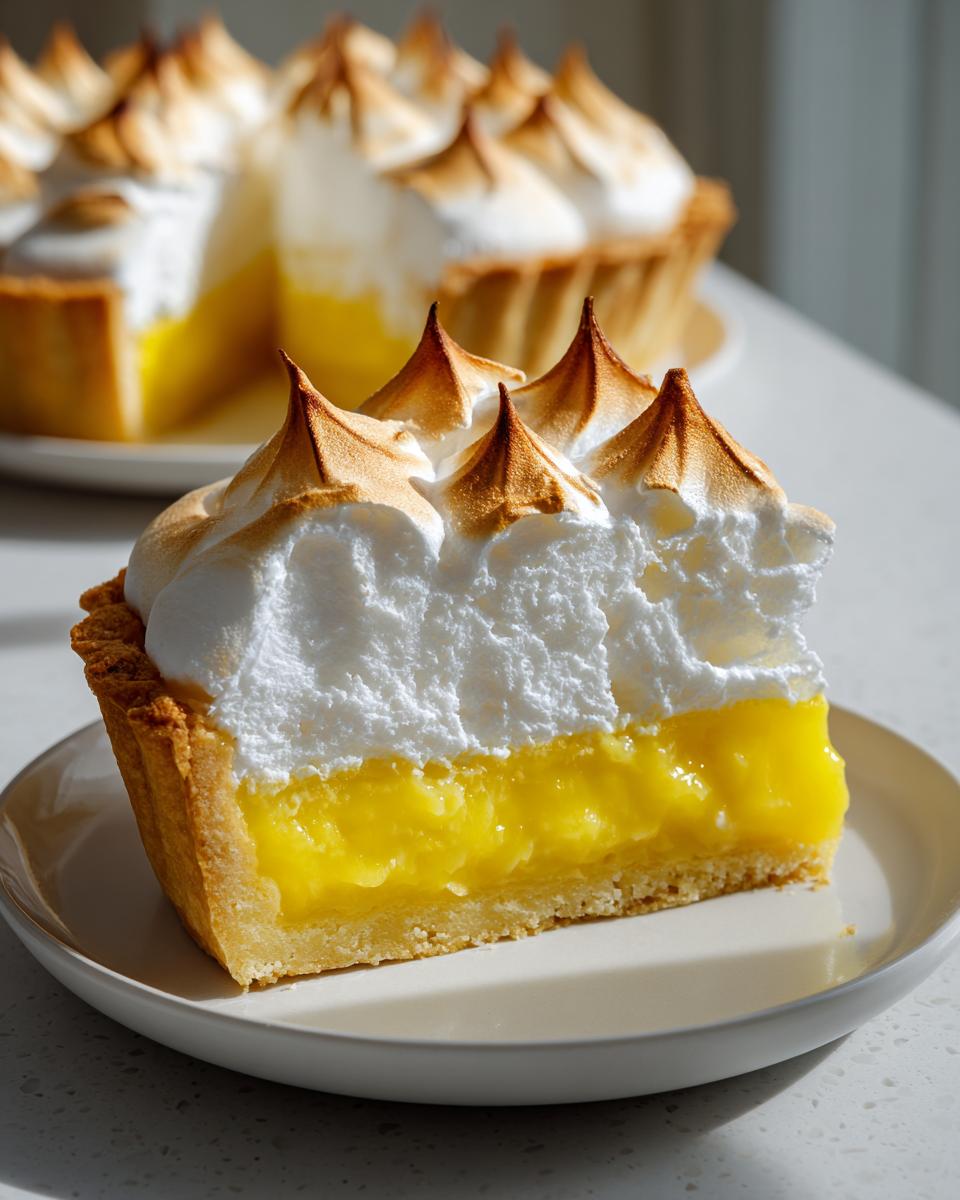
Just look at it! That towering, golden-brown cloud sitting atop a bright, sunshine-yellow filling—that’s what a real Lemon Meringue Pie looks like, right? Too many recipes end up weeping goo or sunken meringue, but I promise you, we’re fixing that today. This isn’t just any recipe; this is my ultimate, totally from scratch guide for the Classic Lemon Meringue Pie. I developed this for years until I got that perfect structure, just like my mom used to make. If you want a showstopper that actually stays together, you’re in the right place. You can read more about why we prioritize reliable, comforting recipes like this over on our About page. We nail that incredible balance between the super zesty lemon pie custard and that sweet, fluffy topping every single time.
- Why This Classic Lemon Meringue Pie Recipe Works (Family Favorite Pie)
- Gathering Ingredients for Your Homemade Lemon Meringue Pie
- Essential Equipment for a Showstopping Lemon Meringue Pie
- How to Prepare the Ultimate Lemon Meringue Pie Recipe
- Tips for Success with Your Lemon Meringue
- Serving Suggestions for Your Tangy Sweet Dessert
- Storage and Reheating Instructions for Lemon Meringue Pie
- Frequently Asked Questions About Lemon Meringue
- Estimated Nutritional Information for This Lemon Meringue
Why This Classic Lemon Meringue Pie Recipe Works (Family Favorite Pie)
I know you’ve probably tried a homemade Lemon Meringue Pie Recipe that ended up disappointing you. It’s frustrating when the filling gets runny or the meringue shrinks! Trust me, I’ve been there. This recipe is the Best Lemon Meringue Pie because it’s been tested so many times—it’s designed to be reliable, even if you’re making it for the first time.
- We use cornstarch as the primary thickener, which locks everything in place better than relying only on egg yolks.
- The filling is built on a foundation of a crisp, Buttery Pie Crust Recipe cooked completely first.
- And yes, we tackle the weeping monster head-on with specific No Weeping Meringue Tips later on.
This pie is honestly the only way to go for a truly Homemade Lemon Meringue Pie.
The Perfect Balance: Tangy Sweet Dessert
What I love most is how these layers talk to each other. You get that immediate, bright punch from the Zesty Lemon Pie filling—it’s truly tart! Then, that sweetness from the meringue just cushions the blow perfectly. When you slice into this, you know you’ve made a real Showstopping Dessert. It’s the ideal Tangy Sweet Dessert for any gathering, especially those big summer holidays.
Gathering Ingredients for Your Homemade Lemon Meringue Pie
Okay, let’s get everything lined up! Because this is a Classic Lemon Meringue Pie Recipe, we use real ingredients—no funny powder mixes here, please! Having these things ready means the whole process flows so much smoother, and we avoid any last-minute panic.
You’ll need things for three main sections: the pre-baked shell, the zesty filling, and that glorious meringue.
- For the crust, I’m assuming you have your favorite Buttery Pie Crust Recipe ready to go for one 9-inch shell. Just make sure it’s completely cooled before we do anything else!
- For the filling, grab 1 1/2 cups granulated sugar, 1/3 cup cornstarch, 1/4 teaspoon salt, 1 1/2 cups cold water, 4 large egg yolks (lightly beaten, save those whites!), 1/2 cup fresh lemon juice, 1 tablespoon of lemon zest, and 2 tablespoons of unsalted butter.
- And for the meringue topping, make sure you have 6 large egg whites that are at room temperature—this is super important! You’ll also need 1/2 teaspoon of cream of tartar and 1/2 cup of granulated sugar just for the meringue.
Ingredient Notes and Substitutions for Zesty Lemon Pie
Listen, the flavor here comes from the lemons, so don’t cheat yourself! You absolutely need 1/2 cup of fresh lemon juice. The bottled stuff just tastes flat and dull compared to the real, bright flavor you get from squeezing them yourself. Also, remember those 6 egg whites? They have to be at room temperature. Cold whites just don’t whip up into soft, voluminous peaks nearly as well, and we want height here!
The rest of the ingredients are pretty standard pantry stuff, but keeping them separate makes assembly a breeze. We aren’t touching those crust ingredients right now, since we need that shell cooled down first.
Essential Equipment for a Showstopping Lemon Meringue Pie
Before we even heat up the stove for that beautiful from scratch lemon custard, let’s talk tools! Since assembling this pie involves liquids, thickeners, and whipping air into egg whites, having the right gear makes you look like a pro and stops things from getting messy. This is an important step for making Homemade Lemon Meringue Pie that looks magazine-worthy.
You absolutely need a sturdy, 9-inch pie plate. Glass is usually my go-to because I can see the bottom crust heating up, but ceramic works fine too. Just make sure whatever you use is nice and deep, because we want a generous layer of filling and a towering meringue!
The biggest must-have, seriously, is a stand mixer. While yes, you *can* beat those egg whites by hand, you’ll be working out your arm for twenty minutes trying to get to stiff peaks. The stand mixer whisk attachment is your best friend for achieving that Fluffy Meringue Topping without all the sweat. If you don’t have one, a good electric hand mixer will work, but be prepared to scrape down the sides often.
Other little things that are life-savers:
- A medium saucepan for cooking the filling. Don’t use your smallest one; you need room to whisk without splashing everything everywhere!
- A rubber or silicone spatula to scrape every last bit of that thick, zesty lemon filling into your baked shell. Leave none behind!
- A fine-mesh sieve, just in case you had any little bits of cooked egg yolk sneak into the custard while tempering—we want that filling silky smooth.
Having these things ready means when your crust is baked and cooling, you can jump straight into making the filling without hunting down your good whisk!
How to Prepare the Ultimate Lemon Meringue Pie Recipe
Alright, it’s time for the main event! We’re taking this Classic Lemon Meringue Pie Recipe and turning it into perfection. Remember, step one is simple: your Buttery Pie Crust Recipe shell should be fully baked and totally cool. If it’s warm, the filling will seep and turn your beautiful crust soggy. I learned that the hard way when I was rushing for a church picnic years ago—never again!
We are cooking this filling over medium heat, and the key is constant stirring. You want this to thicken up nicely. Don’t just set it on the stove and walk away, or you risk scorching the bottom, which tastes bitter! Once it’s thick and just starting to bubble, we move into the most delicate part: tempering those egg yolks. This is where I used to panic! I remember my first attempt; I poured too fast and got these tiny yellow scrambled bits floating in my gorgeous lemon mixture. Whoops! Now, I whisk about a cup of that hot sugar liquid *slowly* into the yolks while whisking constantly. That brings them up to temperature gently so they incorporate beautifully instead of cooking instantly.
Creating the From Scratch Lemon Custard Filling
Once your yolks are tempered, pour them back into the saucepan with the rest of the hot sugar mix. Put it back on medium-low heat—and you have to keep stirring for about two minutes until it thickens up again. It needs to coat the back of a spoon nicely. Don’t let it boil aggressively; we just want it heated through and perfectly smooth. When it comes off the heat, stir in the lemon juice, the zest, and that final pat of butter until it melts. It smells so unbelievably bright! Pour that hot, From Scratch Lemon Custard right away into your cooled pie shell. Don’t delay!
Achieving the Fluffy Meringue Topping (No Weeping Meringue Tips)
Now for folks who battle with their meringue—pay close attention! Grab your totally clean, grease-free mixer bowl. Any tiny smear of fat, and those egg whites won’t stand up tall for you. Get your room-temperature egg whites going until they look foamy. Add the cream of tartar—this stuff is like insurance for your meringue structure. Once they hit soft peaks, slowly drizzle in that measured sugar, one tablespoon at a time. Don’t dump it! You want them stiff and glossy, like shiny clouds.
Here’s the big secret: when you spread this Fluffy Meringue Topping onto the hot lemon filling, make sure that meringue seals all the way to the edge of the crust. Truly press it against the fork tines marks on the crust rim. This seals the precious steam in, which is what causes shrinking and weeping later. Cover every speck of that yellow filling!
Baking and Cooling the Classic Lemon Meringue Pie
Time to brown those beautiful peaks! We’re popping this into a 350°F (175°C) oven. You only need about 12 to 15 minutes. You’re just looking for the peaks to turn a nice golden color. Seriously, watch it closely; it goes from golden to burnt quicker than you can blink! When it comes out, resist the urge to put it straight into the fridge. That rapid temperature drop is a meringue disaster waiting to happen. Instead, let it sit on a cooling rack at room temperature for at least four long hours. Call me at this number if you’re struggling, but patience is key for this stage!
Tips for Success with Your Lemon Meringue
Even though this is the Best Lemon Meringue Pie recipe, a few small points make all the difference between good and absolutely showstopping. Remember those little notes I put in the ingredient list? They aren’t just filler; they are life-savers!
First, let’s talk moisture control. If you want to avoid that dreaded weeping, ensure your mixing bowl for the egg whites is spotless—I mean sparkling! Any hint of grease or yolk, and you won’t get those stiff peaks. Also, please, please, please spread that meringue all the way to the edges of your baked crust. It needs to seal that hot filling in completely like a little protective blanket. If you seal it, steam can’t escape, and when steam escapes, you get water beads on top!
And finally, that cooling step is huge. Don’t rush it into the fridge immediately. You need to let it coo slowly at room temperature for at least four hours. If you shock it with cold, the filling contracts and pulls away from the meringue, causing shrinking. If you’re looking for inspiration on other delightful summer treats, you might want to check out this great summer recipe while your pie sets!
Serving Suggestions for Your Tangy Sweet Dessert
This amazing Lemon Meringue pie is rich, but because it’s so bright and citrusy, it pairs beautifully with lighter fare. Since this is one of my favorite additions to my rotation of Summer Dessert Recipes, I usually serve it after a barbecue or light spring dinner.
Don’t weigh it down! We don’t need heavy whipped cream or chocolate sauce here. A really simple glass of sparkling lemonade or maybe a light iced tea works wonders to cut through the richness. For Spring Baking Ideas, I sometimes grate a tiny bit of fresh orange zest right over the top just before serving. It adds a beautiful aroma and makes it look so intentional. Trust me, it’s gorgeous all by itself, though!
Storage and Reheating Instructions for Lemon Meringue Pie
Okay, this is the sad part of owning a gorgeous Lemon Meringue pie: storage is tricky because that fresh meringue hates sitting around! Honestly, this pie is best eaten the day you make it. If you have leftovers, you can store slices loosely covered in the refrigerator, but aim to eat it within 24 hours. As this is such a vibrant Tangy Sweet Dessert, we want it enjoyed at its peak!
And please, don’t even think about reheating this pie. Putting it back in the oven will just melt your hard work into a deflated, watery mess. If you need to save slices for later, just cover them lightly with plastic wrap—don’t press the wrap onto the meringue, or you’ll stick to it. For the best experience, check out how others serve up their great citrus treats over here, but know that leftover lemon meringue is a day-two treat at best!
Frequently Asked Questions About Lemon Meringue
I get so many questions when people try to conquer their first Homemade Lemon Meringue Pie, which is totally normal! It’s a classic for a reason, but it definitely has a few tricky spots. Here are the things folks ask me most often when they are making their own Lemon Meringue masterpiece.
Can I make this an Easy Lemon Meringue Pie by using a store-bought crust?
You certainly can if you’re in a pinch! That would make it an Easy Lemon Meringue Pie, for sure. But if you want the Best Lemon Meringue Pie experience, I really push for that homemade crust. A buttery, flaky homemade crust just tastes a million times better under that bright filling!
What is the secret to a tall, Fluffy Meringue Topping?
The secret is threefold: make sure your egg whites are perfectly room temperature, your whisk and bowl are totally grease-free—I mean sterile!—and add that sugar incredibly slowly once you see soft peaks. That slow addition builds strong structure so your topping stays tall and beautiful.
If you want to see how others tackle making their lemon desserts simpler, you can check out this great resource here. And please remember to review our privacy policy if you have any security questions!
Estimated Nutritional Information for This Lemon Meringue
Now, hey, I’m a baker, not a nutritionist, so take these numbers with a giant grain of salt! This information is just an estimate based on the ingredients we used here for our Classic Lemon Meringue Pie recipe, broken down into 8 servings. Because we are using real butter and a good amount of sugar to make that rich filling and beautiful topping, we know this isn’t an everyday snack!
But honestly, when you’ve made something this delicious and made completely from scratch, you usually aren’t counting calories anyway, right? This is truly a weekend treat or holiday centerpiece!
Here’s a rough breakdown:
- Serving Size: 1 slice
- Calories: 380
- Sugar: 45g
- Fat: 18g (That’s the butter talking!)
- Protein: 6g
- Carbohydrates: 52g
Remember, if you skipped the crust or used a lighter crust recipe, these numbers would shift! We are including the crust in this estimate because a Homemade Lemon Meringue Pie isn’t complete without it. If you have any questions about our site usage or want to check our Terms of Use, please take a peek!
PrintThe Ultimate Homemade Lemon Meringue Pie (From Scratch with Tall, Stable Meringue)

Make a classic, showstopping lemon meringue pie completely from scratch. This recipe balances a buttery crust, a zesty lemon custard filling, and a tall, fluffy, non-weeping meringue topping.
- Prep Time: 35 min
- Cook Time: 25 min
- Total Time: 60 min
- Yield: 8 servings 1x
- Category: Dessert
- Method: Baking
- Cuisine: American
- Diet: Vegetarian
Ingredients
- 1 recipe for Buttery Pie Crust (for one 9-inch pie shell)
- 1 1/2 cups granulated sugar
- 1/3 cup cornstarch
- 1/4 teaspoon salt
- 1 1/2 cups cold water
- 4 large egg yolks, lightly beaten
- 1/2 cup fresh lemon juice
- 1 tablespoon lemon zest
- 2 tablespoons unsalted butter
- 6 large egg whites, room temperature
- 1/2 teaspoon cream of tartar
- 1/2 cup granulated sugar (for meringue)
Instructions
- Prepare and fully bake the 9-inch pie crust according to your preferred recipe. Let the crust cool completely on a wire rack.
- For the Lemon Filling: In a medium saucepan, whisk together the 1 1/2 cups sugar, cornstarch, and salt. Gradually whisk in the cold water until smooth.
- Cook the mixture over medium heat, stirring constantly, until it thickens significantly and begins to bubble. Reduce heat to low and cook for 1 minute, still stirring.
- Remove the saucepan from the heat. In a separate small bowl, whisk the egg yolks lightly. Slowly pour about 1 cup of the hot sugar mixture into the yolks while whisking constantly to temper the eggs.
- Pour the tempered yolk mixture back into the saucepan with the remaining hot mixture. Return the pan to medium-low heat. Cook, stirring constantly, for 2 minutes until the filling thickens again. Do not boil.
- Remove from heat. Stir in the lemon juice, lemon zest, and butter until the butter melts completely.
- Pour the hot lemon filling immediately into the cooled, pre-baked pie crust.
- For the Meringue: In a clean, grease-free bowl of a stand mixer fitted with the whisk attachment, beat the room temperature egg whites on medium speed until foamy.
- Add the cream of tartar and continue beating until soft peaks form. Gradually add the 1/2 cup sugar, 1 tablespoon at a time, beating well after each addition.
- Increase the speed to high and beat until stiff, glossy peaks form. The meringue should hold its shape firmly.
- Spread the meringue over the hot lemon filling, making sure the meringue touches the edges of the crust all around to seal it and prevent shrinking. Create decorative swirls with the back of a spoon.
- Bake the pie in a preheated 350°F (175°C) oven for 12 to 15 minutes, or until the meringue peaks are golden brown.
- Cool the pie completely on a wire rack at room temperature for at least 4 hours before slicing. Avoid placing it in the refrigerator immediately to prevent weeping.
Notes
- To prevent the meringue from weeping (beading moisture), make sure your mixing bowl and whisk are completely free of any grease or egg yolk residue.
- Spread the meringue all the way to the edge of the crust to seal the filling. This stops steam from escaping and causing the meringue to shrink or weep.
- Cool the pie slowly at room temperature for several hours before chilling. Rapid temperature changes cause the filling to contract, pulling away from the meringue.
- Use fresh lemon juice for the best zesty flavor; bottled juice changes the taste profile.
Nutrition
- Serving Size: 1 slice
- Calories: 380
- Sugar: 45g
- Sodium: 180mg
- Fat: 18g
- Saturated Fat: 9g
- Unsaturated Fat: 9g
- Trans Fat: 0g
- Carbohydrates: 52g
- Fiber: 1g
- Protein: 6g
- Cholesterol: 110mg